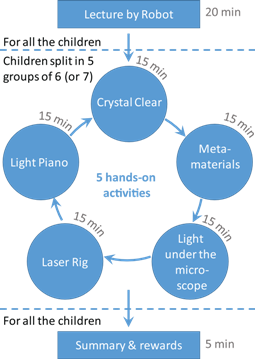
This is our flagship outreach activity. It
consists of a series of science workshops that we bring to primary
schools, targeting year 5 and year 6 children.
Description: The workshop begins
with a short lecture by Dr Valev and his robot assistant,
followed by five activities, aimed at multiple learning
styles. The activities are centred around explaining the
concepts of chirality, properties of light and metamaterials.
These activities are:
1. Laser Rig - The children get a
chance to safely guide a laser beam, using professional
grade components that they need to assemble and position
themselves.
2. Light Piano - Light is a wave, just like sound. By
attaching 7 coloured light bulbs to 4.5V batteries, the
children construct a piano and play popular tunes on it.
3. Crystal Clear - In our research, we use laser beams to
study metamaterials. These are artificial materials, with properties
that go beyond those available in Nature. Using a set of magnetic
rods and metal balls, the children get to build a large
structure that mimics an atomic crystal lattice and they
learn of the very limited number of crystal arrangements in
Nature.
4. Metamaterials - The children learn about
chirality by looking at chiral patterns and drawing their
image in a mirror. They can create new patterns too.
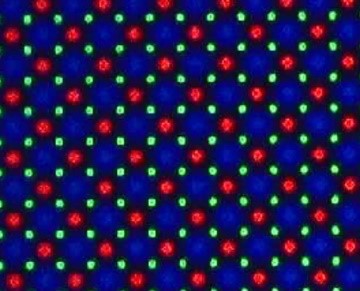
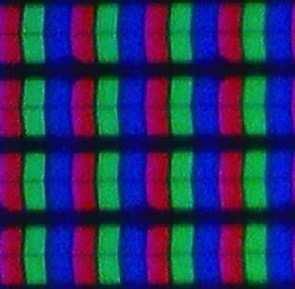
5. Light under the microscope - The children look at various objects with a microscope. In particular they examine the colours that make up pixels and can see for themselves how coulour mixing works.
A short description of the workshow activities is provided in this presentation: ScienceWorkshop.pdf (2.15 MB)
Before and after our visits, children fill in this questionnaire: Pre-Activity_Evaluation.pdf (131 KB). The results of the test allow us to evaluate the effectiveness of our workshops.
Place the phone under the microscope, ideally on full brightness, and tweak the focus/magnification until clear sub-pixels are seen through the eyepieces and camera.
Camera settings
By default, the camera uses auto exposure and white-balance. This often makes the colours appear wrong on the camera feed. For example, red appears pink. This undermines a lot of what is said during the activity.
To solve this:
Click the ‘Camera Settings’ icon
Switch to ‘Manual’ mode
Tweak the exposure to a clear, but not saturated, image is seen (usually ~50ms)
Tweak the white-balance such that red pixels appear red, not pink (usually ~170)
What you should see
Depending on the phone used, you’ll see different things, but the same principle applies
On a white screen, RGB subpixels should be clearly visible (see images below)
Older iPhones work well due to big, linearly arranged subpixels.
Newer iPhones and most Android devices use a different subpixel layout, and are often more dense (see images for comparison).
While this is fine, it’s sometimes easier to explain the idea of colour mixing to get an image when the pixels are big, and clearly distinguishable.