Activity 3 LCD Display
Objectives
The purpose of this activity is to introduce the LCD display module as an effective way of displaying information to the user. Some library code is provided to operate the underlying parallel data interface so that you can concentrate on building functionality. The objectives of this activity are:
-
Build a circuit using the LCD display module and any switches or resistors that you desire.
-
Import the library code for the LCD from Moodle and modify it as appropriate for your hardware.
-
Create a random number generator that could be used as a simple electronic die in a card game.
Hardware
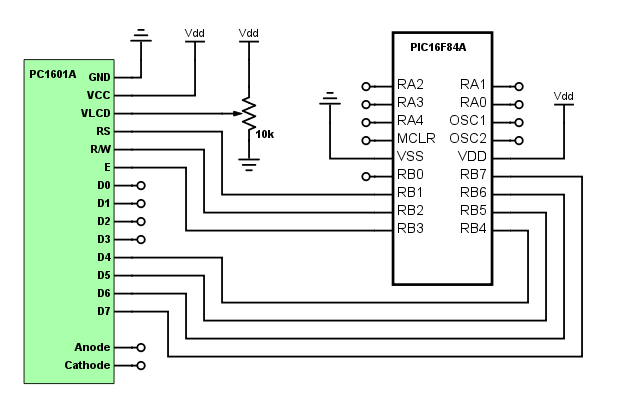
For this activity you will be using the LCD display module, it is a PC1601A module and the datasheet is available on Moodle. You are free to use any other components at your discretion. is a simplified representation of the LCD module and shows the basic pin connections to a PIC, the purpose of each pin is described in the device datasheet. The pins provide a parallel data interface to the PIC based on a four bit (one nibble) data interface, a backlight (note that some LCD modules may not have the backlight fitted), power supplies and a contrast adjustment pin.

Software
LCD Library
The software library for the LCD module is provided for you, and is in the form of two files: lcd.h is the header file that you need to include in your code, and lcd.c contains the actual functions.
Take some time to read through lcd.c and familiarise yourself with the basic functionality of the library, but do not rename or edit the .c files.
In order to add the library into your project you need to add lcd.h to the branch "Header Files" and lcd.c to the branch "Source Files", do this by right clicking on the respective branches and selecting "Add Existing Item..." then selecting the correct file, make sure to also select the "copy" option box, this will copy the required files into your project directory. Add the line #include "lcd.h" to the start of your main.c file in order to access the LCD library functions, a basic example of the library functions is shown in . You will need to modify lcd.h with the pins that you have connected your LCD to, as well as the clock frequency of your system.
Exercises
Exercise 1: Connect the LCD module to appropriate power supplies, and to the pins of your choice on the PIC. Use the datasheet that is available on Moodle for guidance.
Exercise 2: Make a new project and import the LCD library that has been provided for you. Find the pin assignments within the library .h files and change them to match your pin-out. Using the built in library functions, clear the LCD screen and display your name on the screen.
Exercise 3: Explore the functionality of the other library functions that are available to you. Create a program that emulates a die, i.e generates a random number between 1 and 6 when the user presses a button and displays this number on the LCD. The LCD should also display some information messages to the user when the program starts.
1
2
3
4
5
6
7
8
9
10
11
12
13
14
15
16
17
18
19
20
21
22
23
24
25
26
27
28
29
30
// CONFIG
#pragma config FOSC = XT
#pragma config WDTE = OFF
#pragma config PWRTE = ON
#pragma config CP = OFF

#include <xc.h>
// Include the LCD library
#include "lcd.h"

void main(void) {
    unsigned int counter = 0;
    TRISB = 0x00;
    // Set the R/W LCD pin to Write
    RW = 0;
    // Init the LCD
    Lcd_Init();

    while(1)
    {
        // Clear the LCD and set the cursor to the start
        Lcd_Clear();
        Lcd_Set_Cursor(1,1);
       // Display a single integer
        Lcd_Write_Int(counter);
        __delay_ms(1000);
        counter = counter + 1;
    }
    return;
}