Virtual Environments, Packages and Modules
Cleanly Utilising Others Code
Libraries and modules are the building blocks of Python programming, enabling you to reuse existing code and share your own. Python’s vast ecosystem of libraries simplifies complex tasks, from numerical computations and data visualization to controlling hardware and interfacing with real-world systems.
A key aspect of modern software development is managing the dependencies on these external libraries and modules. Without proper management, conflicting dependencies or incorrect configurations can lead to unpredictable behavior in your code. For example, consider an old project that relies on a specific version of Python’s Matplotlib plotting package. When starting a new project, you may wish to update this package, but doing so could potentially break the existing code in your older project. Ideally you would need a way to have specific libraries installed for specific projects.
Python’s virtual environments achieve this by providing an isolated workspace where specific versions of Python and its libraries can be installed and used. This ensures that projects remain self-contained, avoiding issues where changes in one project impact another.
In this lab, you will:
- Learn to create and manage Python virtual environments.
- Understand how to install and use external libraries effectively.
- Practice organizing code into reusable modules and importing them into your projects.
By the end of the session, you will have a solid foundation for managing Python environments and leveraging libraries and modules in your future engineering projects, ensuring your code is robust, scalable, and easy to maintain.
Virtual Environments
In Python development, virtual environments are a powerful tool for managing dependencies and isolating projects. They allow you to create a dedicated workspace for each project, ensuring that the libraries and Python versions you use won’t interfere with other projects on your system. This is particularly useful when working on multiple projects with different requirements or when collaborating with others.
In this section, you will learn how to set up and manage virtual environments, ensuring your projects are portable, consistent, and easy to maintain. This will be achieved in two ways:
- Using the Python Environment Manager extension in VSCode, providing an easy to use management window for all your virtual environments.
- Using the terminal and python commands, ensuring that you do not need VSCode to set up a project.
The Python Environment Manager
If you are not using VS Code then you will not be able to follow all parts of this lab - however it would be worth exploring if similar features are available for your own chosen IDE.
When it comes to managing different installations and libraries, VS Code has a helpful extension called the “Python Environment Manager”. This extension adds a tab to the left-hand side of the editor, shown below in as #1.
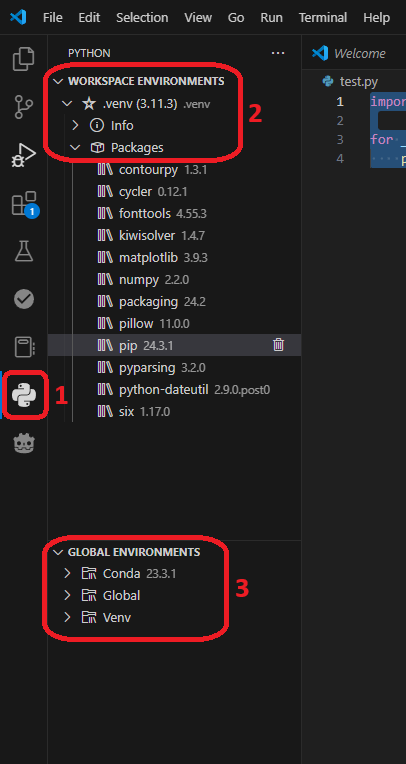
Opening this tab, you are presented with two windows:
- The Workspace Environments window (#2 in ), where Virtual Environments used by your current open project are shown.
- The Global Environments window (#3 in ), where all available environments and Python installs are listed.
Creating and Activating a New Virtual Environment in VS Code
Before we can start installing packages, we must first create a virtual environment for our project. You should ensure that you always do this whenever starting a new Python project.
Creating and Activating a New Virtual Environment in The Terminal
If you are not using VS Code, the same result can be achieved using the terminal instead. You will first need to install the VirtualEnv package using:
pip install virtualenvYou can then use this package to create a new virtual environment. First navigate to your project folder in the terminal, and then run:
python -m venv .venvThis command will create a new virtual environment in the current directory called ‘.venv’.
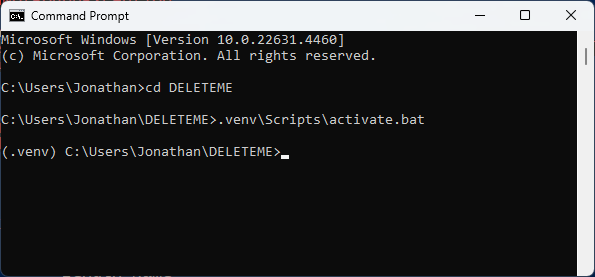
In order to use the virtual environment you will need to ensure that you start it whenever you open a new terminal. This can be achieved by calling:
source .venv/bin/activate  // On MAC or linux
.venv/Scripts/activate.bat // In CMD
.venv/Scripts/Activate.ps1 // In PowerShellIf successful, you should see the title of the virtual environment shown in brackets at the start of the terminal prompt.
Now any packages you install onto Python will instead be installed into the local virtual environment.
Installing Packages
Python comes with a number of key packages pre-installed. Anaconda further adds to this list, reducing the requirement to install any packages yourself. Despite this, it is not uncommon to require a package that is not included in the core installation. When this happens, it is up to the developer to select and install the correct package.
The easiest way to source packages is through Python Package Index, PyPI - however this is usually not done directly via the website. Instead, Python developers typically use a tool called PIP which handles finding and downloading packages and their dependencies from PyPI within your terminal.
Activate the Environment
Before we can use the terminal to install packages we must first activate the virtual environment. You can do this in the environment manager tab by clicking the ‘Open in Terminal’ button next to your newly created virtual environment (note, this will fail if you have not created a virtual environment for the project you have open yet). The terminal window will open, and if successful, should show your virtual environment name in the prompt line.
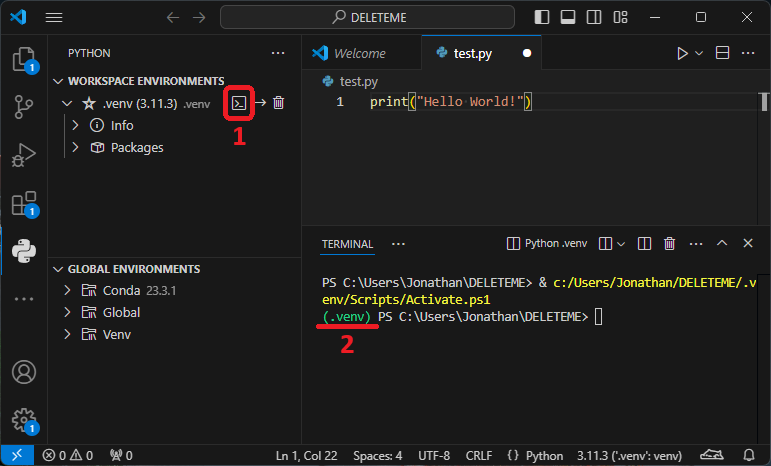
Always verify the virtual environment name in the terminal prompt before executing any commands or code. Be aware that using the “Run” button in VS Code will bypass the activated environment, linking directly to the Python version in that environment. As a result, you may need to close the automatically created terminal before entering further commands, as it won’t be using your activated virtual environment.
If you are using a different editor you may need to start the virtual environment manually, as outlined in .
Finding and Installing Packages
There are a huge range of Python packages available, and this means that keeping track of every possible package and it’s features is infeasible. As you use Python more frequently, you will likely develop a mental list of commonly useful packages, however the ability to find new and specific packages is still key. This process usually involves Google or, these days, ChatGPT.
Random Name Generator
Assume that you need to write some code to generate 5 random names in python.
Using either Google or ChatGPT, find out if there are any packages that could be used for this purpose - do not worry about installing or using them yet.
You may need to check the result in PyPI to ensure that the package is fully documented and actually does what the title suggests.
If you used ChatGPT for the last exercise, you might have found that it suggested several packages, complete with example code for each. While this can be very helpful, you may have also noticed the suggestion of a package called random-names-generator. However, upon examining the PyPI entry for this package, you will find that it lacks documentation, making it unsuitable for use. Additionally, in my case, ChatGPT’s example code for this package attempted to use a different package called rng, which also did not work.
This highlights the importance of verifying the suitability and functionality of AI suggested packages and code before incorporating them into your projects. While ChatGPT is very useful to the modern developer, it will often lie and hallucinate incorrect code or packages, and therefore a developers own understand of any language and ability to verify information is still critical in software development.
Installing the Name Generator
Following the previous exercise, we will use the names package, as it is smaller and serves our purposes nicely.
Install the names package into your virtual environment (check you are using the correct terminal) with the following line:
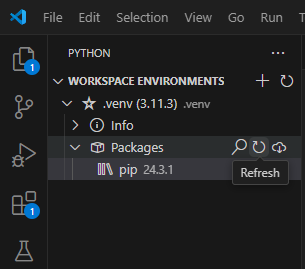
pip install namesOnce done, you can check the listed packages in your local environment window by refreshing the list using the refresh button.
Importing Packages
The import command in Python is used to bring external packages or modules into your script, allowing you to use their functionality in your code.
When you import a module, you gain access to its functions, classes, and variables, which can then be utilized to perform various tasks.
For example, using import names allows you to generate random names with the functions provided by the names package that we just installed.
Import commands should always be placed at the top of the file, to ensure that all necessary modules and packages are available before the code execution begins. This helps avoid any potential errors due to missing dependencies and promotes cleaner, more maintainable code.
Using the Names Package
Now that we have installed the names package, we must tell our code to use it.
Open a new python file in your workspace and add the following code:
1
2
3
4
import names

for _ in range(5):
    print(f"Name: {names.get_full_name()}")
Try running the code and check that it generates and prints 5 random names as expected.
You may notice that the for loop is using _ for it’s loop variable.
This basically tells python that we do not actually need the value that the loop is iterating over - in this case, a list from 0 to 4, using the range function.
We have seen the basic syntax for importing libraries is import <package name>. For example, importing the names package above used import names.
When using functions from the imported package, we had to prepend any desired function calls with the name of the package followed by a . character.
This is important in ensuring that two different packages do not override one another by both defining a function of the same name.
Importing Specific Functions or Classes
In some cases, however, you may wish to only import a specific sub-part of a larger package, such as one function, to reduce memory usage and increase speed.
In this case you can use the from syntax, which takes the form from <package name> import <function name>.
This will result in the function being imported directly into your script without requiring prepending of the package name when calling the function.
This should be done with caution to ensure that you do not accidentally overwrite an existing function in your own scripts namespace.
Importing Aliases
Some packages may have long names, resulting in undesirable command length when calling the the packages functions.
In such cases you can use an alias to change the namespace of the package. This uses the as syntax, such as import <package name> as <alias>.
For example, it is not uncommon to shorten the frequently used numpy package to np using:
import numpy as npThis means that calling functions, such as round() from the numpy package can be done using np.round(...) instead of numpy.round(...).
Importing Wildcards
Wildcards exist for those rare cases where you wish to import all functions and classes from a package directly into your script. This eliminates the need for specifying the package name when calling functions, but it bypasses the namespace protections previously mentioned.
Wildcard importing is achieved using the * symbol, as follows:
from numpy import *In addition to the risk of function name clashes, this results in every function being imported directly into your code. Unless you are very familiar with the package internals, it is likely that many functions will go unnoticed which could add bugs or vulnerabilities. For these reasons, it is strongly advised against using wildcards.
Exercise
Install the matplotlib package into your local environment. This package provides many useful plotting tools for visualizing data.
Test the package using the following code:
1
2
3
4
5
6
7
8
9
10
11
12
13
14
15
16
17
18
19
20
21
22
23
24
import matplotlib.pyplot as plt # Imports a smaller part (only pyplot) of the matplotlib library
from random import sample

# Data
categories = ['Python', 'JavaScript', 'C++', 'Java', 'Ruby']
values = sample(range(0, 100), 5)

# Custom style
plt.style.use('ggplot')

# Creating the bar chart
plt.bar(
   categories,
   values,
   color=['#1f77b4', '#ff7f0e', '#2ca02c', '#d62728', '#9467bd'],
   alpha=0.8
   )
plt.title('Programming Languages Popularity Score')
plt.xlabel('Programming Languages')
plt.ylabel('Popularity (%)')
plt.grid(axis='y', linestyle='--', alpha=0.6)

# Display the plot
plt.show()
Modules
Like packages, modules are reusable pieces of code that encapsulate related functionality. They help organize code into smaller, more manageable parts, making it easier to maintain and navigate. A module can contain functions, classes, variables, and other definitions, which can be imported and used just like packages. This promotes code modularity, enhances readability, and simplifies the management of complex projects by separating concerns and fostering a structured development approach.
Each module is typically a file with a .py extension that contains Python code, such as function and class definitions.
These files are then imported into code using import.
The exact nature and outcome of this import command will depend of the project file structure and configuration.
Importing Modules Directly
If a file is located in the same directory as your script, then you can import code from the file using the import <filename> syntax.
As with packages, the as and from syntax may be used - meaning you can selectively import functions or classes and change the namespace of the import.
- Create a file called
hello.pythat defines a functionsayHi()which simply prints the message ‘Hello world’ to the terminal when called. - Now create a new file in the same directory called
importTest.pyand import thesayHi()function into it using theimportcommand. - Call the
sayHi()function in yourimportTest.pyfile. - Run the
importTest.pyfile and check that it works as expected.
Creating Local Packages
You can combine related Python modules into a local package by organizing them within a sub-directory or folder. This allows you to group modules and structure your projects in an ordered manner.
In order for python to recognize a sub-directory as a package, you must add a file named __init__.py. At this stage we can simply leave the init file empty.
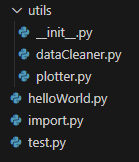
In order to import code from the local package, we must name both the package and containing file. For example, lets assume that we have a function called plotBarChart() in our utils package shown above in . Assume that this function is found in the plotter.py file.
This function could therefore be imported into the base test.py file using the following line:
from utils.plotter import plotBarChartYou will notice that we had to use a new syntax <package name>.<file name> to refer to the specific file we wanted.
- Create a new folder in your project called
demoPackage. - Add an empty file to this new folder called
__init__.py. - Add a second file to this folder called
plots.pyand copy the following code into it. Read through the code to make sure you are familiar with what it is doing.
import matplotlib.pyplot as plt

def plotBarChart(labels, data, title):
    # Custom style
    plt.style.use('ggplot')

    # Creating the bar chart
    plt.bar(
        labels,
        data,
        alpha=0.8
    )
    plt.title(title)
    plt.grid(axis='y', linestyle='--', alpha=0.6)

    # Display the plot
    plt.show()

def plotStem(labels, data, title):
    # Custom style
    plt.style.use('ggplot')

    # Creating the stem plot
    plt.stem(
        labels,
        data,
        basefmt=' ',
        linefmt='-b',
        markerfmt='or'
    )
    plt.title(title)
    plt.grid(True, linestyle='--', alpha=0.6)

    # Display the plot
plt.show()With the package created, create a new python file in the root directory of your project and import one of the plotting functions, using it to plot the following data:
1
2
3
labels = ['Apples', 'Bananas', 'Cherries', 'Dates', 'Elderberries']
data = [30, 45, 25, 15, 50]
title = 'Fruit Sales in Q1'
The __init__.py file
If you attempted to import your package directly using import demoPackage instead of import demoPackage.plots, you would notice that it does not work as expected. This is because Python does not automatically know which submodules or contents should be included when importing the entire package.
This is where the init.py file comes into play. By defining imports in init.py, you can specify which modules or functions should be available when the package is imported. For example:
# demoPackage/__init__.py
from .plots import plotBarChart  # Import a specific function (plotBarChart in this case)
from .data import plotStemNow using import demoPackage will allow you to call demoPackage.plotBarChart(...) in your code just like when using packages installed with pip.
This allows developers to decide which functions are exposed to the user when they import a package in it’s default state.
Defining Package Imports Challenge
- Try modifying your init file to allow direct importing and calling of your
demoPackagefunctions. - Try to create a new function
plotLineChart(labels, data, title)to yourdemoPackage, testing it in your main script. You may need to use google/ChatGPT to work out how to use matplotlib to create line plots. There are many example plots and code provided in the official matplotlib documentation.
The init file also support a number of other features, such as the __all__ list, which takes a list of all sub-files that should be imported.
This will ensure that the full contents of a file is imported if the user uses either import <package name> or from <package name> import *.
A more detail tutorial on creating modules may be found in the Official python documentation.
Conclusion
By completing this lab, you have gained valuable experience in managing Python virtual environments, working with packages, and creating reusable modules. These skills are essential for maintaining clean, organized, and scalable projects in engineering and software development.
You started by understanding the importance of virtual environments and learned how to create and activate them using both VS Code and the terminal. This knowledge ensures that you can isolate project dependencies and avoid conflicts between different projects.
Next, you explored installing and using packages, including best practices for importing specific functions, classes, aliases, or using wildcards. These techniques are crucial for leveraging Python’s vast ecosystem of libraries efficiently.
Finally, you worked with modules by learning how to import them directly and create local packages. Understanding the role of the __init__.py file has prepared you to structure and organize your projects professionally.
With these skills, you are now equipped to develop Python projects with better control over dependencies, reusable code, and a structured approach to organizing your work. These practices will enhance your efficiency and effectiveness as you tackle increasingly complex engineering tasks.