Getting Started with Python and VS Code
IDEs, Debugging, and Recursive Functions
By the end of this PC laboratory, you should be familiar with the Python terminal, the Integrated Development Environment (IDE) known as VS Code, configuring environments, and writing and debugging simple Python functions.
Before you can write any programs in Python, it is critical to ensure that you have set up your development environment. This includes:
- Installing an IDE: An IDE provides the editor, tools, and shortcuts to aid in software development.
- Installing the Python Interpreter: The interpreter allows you to run Python code on your computer.
- Installing IDE Add-ons: Most IDEs have add-ons or extensions that can improve your coding experience.
The EE Lab PCs are already configured with an IDE and Python interpreter. However, you may wish to install and use everything on your own machine. Optional guidance for this is provided in expandable sections wherever applicable. It should be noted that, while you can ask, lab demonstrators may not be able to assist with Python issues caused by using your own PC.
Running Python
The Python installer is available for download from the official Python website. Navigating to the downloads page (see 1 in ), you will be presented with many different versions of Python to install. Typically, it is best to install the latest release version as this will have the longest support and latest features. It is advised that you avoid any pre-release versions, as they are untested and prone to changes.
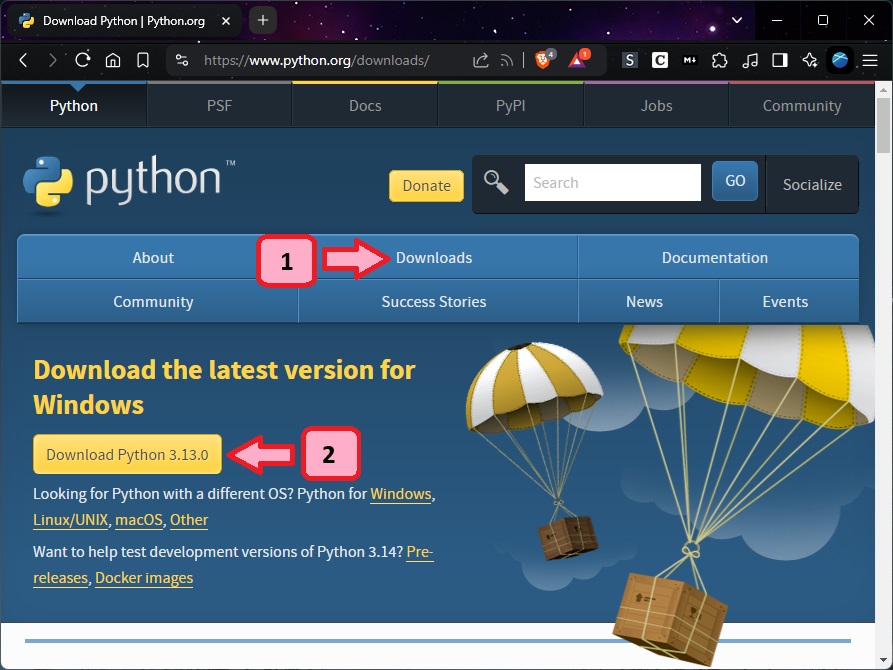
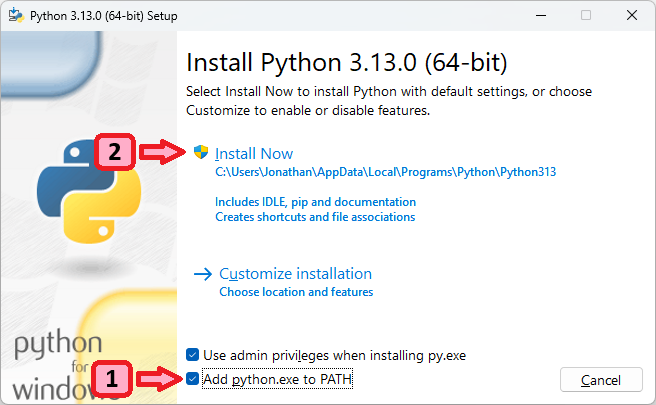
Once downloaded, run the installer and make sure to select the ‘Add to PATH’ option. This option will ensure that other programs on your machine know where Python is installed. If you forget to check this box, you can always run the installer again.
The simplest way to check that Python is installed on the machine you are using (and indeed which version is installed) is by starting a Python shell. Python shells are interactive environments where you can directly type and execute Python code line by line. They are a great tool for quickly testing code, experimenting with ideas, or debugging small snippets.
Launching the Python Shell
If you are using your own machine then searching ‘Python’ in the start menu will result in several options that are now available. At this stage run the simple Python shell and not IDLE.
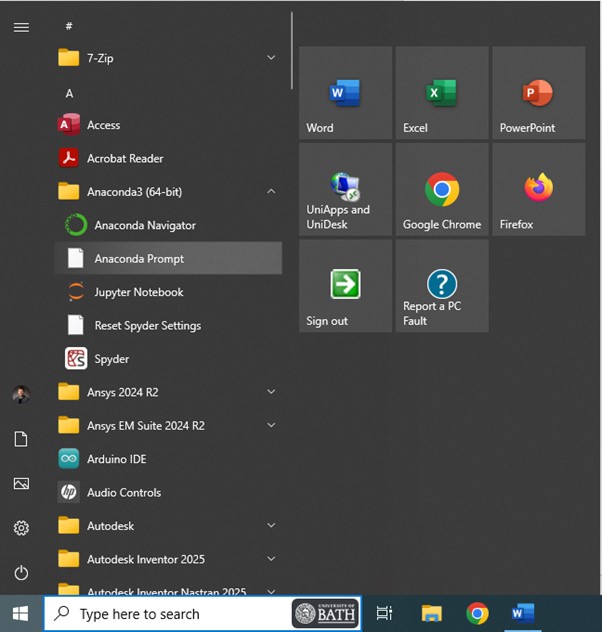
This is done a little differently on the lab PCs, as they actually have Anaconda instead of Python installed. Anaconda is a distribution of Python that comes pre-packaged with the most commonly used libraries. This makes the initial install larger, but means that people can use the most common libraries without needing to download and install them.
In this case, you will need to instead search for Anaconda, and select Anaconda Prompt (as shown in ). This opens a terminal that is preconfigured with a link to the Anaconda based Python install.
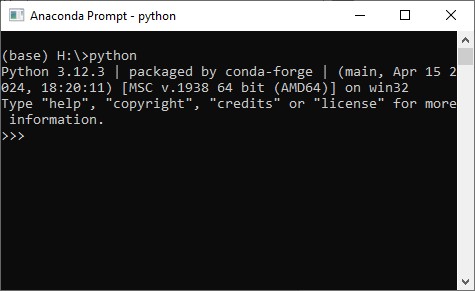
Once launched, you will be presented with a terminal that looks similar to the one in .
To start python within this terminal simply type python and hit enter.
This should then change the prompt, showing >>> to signify that you are now in a python terminal.
Running Code
With the shell open, you can now try running a simple python command to see if it works. Using the code example below, try to make python print a personalised hello message that uses your own name.
>>> print('Hello Jonathan!')The shell can also be used to run multiple lines of code, one after the other. For example, we could create a variable and then use that variable in later code:
>>> name = "Everyone"
>>> print('Hello', name)
Hello EveryoneEditing and running code in this way is not easy, however, because each line must be entered one at a time and is run instantly. This means that small changes in long blocks of code would require that the code be re-entered into the terminal one line at a time. For this reason, the Python shell is usually best when testing simple commands, structures, or syntax, where only a few lines are needed.
Using an IDE
In order to address the limitations presented by the Python shell, developers typically use an IDE or editor to create a Python script. This script is typically saved as a ‘*.py’ file. Python can then be used to run all code within the script file.
Selecting an IDE is entirely personal preference, however we recommend VS Code, which is a very widely used, highly flexible, and light-weight IDE. This will provide you with tools to write, run, and debug python scripts; as well as manage environments, and utilize version control tools.
VS Code can be installed on your own machine by first visiting the official Visual Studio Code website and downloading the appropriate installer. Running this installer with default settings should suffice.
If you install VS Code yourself then you can launch it by searching VS Code in the start menu - you can ignore the Anaconda Launcher stuff below.
Since the lab PCs are using Anaconda, it is critical that you always launch VS Code using the Anaconda Launcher available in the Anaconda folder in the start menu. This will ensure that VS Code is configured correctly for the Anaconda Python installation. Failure to do this will result in issues when important third-party libraries later on the course.
VS Code Familiarisation
VS Code is effectively a text editor for programming, with support for extensions that let your run and debug projects in many different languages or settings.
Folder Based Projects
Projects in VSCode are simply folders. Anything inside the folder is considered part of the project. As such, we must first create a new folder to store all of our code inside. These folders may also contain sub-folders if you so desire - however this must be accounted for when referencing one file from another (don’t worry about that for now).
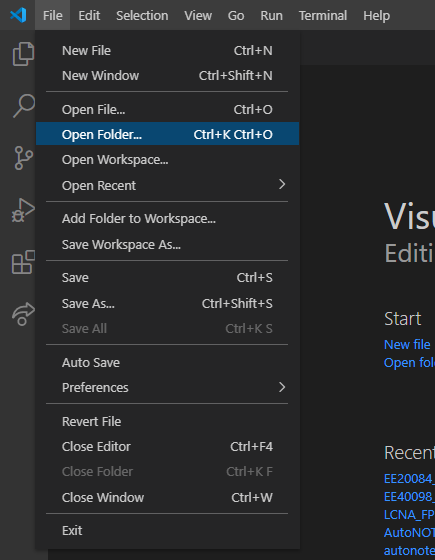
Select File -> Open Folder and browse to the location where you would like your project folder to be on your computer.
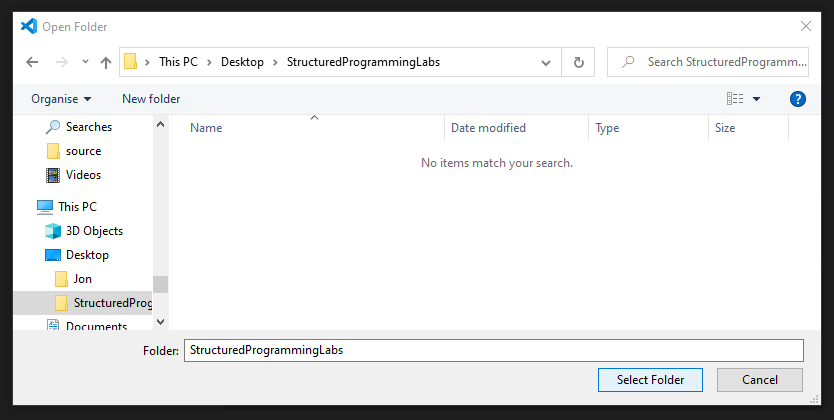
If you do not yet have an active project, use the file browser to create a new folder in this location and then select that folder with the browsers select folder button.
This will open the project in the editor, which may result in your being asked if you trust the authors - if so, say yes to ensure that all features are enabled.
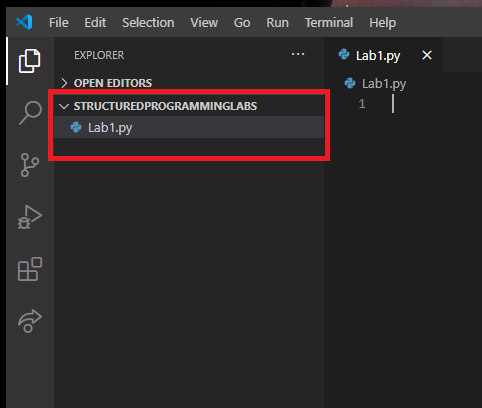
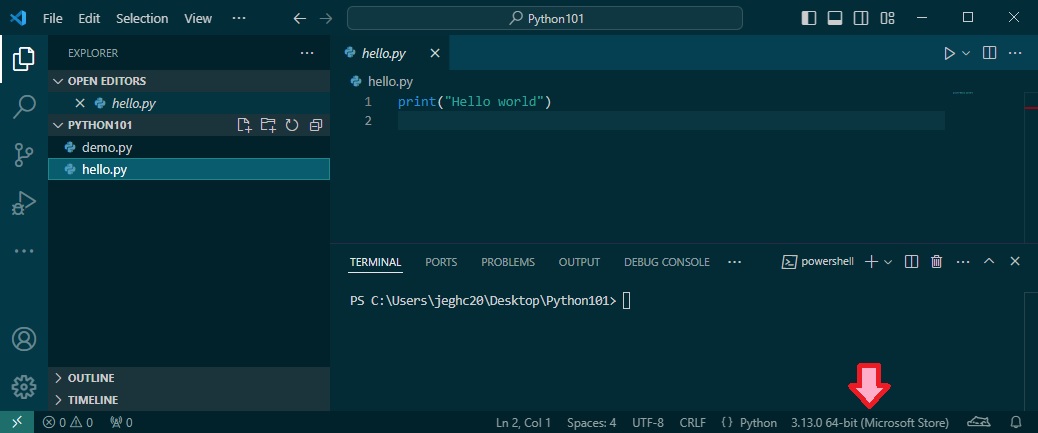
You will need to now add the first file into your project. Simply select File -> New File and then save this file in your project folder with the extension *.py to tell the computer that it is a python file (for example, ‘Lab1.py’). This file should then appear in the explorer window on the left-hand side, as shown in .
IDE Layout
It is important to get familiar with whatever IDE you have chosen, as this will ensure that you know how to use it’s features when developing more complex software. Below is a brief video to introduce VS Code.
Installing Add-Ons
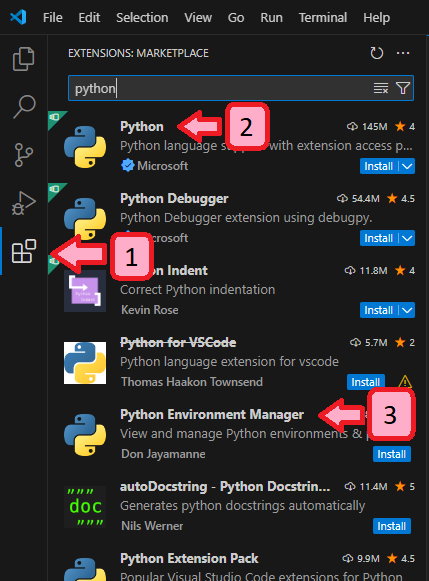
As shown in the video, there are two key extensions that you should add to your VS Code instance. If working on a Lab PC, you may need to do this every time you log into a new machine. The extensions I recommend are:
- Python, by Microsoft
- Python Environment Manager, by Don Jayamanne
You can add these by switching to the extensions tab and then searching for “Python” in the extensions browser.
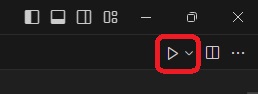
You can tell if the python extensions are working by looking for the little play symbol in the top right of the editor whenever you have a python script open.
Selecting an Interpreter
As shown in the video, it is necessary to tell VS Code which Python interpreter it should be using when running your code. This can be selected by opening a python script in the editor and then selecting the desired interpreter in the bottom right of the lower bar.
Congratulations, you are now ready to create and run python projects!
Writing and Running Code
In this section, you will practice writing Python, and learn how to use the IDE for debugging and running of code. As dictated by convention, we will start our programming adventures by saying “Hello World” to anyone who might be listening. Create a new file called HelloWorld.py in your project folder and enter the following code into the editor:
1
2
3
4
5
6
7
8
###################################################################################################
#   Filename:       HelloWorld.py
#   Description:    A simple hello world example. Just to show the process for python development.
#   Date:           21/11/2024
#   Author:         Jonathan G-H-Cater
###################################################################################################

print('Hello World!')
While the first 6 lines of this code are not necessary to make the program function, it is helpful to get into the habit of providing clear comments for readers in all of your code. In this case, we have added additional comments to the file in the form of a header. This header provides readers with general information about the contents and purpose of the file or program. There is nothing ‘magic’ about this header, it is just a set of comments with some formatting to make it stand out from the body of the code itself.
Running Code
Make sure to save the file, and then use the little ‘play’ symbol located at the top right of the editor. This button will run whatever python file you have open in the editor.
If successful, you should see the message appear in a terminal below the editor window as follows:
Hello World!You have now seen how to write and run python scripts using VS Code.
The print(...) command is used to output information to the user, but at the moment there is no way to get input from the user.
Normally, information is passed to a program when it is first called (which we will cover later in the course).
Sometimes, however, it can be helpful to ask a user to enter some information while the program is running.
This can be achieved with the input(...) command.
This commands takes one argument, and that is a prompt that is displayed to the user when you wish for them to enter information.
The command will then return whatever value the user has input into the terminal.
It should be noted that this will cause the code to hang until user input is provided.
A simple calculator
- Start by creating a new python file in your project folder (filename must end with ‘.py’).
- Using the
input()function, write a line of code to ask the user to enter a number, storing it in a variable.WARNING: Theinput(...)function returns a string - so you may need to cast this value into an integer usingint(...). - Add a second line of code to ask the user to enter a second number, storing it in another variable.
- Finally, write code to achieve the following output using the numbers that the user has entered (for this example, assume the user has entered 5 and 7):
Please enter a number: 5
Please enter a second number: 7

5 + 7 = 12
5 - 7 = -2
5 / 7 = 0.7143
5 * 7 = 35
5 % 7 = 5You may need to use f’strings to achieve this output.
Debugging Code
While writing and running code are useful features of IDEs, their ability to debug code is where they really shine. Debuggers let programmers pause programs while running and view the internal values of each variable and system. They typically provide tools such as stack tracers, watch lists and breakpoints - each of which we will explore today.
- Start by creating a new file called recursive.py and copy the following code into it.
1
2
3
4
5
6
7
8
9
10
11
12
13
14
15
16
17
18
19
20
21
22
23
24
25
###################################################################################################
#   Filename:       Recursive.py
#   Description:    A simple example, using recursion to calculate the factorial of a number.
#   Date:           21/11/2024
#   Author:         Jonathan G-H-Cater
###################################################################################################

def factorial(x: int) -> int:
    """Calculates the factorial of the input number using recursion.

    Args:
        x (int): The input integer that the factorial is calculated for.

    Returns:
        int: The factorial value of the input integer.
    """

    if x == 1:
        return 1
    else:
        return (x * factorial(x-1))

# Ask the user for a number and then calculate it's factorial
num: int = int(input("Please enter a number: "))
print(f"The factorial of {num} is {factorial(num)}.")
- Read through the code and try to work out how this code works by identifying what each line is doing.
It is worth noting that this code uses typing to enforce the types of all variables.
This is why there are lines that include
: intafter variable names. Equally, the arrow symbol after the function definition tells Python that the function returns and integer value. - Run the code as before, checking that it works correctly.
Now that we have code to debug, lets configure our debugger. First navigate to the Run and Debug tab on the left side bar of VS Code. This should result in a new pannel opening, as shown in .
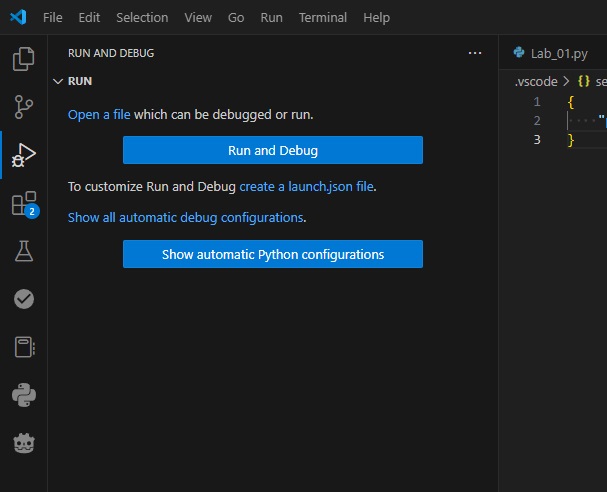
From here, simply select Run and Debug, this will open the command pallet at the top of the editor. Select Python Debugger -> Python File to configure the debugger to simply debug whichever python file you currently have open.
This will cause the program to run in the terminal, changing the debug window to add multiple sub-panels, shown in
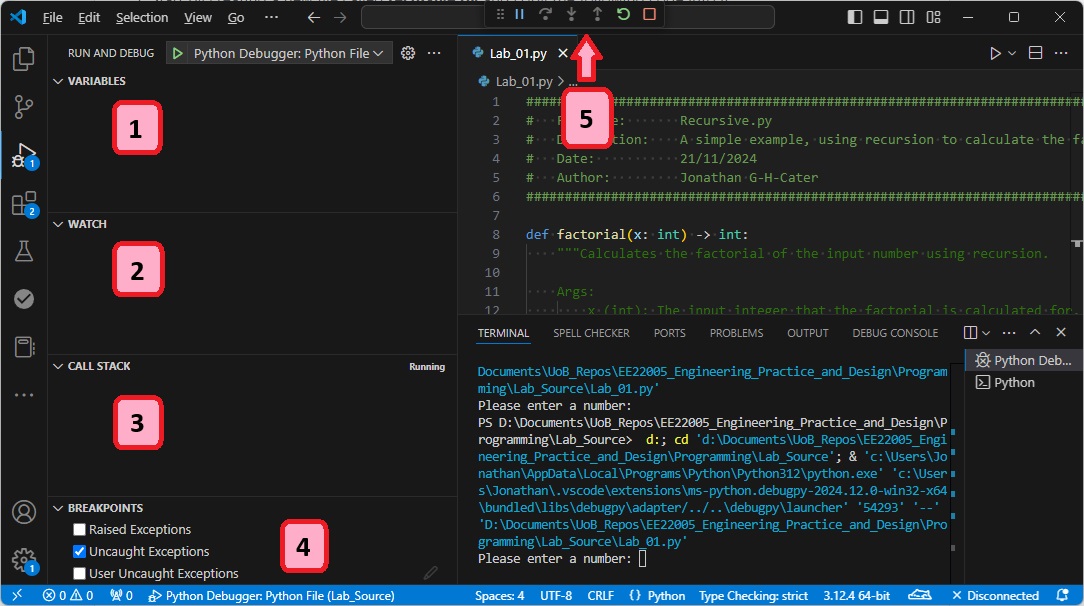
Looking at , there are several debug tools made available while debugging a python script. These are:
- The variables window: Shows all variables that are created while the script is running.
- The watch window: Lets you define statements that are constantly run while debugging the script.
- The call stack: Shows a path trace of the route that the code has taken to get to it’s current point.
- The breakpoints window: Provides a summary of all points in the code where the debugger will pause running.
- The step controls: Allows the programmer to pause, continue, stop or step through the code one line at a time.
The following video goes into detail on how each of these features work.
Extension: Match Statements
Match statements are a fairly new feature in Python (added in Python 3.10). They are the equivalent of Case statements in other languages. They allow you to list an expression that will be processed and compared against multiple possible results. Whichever result matches will then be used to determine what code to run.
For example, consider the following code:
1
2
3
4
5
6
7
8
9
10
11
12
13
14
15
16
17
18
19
20
# simple match case statement
def runMatch():
    num = int(input("Enter a number between 1 and 3: "))

    # match case
    match num:
        # pattern 1
        case 1:
            print("One")
        # pattern 2
        case 2:
            print("Two")
        # pattern 3
        case 3:
            print("Three")
        # default pattern
        case _:
            print("Number not between 1 and 3")

runMatch()
This example shows the general syntax of the match statement. First you use match [variable or expression]: to define what you are checking against.
You can then list several optional results using case [result]:. The result could be any datatype.
Finally, you can use case _: to define code that should run when no match was found.
Using Match Statements Challenge
Modify your simple caculator code from before to ask the user to enter 2 numbers and one of the following commands:
- add
- sub
- mul
- div
- mod
Then print only the answer that matches the entered command - using match statements to control which is output. If the user fails to enter a valid command, print the following message:
ERROR Only available operations are:
   - add: Adds the two numbers together.
   - sub: Subtracts the second number from the first.
   - mul: Multiplies the two numbers together.
   - div: Divides the first number by the second.
- mod: Finds remainder of dividing the first number by the second.An example use of the code should therefore yield something similar to the following:
Please enter a number: 5
Please enter a second number: 2
Please enter a command (add, sub, mul, div, mod): add
5 + 2 = 7