Installing AutoNOTE
AutoNOTE is a tool designed to generate fully accessible and Moodle-Friendly HTML pages from simple markdown files. The following page provides a walk-through on how to get AutoNOTE up and running on your own machine.
How it works
AutoNOTE builds on a combination of Jekyll, an open-source static site generator written in Ruby; and Bootstrap 5, a free and open-source CSS framework directed at responsive, mobile-first front-end web development. Using custom-made plugins, layout files and javascript code, AutoNOTE can take a simple markdown file and generate a fully-responsive webpage.
The modular nature of this project makes it easy to add support for new features. A full breakdown of the project workspace is provided on the AutoNOTE Workspace Explained page.
Environment Setup
The AutoNOTE project has a number of environment prerequisites:
- A basic text editor or IDE
- Ruby 3.x
- Bundler
- Jekyll and Rouge (automatically installed by AutoNOTE)
The following page will walk you through installing these prerequisites, before pulling the AutoNOTE project from Github. Where possible, the project is configured to support easy installation and configuration of these dependencies, allowing you to get to writing as quickly as possible.
All steps required to install and use AutoNOTE are currently possible on University managed machines without Admin privileges.
The Editor
This project has been designed to work natively in VSCode. While you are free to use any editor that you desire, using VSCode will allow you to make full (and automatic) use of the pre-configured workspace settings and tools that have been included within the project source files.
Installing VSCode
If you do not already have VSCode, you may install it for free from https://code.visualstudio.com/.
VSCode User Settings
The recommended extension and editor settings should be included in the “.vscode/” folder within the project workspace (we will get there in a second). You can then further configure the editor using the user-wide or project-specific settings as desired.
Navigating VSCode
If this is your first time with VSCode, it is strongly recommended that you familiarize yourself with the user interface. Microsoft provide a useful breakdown of VSCode’s user interface here.
Ruby 3.x
The AutoNOTE now uses Ruby 3.x.
You can check if you have any version of ruby installed using ruby -v in the terminal (ctrl + ' in VSCode).
If you do not already have Ruby 3.x installed, you can download and install it from the official ruby download page.
You will need to restart VSCode once you have installed Ruby.
You can check that the install worked correctly by running ruby -v again in the VSCode terminal.
Bundler
The AutoNOTE project uses bundler to install and manage the required ruby Gems (or plugins). To this end, the AutoNOTE workspace will include two files, “Gemfile” and “Gemfile.lock”. These ensure that the correct versions of each Ruby dependency is installed.
You can install bundler using gem install bundler in the terminal.
Getting AutoNOTE
The Git way
Using the method outline below will allow new AutoNOTE updates to be seamlessly pulled into your active projects.
# Create local git repo
git init

# Add the remote repository for the new project
git remote add origin <URL_TO_NEW_PROJECT_GIT_REPO>

# Add the AutoNOTE repository to get the source files
git remote add upstream https://github.bath.ac.uk/jeghc20/AutoNOTE
git remote set-url --push upstream no_push

# Copy the AutoNOTE files into our new project
git pull upstream master
git push origin masterCreating a New AutoNOTE Project
Start by clicking the button below:
You will need to give your project a suitable name and select whether you wish for the project to be private or public.
Finally, you can leave “include all branches’ unchecked unless you wish to use experimental and in-development features.
Cloning/Downloading your Project
Once the new project repository has been created you will need to download it onto your local machine.
That can be done using either the git clone command or the “Code -> Download Zip” options on the new project repository site.
Make sure to unzip the project into an empty folder if you opted to downloaded the project as a zip file.
Opening the Project
In VSCode, select “File -> Open Folder…” and navigate to the project folder you created in the last step. This should open the project folder workspace.
Assuming you have done this correctly, you should see a list of folders and files in the workspace, including folders such as “_data/” and “_layouts/”, and files such as “index.md” and “Gemfile.lock”.
VSCode will recommend a set of extensions when you open an AutoNOTE project for the first time. Each of these extensions have been hand-chosen for the project - simply select “install all”.
First Time Setup
There are a small number of steps that must be performed whenever you open an AutoNOTE project on a new PC for the first time.
Run Bundler
If this is your first AutoNOTE project on the PC you will need to run bundler. This can be done by opening the project workspace in VSCode and running bundle install in the terminal (ctrl + ').
Hosting/Editing Projects Locally
Now that the project has been downloaded and configured we can finally start using AutoNOTE to create Accessible notes and websites. There is a process that must be followed when editing AutoNOTE projects to ensure that your edits are converted into AutoNOTE output.
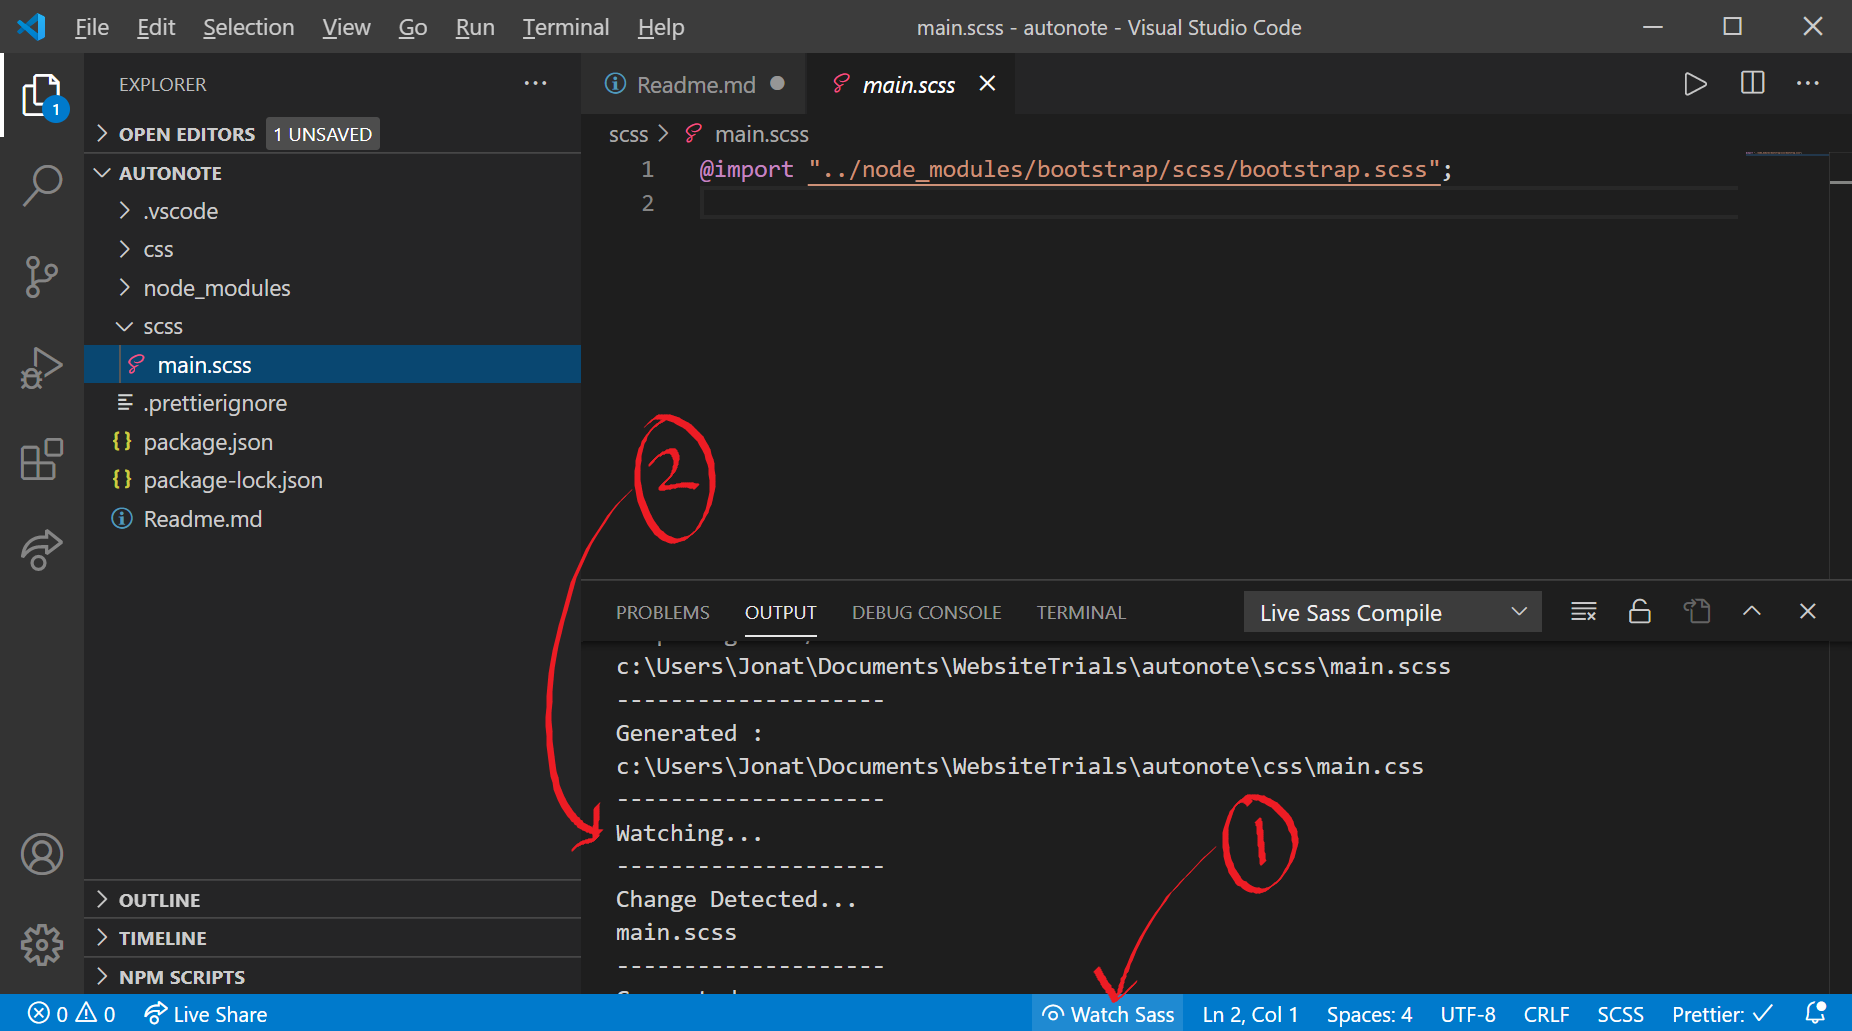
Start SCSS watcher
Before making changes to the look of the site, it is important to ensure that all SCSS changes are compiled on save. This is best achieved by starting the live SCSS watcher found at the bottom of VSCode (1). This should then display an output that confirms watching is active (2).
Start the jekyll server
Run bundle exec jekyll serve in the workspace terminal (ctrl + '). This starts the Jekyll compiler and also hosts a local version of the AutoNOTE output at http://127.0.0.1:4000.
If this step fails with the error message: Unable to load the EventMachine C extension;
- Go to “*C:\Ruby2x-x64\lib\ruby\gems\2.7.x\gems\eventmachine-1.2.5-x64-mingw32\lib*”
- Open “eventmachine.rb”.
- Add
require 'em/pure_ruby'to the top of the file.
Make your edits
You are now ready to start editing the project. If this is your first time with AutoNOTE we suggest following the Getting Started tutorial next.