--------- multipitchclimbing.com ---------
|
This site presents the images from the ebook High: Advanced Multipitch Climbing, by David Coley and Andy Kirkpatrick. In order to keep the cost of the book to a minimum most of these were not included in the book. Although they work best when used in conjunction with the book, most are self-explanatory.
Please use the following links to buy the book: Amazon USA (kindle) / Amazon UK (kindle) / itunes / kobo |
|
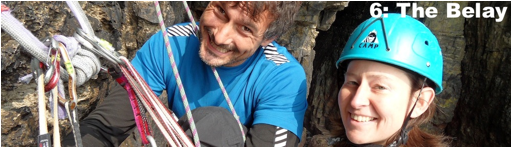
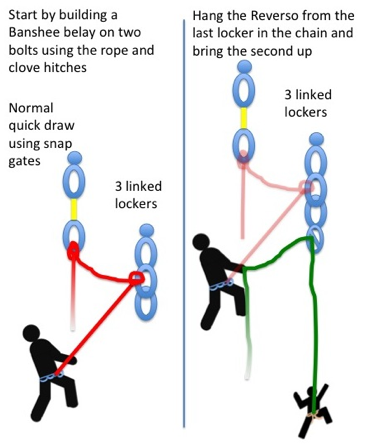
This is one of the longest chapters in the book. In part this is because the form of the belay depends on what you find to belay off, but it is also because standard practices vary greatly across the world. We present a lot of possibilities and what you finally use out there on the crags will depend on personal preference, but we hope you at least try a few alternatives.
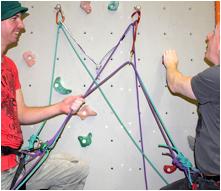
We look at both belays built from the rope and those that use a cordelette to create a powerpoint. We look at the sliding-X, EDBs, Banshee belays, and how to belay a leader directly, rather than off the harness. We also see how to reduce the fall factor by using a chariot belay, at parking the second and third to create more room at the stance, and consider something critical to moving fast – getting the swap over at the belay dialled (the fastest method discussed takes less than 2 seconds). |
|
|
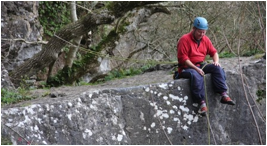
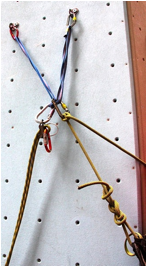
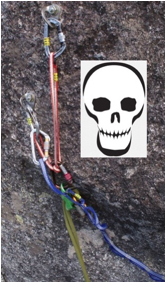
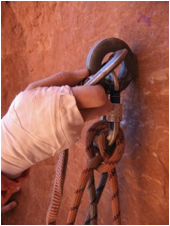
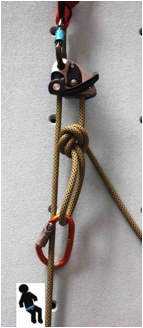
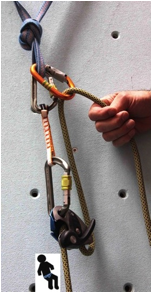
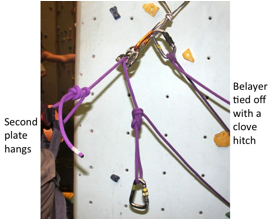
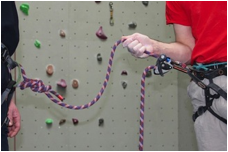
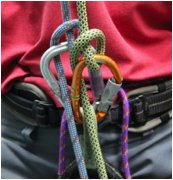
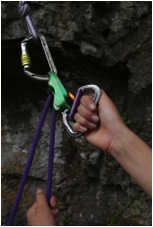
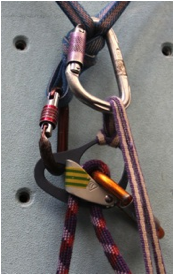
The belay is what you make of it—note Darren is plate hanging (i.e. hanging off the Reverso), not tied into the anchors, and a backup knot on his rope has been used. This is a common approach when climbing in a three particularly if you need to park the third person out of the way on a long tether (Coronation Street, Cheddar Gorge, England.) |
|
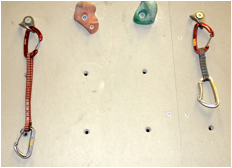
A belay obviously needs to be solid. By this we really mean solid in any of the directions it might get pulled in. There are likely to be three such directions: 1. Directly downwards, as the belayer hangs off it or the leader takes a factor two fall onto it; 2. Towards the last runner on the previous pitch, when the second falls off; 3. Upwards towards the first piece on the next pitch, when the leader falls.
Many trad belays are built as if the only possibility was number 1, and mainly with the idea of only hanging the belayer and the lunch from the anchors. Some climbers who haven’t belayed directly from a trad anchor (i.e. belayed with the Reverso hanging off the belay not the harness) get stressed when they do because they feel the belay might collapse if the second falls off. The second falling off is as benign as it gets. If this force could blow even one piece in the belay, then what is going to happen if the leader falls before the first piece, or onto the anchors if the anchors are the Jesus piece?
In my (DC) mind, there are three nightmares. Firstly the factor 2 fall. Hopefully the Jesus piece will solve this in part, but this creates the second nightmare: the high factor fall. The belayer will be jettisoned upwards and is likely to be smashed into the rock. The belay will also be pulled upwards hard. Thirdly the leader falls and is injured. If she can’t be lowered to safety, the belayer may have to escape the system and head up to her. This means she will be hanging off the belay and pulling it upwards, without the weight of the second to counteract this. If the belay can’t take an upwards force this doesn’t sound good. Although such an event might be rare, it is probably true that too much self-rescue practice and writing is all about escaping the system and mounting a rescue of the second (presumably because guides practice self-rescue more than most people), yet, unless he gets hit by rocks, the second is not normally the person who gets smashed up and needs rescuing, it is the leader. This is because it is the leader who will be taking that nasty leader fall. Hence we should probably all be asking ourselves more often, is that belay stable if the belayer is removed from it, or if it takes an upward pull?
A tip from personal experience: as soon as you place the first good piece in the belay clip into it with the rope. This is just in case you step off the belay ledge by mistake whilst building the rest of the belay. Do this even if you plan to build the belay with a cordelette. |
|
|
|
|
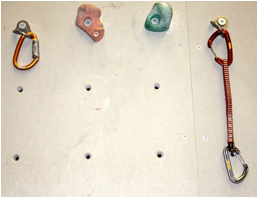
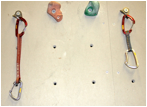
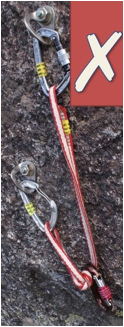
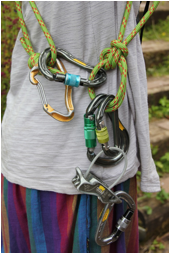
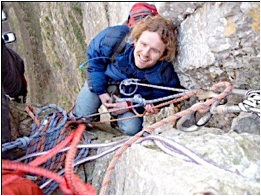
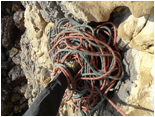
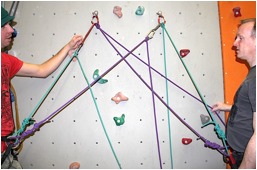
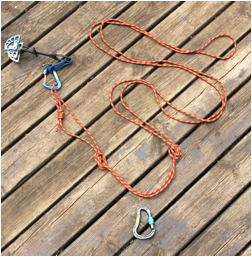
A very poorly organised belay. (Leaning Tower, Yosemite, USA.) It is very hard for anyone to workout what is safe to unclip and what isn’t. |
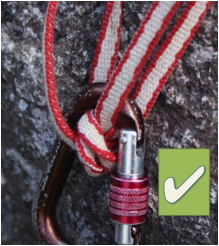
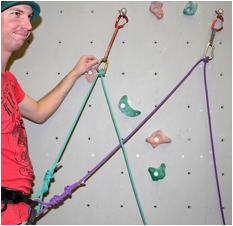
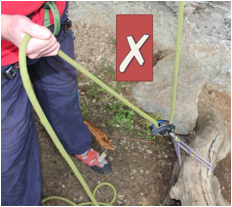
NO! Try and avoid clipping multiple slings directly to your harness. Build the belay with the rope, or use a cordelette or a sling to make a powerpoint. |
|
|
|
|
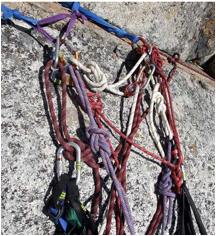
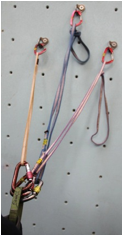
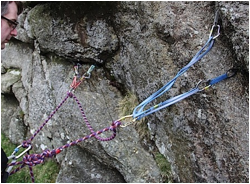
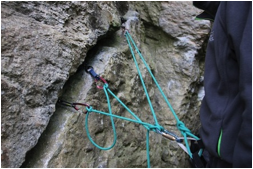
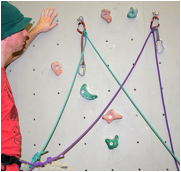
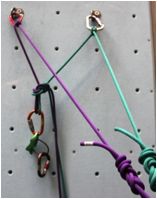
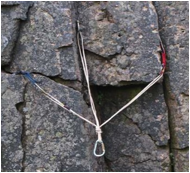
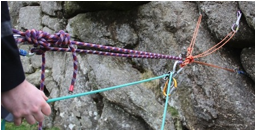
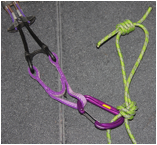
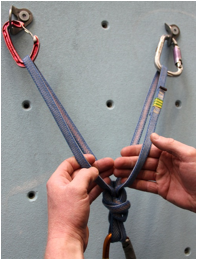
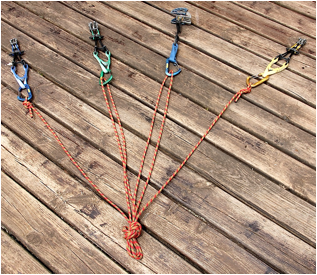
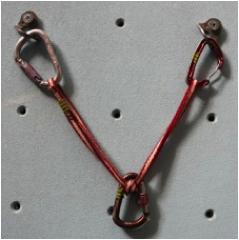
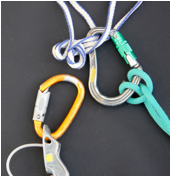
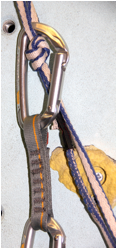
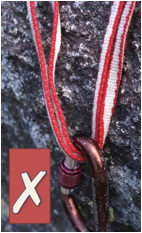
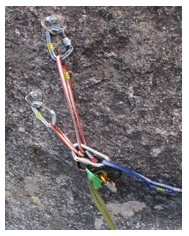
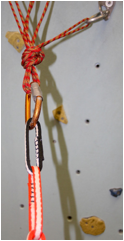
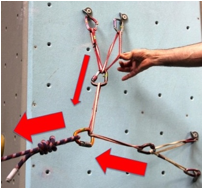
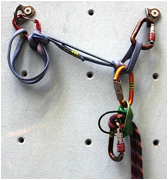
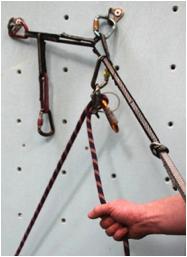
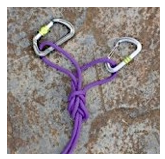
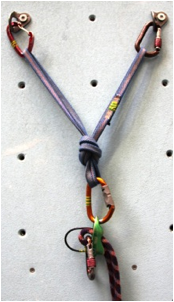
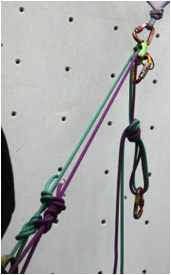
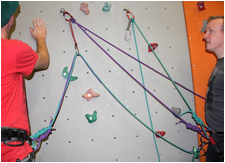
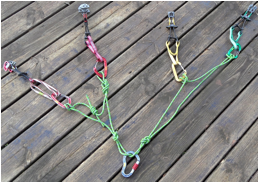
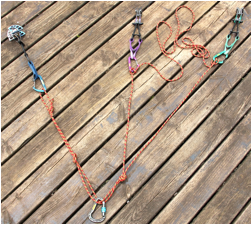
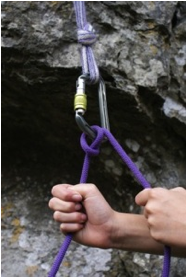
Slings can be used as part of an anchor, but almost always the rope will form the final link. Here, four pieces are bought together to two main anchor points. The blue sling is in the form of a sliding-X: however it is clearly not equalising (look at the slack in one arm) and the climber should have used limiter knots in case one arm of the X blows. |
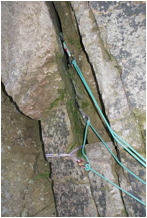
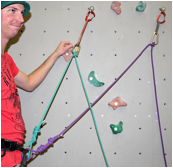
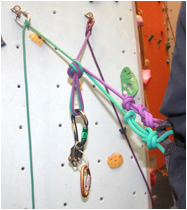
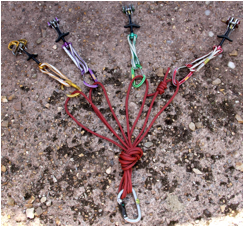
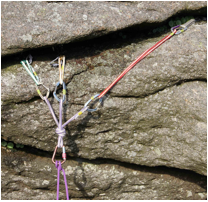
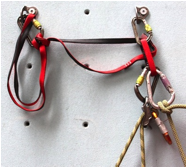
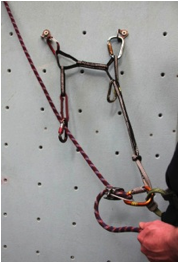
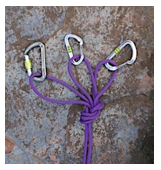
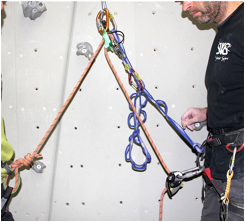
A five piece belay without the use of any slings: use as many pieces as the quality of the placements demands. In this belay most of the pieces are wires. Cams are normally carried on their own carabiners, wires are not. This means you will need to cannibalise sling draws for their carabiners when placing wires in the belay. A quicker solution is for the leader to carry two or three spare snap gates ready for such belays. These have been termed magic carabiners, as they help to magically speed the process up.
|

|
|
|
|
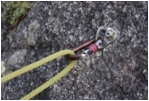
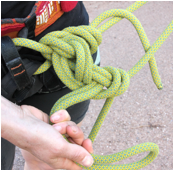
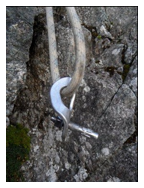
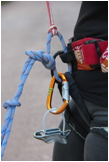
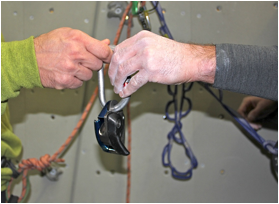
Feed the ropes into the belay plate whilst the wire keeper loop is still on the locker. This way you won’t drop it. |
|

2. Where to Belay
|
Although it is tempting to make every pitch a rope stretcher, and combining pitches can often save time, it isn’t always the fastest solution. It will slow you down if: it means using belays which take longer to build (e.g. 4 cams rather than a big fat tree); means communication is difficult; means the weakest person leads the crux; means you have to climb more cautiously as you have run out of gear; means you find it difficult to build the belay because you only have one cam left; means you can’t throw a rope down to help a stuck second over the crux because he is too far away; means you get injured because you belayed in a place exposed to stone fall rather than beneath the overhang you passed; means the rope drag makes the moves twice as hard as they should be. |
|
|
|
|
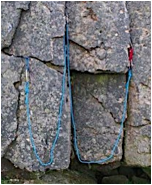
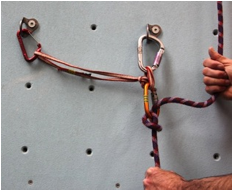
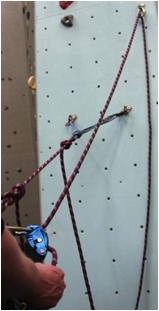
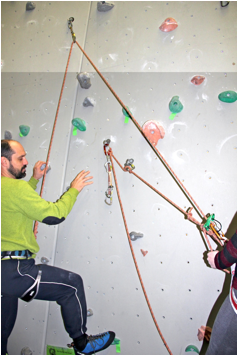
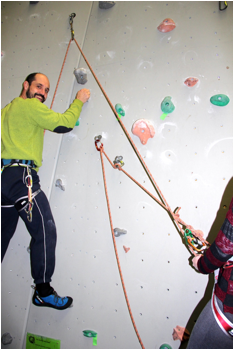
If possible belay so you can see your second, even if it means extending the anchors. This will speed everything up. (Keep the rope running back to the anchors tight – unlike how this climber has rigged it.)
|
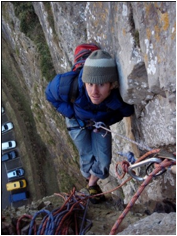
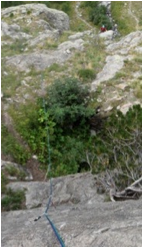
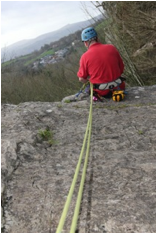
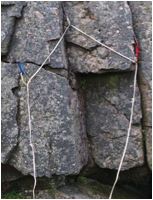
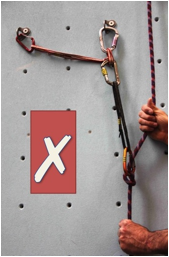
View from a poorly placed belay (the second is the small red dot near the top of the photo and is just finishing the first half of the pitch). The second could not have been visible for much of the pitch (nor could have been the leader when she was leading it) and the rope could have dislodged stones from the grassy ledge. Hence, it might have been better if the belay had been set at the front of the grassy ledge.
|
3. Belays Built from the Rope
|
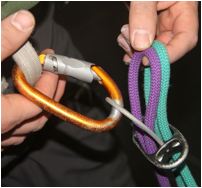
The world is divided in many ways but rarely as vocally as the division between those that use the rope to form the belay and those that use a sling/cordelette. Most climbers however understand that both have advantages and disadvantages. In summary these are: using the rope means you don’t have to carry cordelettes, you are more likely to use placements that are further away (and might be more solid), and the rope adds an extra dynamic element to the belay compared with dyneema slings; whereas using a cordelette produces a belay that is easy to read (especially in a team of three), has a powerpoint for the Reverso, makes it easier to escape the system (this is something you might need to do even if there isn’t an emergency), you always have some abseil tat with you.
Although I couldn’t find any published data, anecdotal evidence suggests that in competent hands there is little time advantage in either, and that in incompetent hands both can take a long time.
|
|
|
|
|
|
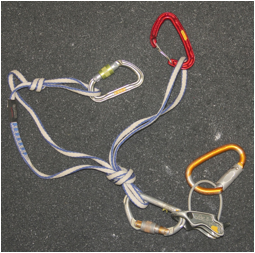
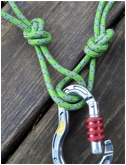
Basic rope-based three-point belay. The rope is tied off at the piece if the piece is within reach, or at the harness if not. You may find it more comfortable to place the locking carabiner on the rope tie-in loop, rather than the belay loop. To reiterate, the general rule is to tie the piece off to the locker at the harness with a clovehitch if the piece is out of reach from your final position, and with a clove hitch at the piece if not. |
|

|
|
|
|
When using two ropes is it common use one rope for the anchors on the left and the other for those on the right. |
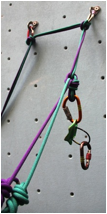
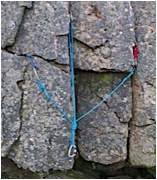
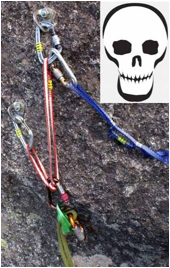
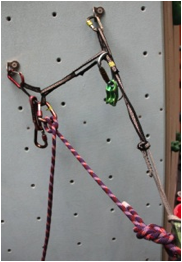
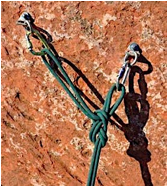
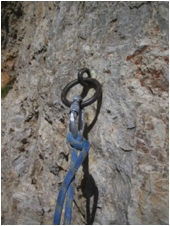
This three-point belay looks solid (one thread and two good cams), but all the anchors are in the same pillar of rock—which could easily fail as it is cracked at the base and unsupported on the left. In reality, the cams offer nothing, if the thread fails the cams fail. Although this belay has been built using the rope, this problem is more often seen with cordelette belays as it is tempting to rely more on co-located pieces. |

|
|
|
|
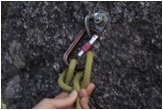
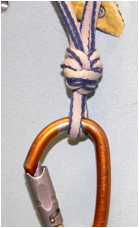
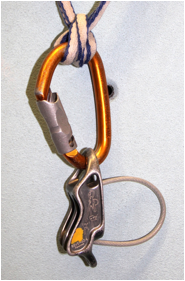
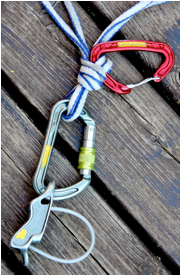
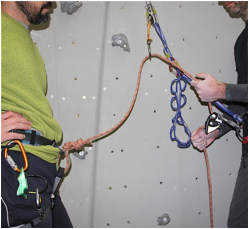
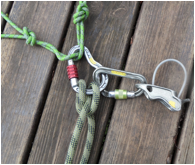
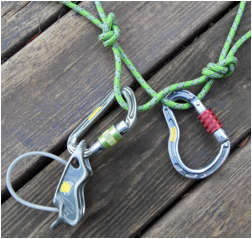
One example of a two-bolt belay using the rope. Note the draw that becomes the Jesus piece for the next pitch. The assumption here is the second will lead the next pitch, so the current leader has tied in with a locker and to the TOP of the draw. |
|

|
|
|
|
|
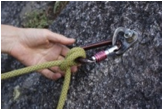
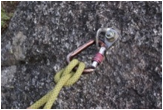
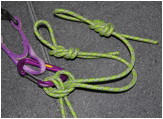
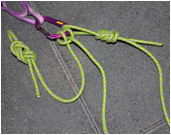
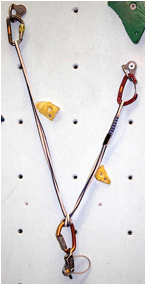
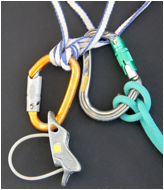
Often it is difficult/impossible to get two carabiners through the bolt hangers. By using draws there will be a carabiner for both climbers. Again one of the draws becomes the Jesus piece. To allow this to happen, the rule is that the climber who is not leading the next pitch ties into the TOP of the draws. This requires the use of standard sized carabiners, not mini ones. (Note, in the middle image it would have been better if the clove hitches had been placed on the outside of the draws, so they would have been easier to untie.) The middle photo shows the setup when swinging leads, the right image when not swinging leads. In the latter case, the leader will simply convert one of the extenders into a Jesus piece by unclipping the clove hitch and then clipping the lower carabiner. |
||
Tying off
|
|
|
|
|
|
|
|
|
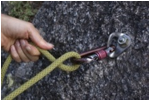
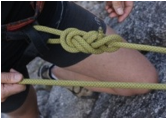
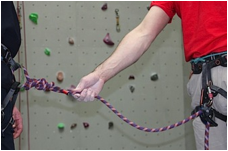
Tying into an anchor using a clove hitch at the piece. (Note the clove hitch is tied one handed and on the carabiner, not formed then slipped onto the carabiner. This allows you to get the length of rope just right and to be safely clipped into the anchor whilst tying the knot and still on belay.) |
||

|
|
|
|
|
|
|
|
|
|
*missing image |
Most of the time it is best when tying off at the harness to use a clove hitch on a locking carabiner as shown in the basic three-point belay photo (above), however tying into an anchor using a figure of eight at the harness is useful when you run out of lockers or when travelling light. Finish with a half hitch around the pair of ropes in her left hand. The process is repeated for each attachment point. |

|
|
|
|
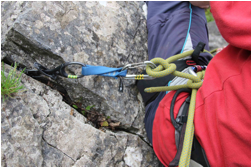
If the main anchor is a long way back, place another anchor close to you. This stops you being pulled over the edge because of rope stretch, or being pulled sideways across the cliff. (This second piece is termed a “counter piece” as it counteracts forces in directions other than that where the main strength of the anchor lies). |
|
|
|
|
|
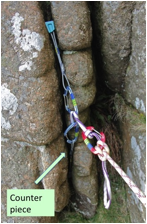
Left: here the counter piece is clipped to the belayer to stop him being pulled rightwards in the event of the leader falling. Right: the counter piece is simply a piece in opposition to one of the nuts in the belay and placed only to ensure the belay stays put if an upward force is applied: the belayer could still be lifted up and propelled into the rock face or roof. |
|

4. Powerpoints Made from the Rope
|
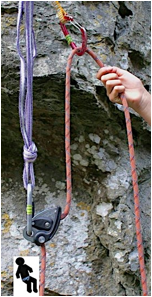
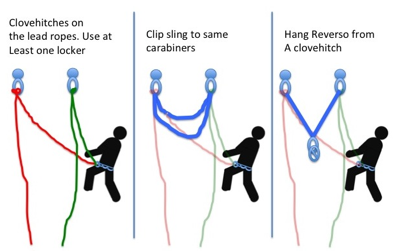
You don’t need to use a sling or cordelette in order to use a Reverso in guide mode – just hang it off the ropes. Knowing you can do this counters any arguments that using guide mode requires you to use a cordelette or a sling to build the belay. As the photos show, there are many ways to do this. |
|
|
|
|
|
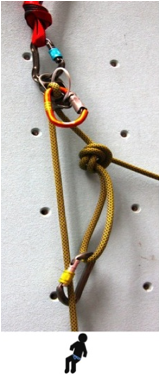
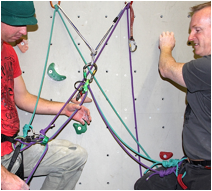
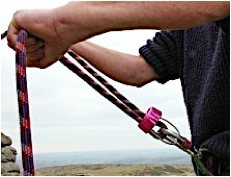
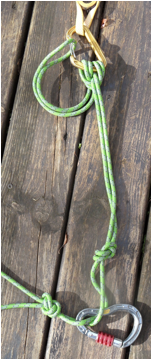
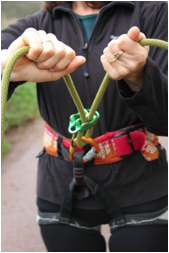
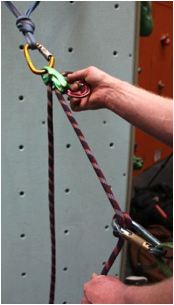
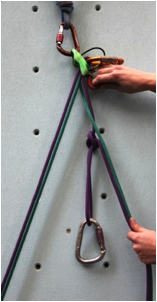
Building a “powerpoint” using the rope. Left, on the slack side of the anchors; middle between the belayer and anchor; right, Banshee-style. With the middle and right options it normally makes sense to form the powerpoint overhand before tying into the anchors – this is easier than guessing how much slack to leave. |
||

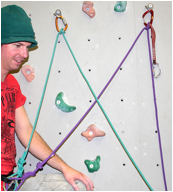
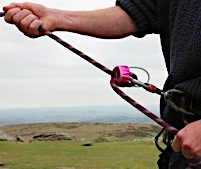
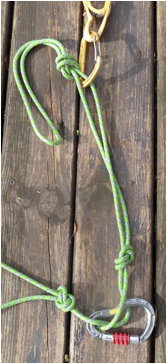
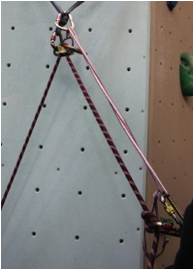
Another Banshee-style “Powerpoint” built from the rope.
5. The direct isolation loop belay (DIL belay)
|
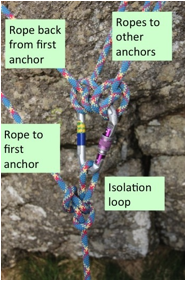
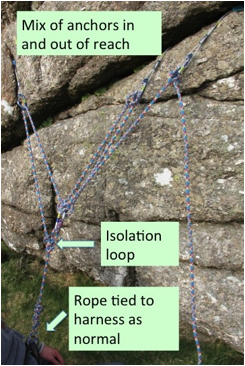
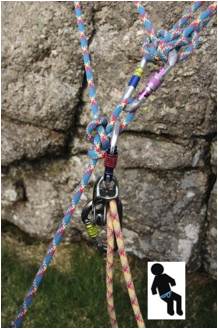
In the images above of powerpoints made from the rope, the rope is tied off at the anchors. This is fine if the anchors are within reach and there are only two anchor points in the belay. With multi-point trad belays neither might be the case. This means the anchor lines need to instead be tied off at the harness once the belayer is standing/sitting/hanging in the location they will belay from, and that there could be a lot of clovehitches to tie-off. A few climbers have always tied the anchor lines off (and hung the belay plate in in-direct mode) not off the belay loop but from an isolation loop. This is just an overhand on the bight (or figure of eight, or butterfly) on the climbing rope 15cm (6inches) from the tie-in knot. They then belay by sitting to one side of the belay plate, making sure the belay plate is in front of them at all times to allow it to be locked off easily. The reason for doing this is that it makes escaping the system trivial if the second has a problem: just tie the belay plate off, untie the harness tie-in knot and walk away. This leaves the second on a releasable system (the tied off belay plate). It also means a powerpoint is always in place should one be needed in order to mount a rescue. It is useful on single pitch routes when the belayer is sitting at the top of the cliff because it means that they can possibly run to the base, find out what the problem is, hopefully sort it out, run back up and tie back in very quickly. It makes less sense in a multipitch situation. Here, the belay might well be a hanging one, making it impossible to safely use the belay plate in the in-direct mode to bring up a second because it will be hanging above the belayer and therefore will not easily lock off. However, this hanging position with the plate above the belayer is exactly what we try to do when direct belaying. This suggest it might be worth adopting this practice of using an isolation loop when direct belaying on complex trad anchors when a cordelette is not appropriate (for example, when one of the anchors is a tree 5m (15ft) away) or if you don’t carry a cordelette. The main downside compared to a cordelette will be that the switch-over will be more difficult if the belayer is also going to lead the next pitch, but it should be no more complex than if a normal system of tying in with clove hitches at the harness had been used. When the second arrives, there is less point in him setting up an isolation loop as he won’t be using a direct belay. Although it would still offer advantages when escaping the system and mounting a rescue because the isolation loop will provide the powerpoint.
To reiterate, the nice thing about the DIL approach is that it allows those that don’t like cordelettes to make full use of direct belaying.
When using double ropes, you need to form the isolation loop out of both ropes, tie two isolation loops, or much better use just one rope in the belay. If a different rope is used at each stance then the ropes should still be long enough. When swinging leads this will automatically happen if each climber picks a different rope as “their” belay rope. However, if the belay contains a large number of pieces, or pieces a long way apart, then you will be better forming the belay from both ropes, possibly using one rope to connect most pieces, and the other rope to tie yourself to the counter piece. |
|
|
|
|
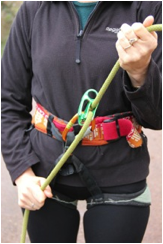
Forming a direct isolation loop (or DIL) belay. First, form the isolation loop using a butterfly, figure of 8 or overhand. The isolation loop then plays the role the belay loop normally does. The further away the isolation loop from the harness, the easier the use of the Reverso will be, but the more difficult it will be to get the anchor lines correctly tensioned (long arms help). |
Now treat the isolation loop as you would the belay loop or tie-in loop. Tie off as normal, with clove hitches on the pieces if in reach and on a pear-shaped locking carabiner at the isolation loop if not. |
|
|
|
|
|
Finally add the belay plate in guide mode (two ropes are shown just for clarity; in reality it would all be the same rope if climbing on a single). |
6. Belays that largely don’t Use the Rope
|
The main advantage of using a sling, cordelette or belay rig to build a belay is the ease with which you can chop and change who is doing the leading or can escape the system. Escaping the system isn’t only done in a self-rescue situation. You might just be abseiling down the pitch to remove a stuck piece and then re-ascending, or needing to untie from the ropes because they have got in a real mess. This doesn’t mean that not using the rope is best, there are various downsides to using a cordelette (it’s another thing to carry, it can blow all over the place in strong winds, it makes people look for anchor placements that are near each other rather than the best or quickest – this is termed cordelette blindness). But it can often be the logical approach. |
||
|
|
|
|
|
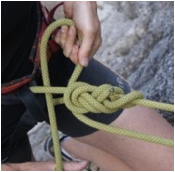
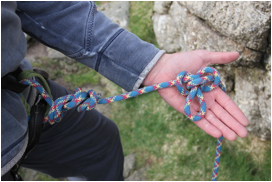
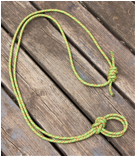
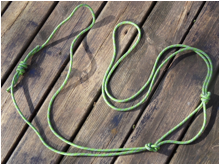
Building a trad powerpoint with a long sling or cordelette. (Clip the sling through all the pieces; bring down the lobes by running your fingers down between the pieces; tie an overhand (or figure of eight) with all the strands. If the cordelette is too long, shorten it by placing an overhand in one of the arms and clipping below this, or by one of the methods shown later.
|
||

|
|
|
|
|
Building a trad powerpoint with a snakeloop-style cordelette when the ends are not clipped to the same piece. This allows you to reach pieces further away, but reduces the strength of two of the arms. If you don’t need the extra length, clip the two ends to the same piece.
|
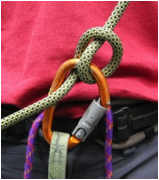
Powerpoint with a low (counter) piece to handle an upward pull. (Note the counter piece here is being used to stop the other pieces from being pulled out – the belayer could still be flung upwards, although not as much as without it. |
|
|
|
|
|
|
The powerpoint can be formed using an overhand, figure of eight or figure of nine. Using a figure of 8 or 9 can be useful in making the knot easier to undo or in slightly shortening the system. (A figure of 9 is just a figure of 8 but with an extra turn.) |
||
|
|
|
||
|
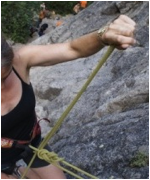
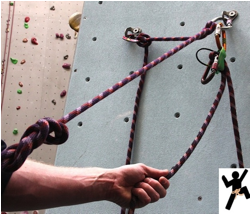
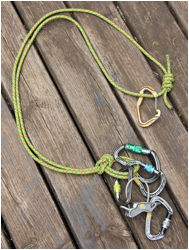
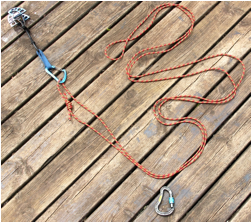
Extending a powerpoint using the rope so the second can be in view. The need to do this often arises when the anchors are on the wall at the back of a large ledge and when there is the need to keep the second in sight because they might have difficultly with the pitch. If you belay out of reach of the Reverso, you won’t be able to give slack or lower the second without returning to the anchors, and then you will not be able to see the second—although this is not usually a problem. An alternative is to place the Reverso on an overhand on a bight in the ropes, as shown in one of the earlier images. (Here a different rope has been used to extend the powerpoint, this is just for clarity; in use there would be only one rope.) |
|||
|
|
|
|
|
|
|
|
|
|
|
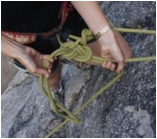
If the cordelette is too long, shortening it by doubling the cord through the last piece or by tying an overhand or clovehitch. |
|||
|
|
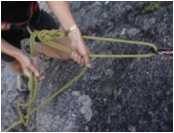
If the cordelette is too short, then some of the pieces can be connected in series, although this might reduce the strength of the system. The in-series pieces need to be inline with the powerpoint to ensure stability if one blows. |
|
It is easy to run out of space in the powerpoint during a rescue—consider using the shelf to give yourself more space. Never use the “shelf” above a clovehitch powerpoint: if the main carabiner is removed the shelf might no longer exist – this could have fatal consequences. It is probably good practice to always leave a carabiner in any powerpoint, as loading the shelf could in theory pull the main knot through. |
|
|
|
A shelf in use. |

|
|
|
|
Identifying the shelf—run your fingers down from the anchors to separate the strands.
|
|
|
|
|
|
Left a correctly identified shelf. Right a misidentified shelf—if either anchor fails the result is likely to be catastrophic. A carabiner should be left in the powerpoint when the shelf is in use to guard against the possibility of the overhand pulling through. |
|


|
|
|
|
The cordelette conundrum. The more pieces in the belay, the greater the number of strands that come together in the overhand. Hence just when you need more cord because you have more pieces to connect, the more is swallowed by the powerpoint itself. With a three-piece belay 1.9m of your 7mm thick 6m cordelette will be in the knot; with four pieces, 3.2m will be! Much of the time this means extending pieces with slings, or bring pairs of pieces together with overhands in slings or sliding-X’s, then clipping the extensions to the cordelette. If this is needed, then it will normally be quicker to use the rope rather than a cordelette.
|
|
|
|
|
|
Using thinner cord and/or leaving the cordelette open means that much less cord is in the knot so it is easier to reach pieces further away. Compare this picture with the one above – they are the same length of cord, but this one is 5.5mm spectra. However, be aware of the reduced strength of this. |
|
|
|
|
|
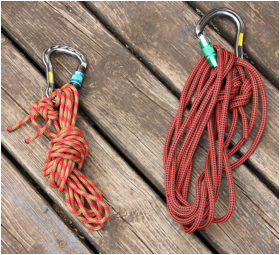
Cordelettes can be stowed by knotting with an overhand, or tripling up and twisting.
|
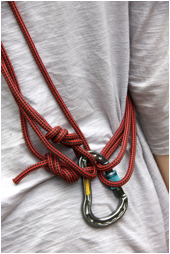
Or around your shoulder. In this case it helps if the length of the cordelette has been chosen to make this a comfortable fit. |
|
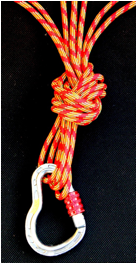
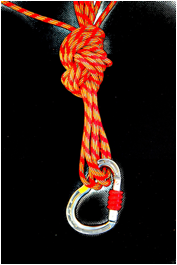
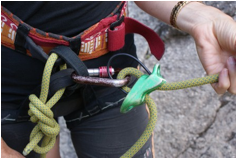
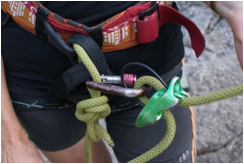
For two-bolt belays, the same “powerpoint” philosophy can be applied by using a 120 cm sling and an overhand on a bight or an alpine butterfly. Or use a 60 cm sling with an in-line overhand (or figure of eight) knot placed near the mid-point of the sling—this needs to be correctly clipped in case one bolt were to fail. |
|
|
|
|
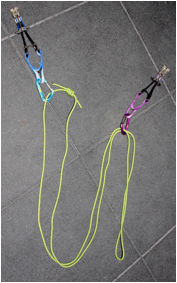
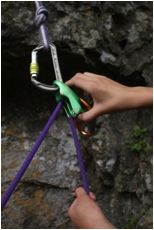
Standard two-bolt powerpoint using a 120 cm sling and an overhand on a bight. (A figure of 8 can be used instead of an overhand.)
|
Standard two-bolt “powerpoint” using a 60 cm sling and a single in-line overhand.
|
|
|
|
|
Close up of a correctly clipped in-line single overhand knot in a powerpoint. (This is the knot shown above right)
|
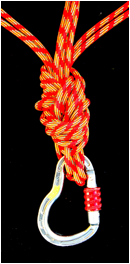
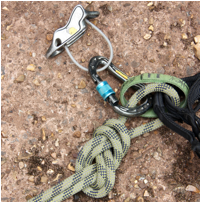
Miss-clipped in-line overhand. Failure of either bolt might well be fatal. |
|
|
|
|
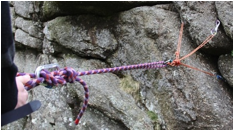
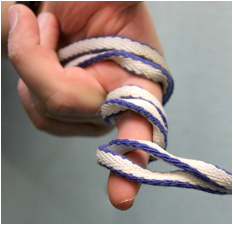
With 2 bolt belays you might find using an alpine butterfly easier to untie than an overhand. Use the same method to form the butterfly as that shown in the knots appendix, but around your finger. With practice this will take no longer to tie than an overhand. |
|
|
|
|
|
“Powerpoint” based on a clovehitch. Never use the shelf on this. |
|
|
|
|
|
|
|
Failure of the shelf of a clovehitch powerpoint. If someone removes the Reverso, the shelf evaporates. This could easily get you killed. (Note: The shelf doesn’t always fail when the Reverso is removed, it depends on how the shelf and clovehitch were formed and is hence somewhat random and therefore possibly even more dangerous. |
|||
|
|
A tiger clip. Some people clip a carabiner into the knot after forming the powerpoint overhand so as to make it easier to untie. This is very effective with thin dyneema slings. (Note, a toothless carabiner has been used.) This is potentially dangerous, in that, if someone in a hurry (or in the dark) thought the tiger clip carabiner was a secure place to clip in and weighted it, the knot would fail once the main locker was recovered. As removing the locker is exactly what will happen if you are swapping belay plates or an emergency occurs, this is a very serious issue, and I (DC) would never use the approach. Accidents happen when the unplanned occurs. Systems should be easy to read and safe against the unexpected. Some people use a small keyring-like clip to make it more obvious that one should not clip into it – but this might mean someone clips into something that can’t even take bodyweight. |
||

|
On many routes with bolted anchors the bolts will be similarly spaced at each belay. This means you can carry a pair of preformed belay rigs made from a 120cm sling, a locker and a carabiner for clipping the bolts, the Reverso and its two lockers and a final locker to tie yourself in with. If you like the approach you can buy a more robust version from some of the major climbing companies that will last a lot longer and is designed so you don’t have to undo the main knot to adjust its length. Or just use a length of 8mm cord tied in a loop to really keep the cost down.
|
Belay rigs can be carried pre-formed between pitches if the bolts are likely to have similar spacing at each stance. The overhand near the top locker is for the Jesus piece.
|
|
|
|
With belay rigs it is easy to make the Jesus piece integral. |
|
|
Although it looks as though the arms and main overhand knot of a sling or cordelette based powerpoint should help to equalise the load between the pieces, in reality this doesn’t happen. The reasons were explained in detail in the supporting webpage for Chapter 3 (Physics). In short, these are that the shortest arm will take a disproportional amount of the load, and that as the load moves most of the load will end up on a single arm. To solve these problems climbers have for many years used the sliding-X. Unfortunately, for the reasons described at length below, the sliding-X doesn’t seem to offer much of an advantage over a regular powerpoint.
One nice thing about a sliding-X in its purest form (i.e. without limiter knots) is that there are no knots to untie each time you strip the belay. However, without the limiter knots, a sliding-X has considerable extension if a piece blows, normally enough to drop the belayer off the stance. This will be a bit of a shock, and if the belayer is clipped into the X with a daisy or other tether could rip the belay from the wall (see extending death belays, below). |
|
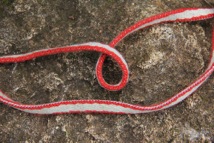
Sliding-X. Unlike an overhand knot, this shares the load between the two anchor points. But failure of either bolt will drop the carabiner to the end of the sling and the belayer off the ledge. |
|
|
|
|
One way of forming a sliding-X.
|
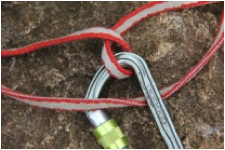
Correctly clipped sliding-X.
|

|
|
|
|
Mis-clipped sliding-X. Failure of either anchor point could be fatal.
|
Sliding-X with limiting overhand knots. Now failure of either bolt would only lead to a small drop. If the knots are too close to each other, the range of angles the sliding-X can slide over will be very small. This is important to realise if the direction of pull might change: which it normally does.
|

|
|
|
|
Sliding-X with one limiter knot. This can be useful if one piece is higher than the other |
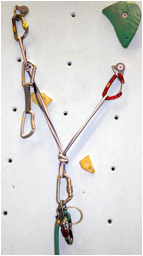
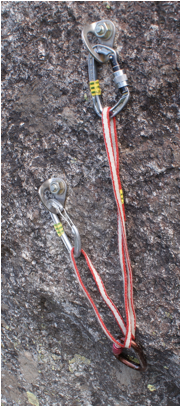
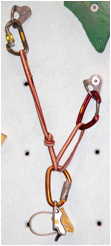
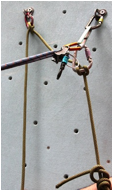
Four-piece anchor utilising a pair of sliding-X’s with limiter knots bought together into a powerpoint. Note how the right hand arm has been extended with a quick draw to make the angle at the overhand smaller than it might have been. |

|
Before spending time trying to build equalised belays from slings it is worth understanding some fundamental principles.
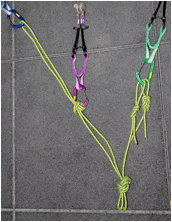
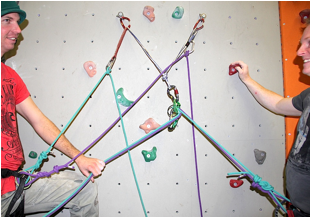
1. In order to equalise, the X of a sliding-X needs to slide. Unfortunately tests show that because of friction at the carabiner, the ease of sliding is restricted (this is termed the carabiner factor), even with an ideal setup. This means that the force in one arm might only be half that in the other. New 6 mm dyneema will probably slide better than fat furry nylon. 2. If one piece can take the load independently, there is no point in trying to equalise. You should concentrate on redundancy, minimising the drop if the other piece blows and multi-directionality. 3. Equalisation plays no role if one piece has less than half the strength of another. Imagine one arm of a perfectly equalising belay can take 6 kN and the other 3 kN. It might be tempting to think this belay can take 9 kN. However, if a 6.1 kN load is applied each arm with receive 3.05 kN, the weakest arm will fail, and then the stronger as it receives the full 6.1 kN. 4. This leads to the rule that the maximum theoretical strength of a two-piece sliding-X is NOT the sum of the strengths of the arms, but only twice the strength of the weakest arm. Understanding this is key (and most climber’s don’t): unless you know both arms are strong, a sliding-X is probably the last way you should be building a belay. 5. Just linking everything together with perfect sliding-X’s or other such systems will not in general share the load equally between the pieces. We know from the Chapter 3 that forces depend on angles and that force is a vector. In the following picture we see three sliding-X’s. The angle of pull is different for each piece. The top two bolts for example have very little load on them, which would be a shame if it were the strongest ones. Here the presence of the lower bolts is stopping the upper ones doing their job. A better solution might have been on getting the load on the upper bolts and minimising extension if anything pulls.
So, logic tells us that a sliding-X will only be better than a normal powerpoint (i.e. both arms hold) if, and only if, (a) neither arm of the powerpoint could have taken the load independently, (b) the weakest arm of the X is at least half as strong as the other, but not strong enough to take the load by itself (if it was you could have used a powerpoint), (c) the weakest arm can take at least half the load, (d) the sliding-X holds – if the whole thing fails it doesn’t matter how you tied it. (d is in fact implied by b and c.) (Note, if one arm of a sliding-X fails this will be worse than one arm of a powerpoint failing because of the extension.)
This sounds like there might only be a very small window of possibility where a sliding-X could outperform a powerpoint. And given the downside (extension) it might not be worth trying.
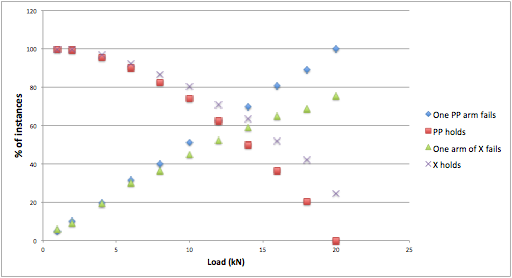
The following graph results from a simple mathematical model of a 2-armed powerpoint and a sliding-X. For the powerpoint it is assumed that only one arm takes all the force (i.e. the worse case), for the sliding-X it is assumed the load is perfectly shared between its arms (i.e. the best possible case). 1000 falls of random force (x-axis) were applied (of 1 to 20kN with a uniform probability distribution). Each arm is assigned a strength of between 0 and 20kN (with a uniform probability distribution). The y-axis shows the percentage of falls for which one of the arms of the powerpoint or sliding-X fails and the percentage of times the powerpoint or sliding-X holds (including cases were one arm fails). We see that the window of advantage the sliding-X might offer is indeed very small, and at small loads it is essentially zero. At very large loads (>9kN) the sliding-X does indeed offer an advantage; however, it is not clear how often (if ever) such loads occur (Black Diamond have never found a stopper (a wire) rated to 9kN to have failed). In addition, as stated, the distribution of the force in the falls was assumed uniform: i.e. a 15kN fall was as likely as a 2kN fall. This is unlikely to be true, and hence the graph probably overstates any advantage the sliding-X may have. Also, when an arm of a sliding-X fails the climber falls further (even if limiter knots are present), presumably increasing the force of the fall. This has not been accounted for, and hence, once more, any advantage the sliding-X might have is even less than shown.
However a sliding-X without limiters is fast to tie, so maybe that why it is popular.
|

|
|
|
|
|
One classic way of tying into a direct belay with the rope. The climber’s weight is equalised between the anchors and if one bolt were to fail, the remaining bolt would not be shock loaded nor the climber suffer too large a jolt, i.e. the belay is stable against partial failure.
|
The other classic way of tying into a direct belay with the rope. The rope is attached to the powerpoint or shelf. When using a single rope, this is better than tying into a single piece as if one arms fails the belayer is not thrown off the stance; make sure the Reverso can’t be trapped by the rope’s carabiner—it might not lock off if it is.
|
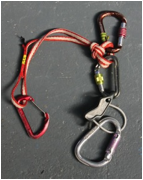
Correct use of daisy when connected to a direct belay or powerpoint. If either bolt fails the belayer will swing, not drop onto the remaining bolt. Here, and in-line overhand has been used to form the powerpoint. This is not a suitable method if the powerpoint has been formed using a clovehitch, as if the clovehitch is removed you may die. |
10 The Extending Death Belay (EDB)
|
|
|
|
|
Unless you really don’t have an option, don’t trust a single bolt as a belay or rap point—they do fail.
|
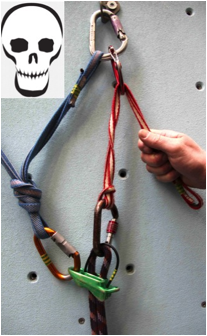
Extending Death Belay (or EDB). I.e. one not stable against partial failure: If the top bolt blows the belayer will shock load the system with a large effective fall factor, as the remaining non-dynamic system will extend and probably drop him off the ledge. |
Again an EDB, however with the potential to only create a much small force on the daisy (and less destabilisation of the belayer) as the drop is less. However, the daisy has been clipped into a snap gate not a bolt or locking carabiner!
|
|
|
|
|
|
Solving the EDB problem: clip the daisy into the powerpoint. If one piece fails only a swing rather than a drop will result. |
Not sensible at all: left, cross-loaded tie-in knot; right, daisy girth-hitched to the rope tie-in loop. The crossloading is only part of the problem: untying the lead rope could prove fatal. |
|

11. Redundancy vs. Equalisation
|
When considering if you are trying to obtain redundancy without extension or want equalisation. Consider the following two images. |
|
|
|
|
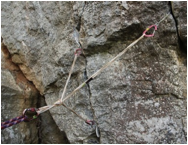
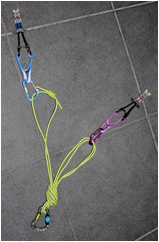
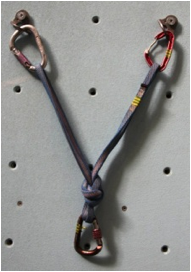
The right hand arm has been extended to both allow a distant placement to be reached and to reduce the angles between the arms. This arrangement won’t equalise like a sliding-X, but it has redundancy as it is stable against partial failure from one piece blowing.
|
How well does anything equalise?
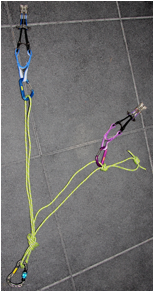
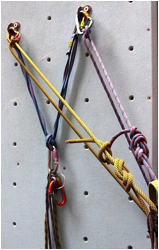
If the angles between each piece and the direction of pull are not the same, the load will not be evenly distributed. Here, given the direction of pull, the upper bolts carry almost no load. One has to ask, is it worth the small amount of equalisation this array might provide over the potential for extension during partial failure. Maybe using the rope would have been a better option.
|
12 . Banshee Belays
|
Connecting high quality bolts in series is fast. This can be done with the rope or with a sling. Many will see this as a controversial approach as it doesn’t try to equalise, or minimise extension under partial failure. It is however common in much of Europe were new big fat bolts have been placed by trained individuals into solid rock.
It is much quicker than a cordelette and allows direct belaying of the second. |
|
|
|
|
Non-equalised, or banshee, belay. Left: It is best if the main locking carabiner (the one on the right hand bolt) is reasonably large, as it carries the clove hitch and the Reverso’s carabiner. If the main carabiner is large enough, it can simply carry the clovehitch and the Reverso. Right: Some will be nervous of clipping two carabiners together—the use of a very short open extender (i.e. a short lamb’s tail) between the two locking carabiners solves this, as will the use of a banshee rig (see below). |
|
|
|
|
|
|
Banshee rig—a 120cm sling is normally best. Carry two between the party, just as you would a normal belay rig. It is also best to tie the loop (formed from a bowline on the bight) adjacent to the stitching on the sling, as the stitching can get in the way of the clovehitch on the second bolt.
|
Banshee belay using a banshee rig. The belayer is attached to the sling via another locking carabiner clipped into the bowline on a bight. |
Mammut’s Belay Eight banshee belay rig in use with the belayer clipped to the main loop. This loop is manufactured in much the same way as a harness belay loop, so it is strong and hardwearing.
|
|
|
|
|
|
A thin dyneema sling is fine for a temporary banshee belay rig, but the sling will wear quickly, and slings aren’t cheap. A cheaper alternative is a length of 7 or 8mm cord. Set the length so it can be carried over a shoulder. However you carry it, carry it with all its carabiners: belay rigs are about speed. |
||
|
Another way of forming a Banshee rig is to use a PAS-style daisy (don’t try this with a normal daisy – the pockets might fail). Doing this means there is no dynamic element in the system at all. The user needs to be very aware that they must not shock load the belay bolts. Hence this approach is for advanced climbers only.
|

|
Realised Ultimate Banshee Belay Rig (or RUBB). A snapgate will also be needed to clip the second bolt. Note how this short PAS has been extended with a 60 cm sling. Using a longer PAS is better. |
|
|
|
|
Bringing up the second on a RUBB. The spare PAS links between the bolts can be used to hang the sacks, water and the lunch from, much like a daisy belay (see below). One issue with a RUBB belay is that because the PAS is girth hitched to the belayer, she can’t escape the system easily. Escape is possible but it will be slower: a quick solution would be to just cut the PAS at the harness, after the belayer secures herself using another sling. This is another reason the RUBB is only for advanced teams.
|
Belaying the leader on a RUBB. The end of the RUBB is used as a Jesus piece.
|
|
|
|
|
If the bolts are aligned such that failure might create an EDB, tie into the other bolt with the rope as well. The rope needs to be tight in order to avoid an EDB being created. This can be done as the second prepares to leave the lower belay and hence doesn’t waste time. (Note, if the right hand bolt blows whilst the second is climbing, their rope provides the dynamic element.)
|
An alternative: single rope Banshee Belay.
|
|
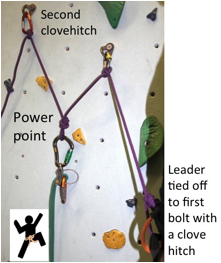
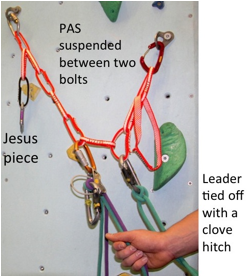
Given a three-person team with backpacks, water bottles, cameras and a good lunch there can be a lot of stuff to park at the belay, especially if the climbing is hard so packs are frequently removed. This can lead to a crowded powerpoint and shelf that can be dangerously hard to read, and could lead to someone unclipping the wrong person. A PAS gives you far more tie-in points, but is only useful for two-bolt belays. |
|
|
|
|
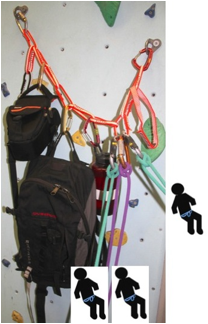
A daisy chain belay. A PAS-style daisy is used to link the two bolts. The belayer ties in with her rope and the tail (or any link) can be used as a Jesus piece. This solves the problem of the belayer being trapped in the RUBB and not being to easily escape the belay. Never use a traditional daisy for such a belay – the pockets aren’t strong enough. Like any belay rig, the daisy is carried with the Reverso and carabiners attached. |
Once the seconds arrive they too tie in with clovehitches on lockers. The remaining links can be used to hold cameras, sacks, water bottles and lunch, creating a “work-station” in the sky. |
14. Bunnies and Other Alternatives
|
The following images show three alternative ways the belayer can tie into the anchors. These have their fans, but are rarely seen in use – mainly as the methods shown above are better. One issue with them is that when you first get to the stance you need to immediately clip an anchor in case you fall off the stance whilst building the belay. These knots don’t allow you to do this—instead you will be fumbling around tying a complex knot whilst trying not to fall off the rockface and standing on the rope. However, the bunny ears and a triple figure of eight loop are good for fixed rap lines. |
|
|
|
|
|
A self-equalising figure of eight. This seems dangerous in that failure of one bolt could be catastrophic. COPYRIGHTED IMAGE
|
Double figure of eight loop (or bunny ears).
|
A triple figure of eight loop makes a neat way of belaying to three bolts without using a sling, or of fixing a rap line.
|
|
Here we compare the approaches seen above: The more stars the better. This is presented only as a way of thinking about belay types, not a recommendation of any particular approach, and others will disagree heavily, but it should make for some lengthy fireside debates at Camp 4. |
|
System |
Flexibility |
Speed |
Easy to read? |
Equalisation |
Stability under partial failure |
Easy of untying after being loaded |
Scalability |
|
Directly with the rope and clove hitches |
* |
** |
** |
*** |
*** |
*** |
*** |
|
Sling with an overhand on a bight (i.e. a powerpoint) |
*** |
** |
*** |
** |
*** |
* |
** |
|
Clove hitch on doubled sling |
** |
** |
** |
** |
*** |
*** |
* |
|
Sliding-X |
* |
** |
* |
*** |
* |
*** |
* |
|
Sliding-X with limiting knots |
* |
* |
* |
**/*** |
*** |
* |
* |
|
In-line overhand |
** |
** |
** |
** |
*** |
* |
* |
|
Alpine butterfly on 120cm sling |
*** |
** |
** |
** |
*** |
*** |
** |
|
PP on the rope |
* |
* |
* |
** |
*** |
*** |
*** |
|
Self-equalising figure of eight knot |
* |
** |
* |
** |
* |
*** |
** |
|
Bunny knot |
* |
** |
* |
* |
* |
* |
* |
|
Triple figure of eight knot |
* |
* |
* |
* |
* |
* |
* |
|
Banshee: clove hitches on rope |
* |
*** |
** |
* |
* |
*** |
* |
|
Banshee: sling with double loop knot |
** |
** |
** |
* |
* |
*** |
* |
|
PAS belay |
*** |
** |
*** |
** |
** |
*** |
* |
|
RUBB |
* |
*** |
*** |
* |
* |
*** |
* |
15. Belaying the Leader Directly From a Munter (Italian) Hitch
|
The idea of belaying the leader directly off the anchor rather than from the harness will seem alien to most climbers, however there are potential advantages, most importantly that the belayer is not flung upwards at high speed in the case of a high fall factor fall. If the second were flung upwards and is not using a Grigri he might not hold the fall because he might intuitively put his hands out in front of himself to safeguard himself. Secondly, it should make it much easier/possible to hold a fall factor 2 where the normal approach would leave the plate upside down with the brake hand below the plate - thereby stopping the plate from working.
The traditional solutions to the problem of a high factor fall near the belay are to use a counter piece to hold the belayer down (not normally possible with bolted routes), to place more runners during the first few metres of the pitch (not always possible), placing a screamer on the Jesus or other low piece or to use a chariot belay. It is worth noting that high effective fall factors can only arise if the falling leader has the chance to build up speed. On low angle rock this is unlikely.
Like much in climbing, the subject has not been researched as much as one would like and (fortunately) the field data from real high fall factor falls is not extensive. By belaying directly off the anchor, the dynamic element from the upward movement of the belayer will be removed, therefore the top piece will see more load and the leader suffer a more aggressive catch (unless a screamer is also used). This might be important if the pitch contains marginal pieces even high up on the pitch. Another potential problem with a direct leader belay is the possibility of the upper hand (the one above the Munter) being square against the rock. Hence belay gloves are recommended.
The climbing literature contains a few examples of complete belay anchor failure when the belay has been ripped from the wall and the two climbers being left suspended from a high runner. The reason they have survived is that the runner was stronger than the belay, and that the belay device was on the harness. If a direct belay fails, the belayer would be left controlling the fall by just holding the rope, this would be even harder. Hence direct belaying of the leader requires an anchor that is as strong in the upward direction as the downward and can really take a lot of pulling/vibration from any direction: i.e. good quality bolts. Yes, a direct belay might in general be better for the first few moves off the belay, but this might not be the place the climber falls. Do you really want to be belaying the whole pitch from one up-wards pointing cam (used as a counter piece or piece in opposition) in the belay?
There have been attempts to use belay plates (rather than a Munter) for direct leader belays (see for example the video and references in http://willgadd.com/anchor-clipping/), however, some would comment that such approaches have not been tested in the field to the same extent as indirect belays or direct belays using a Munter have, and there might be issues such as the plate becoming trapped and therefore not gripping. More extensive testing will be needed before using belay plates in this way becomes the norm. |
|
|
|
|
Belaying the leader directly using a Munter and banshee belay rig—this is a skill which needs practice for the leader to feel and be safe. The approach is very attractive if the belayer is much light than the leader. Belaying gloves are recommended. |
Don’t put the Munter on a long tail, you will lose control of it if the leader falls. |
16. Chariot Belays and Leading Through to the First Piece
|
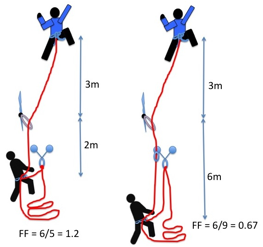
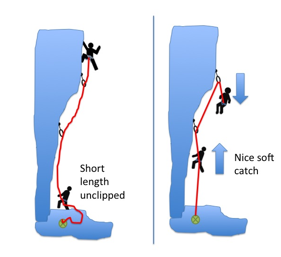
So how do we stop that high factor fall onto the belay? It is believed that such falls have led to the deaths of several climbers, so this isn’t fantasy land. Belaying with a Munter directly off the belay seems like a possible way of surviving such a fall, but is there a way we can simply avoid such high fall factors, and the associated forces. To create high forces, not only does the fall factor need to be high, the effective fall factor does as well. This means a clean fall is needed, which probably indicates steep ground above and below the belay. You also have to fall off. Although a fall at any point is always possible, this suggests we should be extra paranoid if there is a hard move above the belay, or lose rock.
Two solutions climbers have developed to deal with runout hard climbing above the belay are the chariot belay and simply not stopping at the belay but climbing through the hard section then lowering back to the belay after clipping a bolt above the belay. A chariot belay is created by the belayer hanging himself some distance below the belay on a tether formed using the rope. Clipping the first bolt on the next pitch leads to probably the quickest changeover when leading through of any method, and is discussed later. |
|
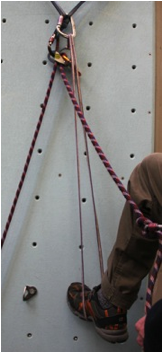
A chariot belay being used to almost halve the fall factor. Note how the anchor was clipped so the leader could top rope up to the anchor and place the Jesus piece. |

|
Leading through a crux directly above the stance to reduce what might have been a high fall factor to a very low fall factor. This is also a way of making a poor anchor a little less terrifying – assuming the high piece is solid. |
17. Belaying Off the Rope Loop or Belay Loop?
|
|
|
|
The belay plate can be attached to the belay loop or the tie-in knot. But if you attach it to the belay loop at least you won’t drop it when you untie. |
|
|
|
|
|
Alternatively, just attach it to both. |
|
18. Monster-Bolt Belays
|
An interesting question is why we place two or more bolts at the belay, rather than using the same amount of time to drill a deeper hole. Once upon a time pairs of anchor bolts were often placed a long way apart in what was hopefully different lumps of rock and gave some sense of backup. These were then linked with an old piece of rope, countering much of the increase in security we might have felt from having two bolts. We now tend to place a pair of closely spaced bolts and equip them with links for abseiling. It is not clear if one big long bolt is better or worse than two smaller ones drilled in the same lump of rock, by the same person on the same day possibly using the same poorly mixed glue and bolts. This has led some locations to favour one big bolt at belays.
In the book we describe an ultra fast method of tying into and belaying from single bolted anchors. |
|
|
|
|
Some monsters are out there waiting for you. Some are stronger than others (COPYRIGHTED Photos by Jim Titt). |
|
19. Direct Belaying of the Second
|
One of the key techniques used on long routes, and mentioned repeatedly in the book, is bringing up the second using a Reverso or equivalent in guide mode. This is termed direct belaying. Assuming the anchors are solid, this is safer, and allows the leader to drink, eat and re-organise the rack for the next pitch. It also allows two seconds to be belayed safely up the pitch at the same time. |
|
|
|
Reverso in guide mode (also called a direct belay). The rope has to be fed through the device in the correct way: see the manufacturer’s instructions. If the second falls, his rope will crush the brake rope and lock off. Although the manufacturers don’t recommend such devices as being hands free, they offer an extremely good level of backup compared with a normal (indirect) belay off the harness, especially after 18 hours of belaying and climbing. Note: such devices are not designed to belay a leader directly off the anchors. |
An example of direct belaying with the belayer tied in using the rope.
|
|
|
If you need to tie off the climber whilst direct belaying simply form an overhand and clip it to the rope.
|
20. Direct Belaying with a Grigri
|
Petzl does not recommend using a Grigri in guide mode, however some climbers find the approach very useful. If you do it make sure that the device will not be forced against the rock and fail to work, and that you set a redirect in case you need to lower the your second. Trying to lower someone without the redirect might be catastrophic as the rope will be exiting the Grigri in the wrong direction, therefore you need to have the redirect carabiner in place (but not clipped) before you start to bring the second up just in case you need to lower in a hurry. The redirect could be one of the anchor pieces, or the powerpoint can be used by hanging the Grigri on a lamb’s tail. Never park the second (see below) on a Grigri. Do not use this technique unless both climbers understand the risks. |
|
|
|
|
Grigri in guide mode. This is not recommended by the manufacturer, and there is the need to make sure the camming action is not compromised by the device pressing against the rock and that the brake rope is held firmly at all times. As pictured, the leader has failed to install the redirect required so that the second could be lowered – this is essential.
|
Tying off a Grigri in guide mode. The climber is on the rope exiting the bottom of the photo. This is only a temporary fix. If the rope slides and the knot meets the Grigri, the leader might need to set up a haul to undo the knot if the second cannot unweight the rope.
|
|
|
|
|
Grigri in guide mode set for lowering by passing the brake rope through a re-direct. Place the redirect carabiner when you hang the Grigri, but don’t place the rope through it until you need to lower. If you try and lower without a re-direct then you will kill your second. |
Close-up of a Grigri on a lamb’s tail with a redirect.
|
|
Plate hanging provides another reason for using direct belaying, particularly with a party of three. Rather than the second tying off when he reaches the belay, he simply weights the Reverso. This mean he will automatically be on a dynamic tether of exactly the right length. The approach does need a competent team as everyone needs to understand not to remove the Reverso until the leader has put everyone on belay: otherwise they will probably die. When using the approach it makes sense for the party to have cow’s tails or daisies ready for clipping themselves independently into the belay in case the Reverso needs to be removed. For example, if on the next pitch a team of three changed from climbing in parallel to climbing in series.
The approach works really well with a team of three, as often there isn’t room for three at the stance, so it can be better to park the third below the belay on another ledge and drop the ropes to them to sort out, while the upper second belays the leader on the next pitch. This requires a very long tether of exactly the right length. Plate hanging can provide this.
Note. As the second is left hanging off the Reverso, the team needs to carry 3 belay devices (2 of which need to be Reversos or equivalent) and need to remember to pass the one used to hang from on the last stance to the leader before she sets off. At some point you will forget to pass the belay device to the leader, so it would be good to learn to use a Munter as a direct belay. When belaying two seconds use a separate Munter and locker for each second. |
|
|
|
|
When using the belay device in guide mode, there is no need to tie the second off at the stance, just park him in the best place and tie a backup knot in the ropes. With two seconds, a knot and carabiner is placed separately in each rope. A backup knot is critical especially with two seconds as the movement of one second around the stance can semi-release the Reverso, allowing the rope to the other climber to slide and drop the climber the length of the rope. The photo shows a single second on twin roes and therefore a single backup knot, which is about to be clipped back to the climber’s ropes as in the photo to the right.
|
A correctly tied off Reverso. |
|
|
Parking the third: Plate hanging at a belay. (Cheddar Gorge, England.) Darren has been parked well out of the way as there wasn’t enough room on the stance for three. Note the backup knots. Never park a second on a Grigri.
|

22. Redirecting the Rope
|
Using a Reverso in guide mode with a fat single rope is a right pain as the rope won’t run smoothly through the device when it is hanging from a powerpoint, in addition some climbers don’t own a Reverso-style plate. The solution can be to run the rope from the belay plate or Grigri up to a redirect and then down to the second. On a hanging stance this will be much more comfortable and safer than an indirect belay. On a hanging belay it is also exhausting to keep lifting rope through the plate and over the belay to stop it falling down the cliff, and it is easy to end up with the plate not locked off some of the time.
The re-direct can be the powerpoint, a solid anchor piece, or the first piece on the next pitch if it is a solid bolt.
The approach is also often used by teams who like to belay on Grigris or who use the flying swap method described in the section on swapping over. |
|
|
|
|
Using a redirect to bring up the second to a hanging belay. This is less exhausting and more controlled than an indirect belay with the rope hanging downwards. It works well with either a normal belay plate or a Grigri.
|
Grigri with redirect off the first bolt of the next piece, used if the second will lead the next pitch.
|

23.Stacking the ropes at the belay
|
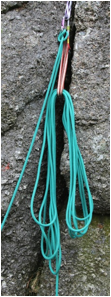
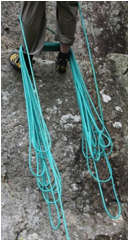
A common cry from the second is, “Hang on! I’m just sorting the ropes out”. Sort the ropes out before they get into a mess by stacking them neatly and in a way that means you focus on the belaying, not the ropes. When looping the rope over your legs, a sling or the anchor lines making each loop 15cm (6 inches) shorter than the last one can help stop the loops creeping inside of each other. |
||
|
|
|
|
|
|
|
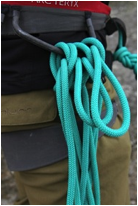
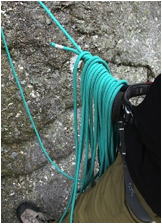
Various ways of stacking the ropes at a hanging stance. The last one shows the ropes carefully piled on the ledge: note the ropes have not been pulled through to separate them as this is not normally necessary in this situation, just flip the pile up side down if swinging leads. But is does require the second to stay ahead of the game and always ensure there is 10m of rope that can be paid out fast. |
24. Swapping Over
|
Here we show a few examples of how you might swap over at the belay whether you are swinging leads or leading in blocks. There are a great number of possibilities, however the message is that that the changeover should take very little time. The use of magic carabiners can save a lot of time.
It might seem we are over complicating things, but the evidence is that teams take far longer doing this than is necessary, especially when leading in blocks or if the stance is cramped. The kind of things that slow people down are: the leader not thinking where everyone is going to stand, not or sorting the remains of the lead rack out; the ropes getting in a mess; the rope being removed and reinserted into the belay device when it doesn’t need to be; someone temporarily tying into to lots of pieces when they don’t need to. This can all be summed up as: not having a plan.
The final example is the flying swap. On a bolted route this is a ridiculously quick method for those that like using Grigris. |
A. Swinging leads on a direct belay.
|
For most people swinging leads is the easiest way to make the change over smooth. In the images below the second ties into the powerpoint or one solid piece temporarily and the belayer gets to keep her belay plate by removing it from the powerpoint and putting it on her belay loop. The ropes are never removed from the belay device. The exact sequence will depend on how the leader tied into the belay. |

One way (of many possibilities) of swinging leads with a direct belay.
|
|
|
|
|
|
|
Swinging leads on a two-bolt belay when tied in using the rope (much the same as the drawings above). Note the draw that becomes the Jesus piece, and that the original leader tied into the TOP of the draw. |
|

|
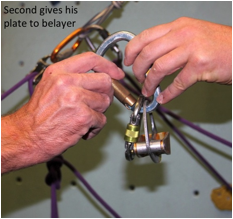
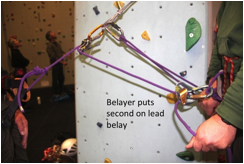
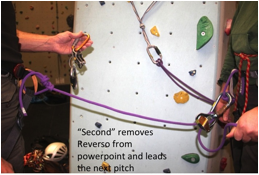
Trading plates is THE standard method when alternating leaders when at least one member of the team is carrying a Reverso-like device. The second arrives at the stance and plate hangs without a backup knot. The belayer takes the second’s belay device and puts the second on an indirect belay and ties an overhand below this belay device as a backup. The second is still hanging from the Reverso. When the re-racking has finished the second (who is now the leader) simply removes the Reverso that he has been hanging from, clips it to a belay loop and sets off.
This is all a lot more simple than it sounds, and the neat thing is that it is impossible for either climber to be left without a belay device. Again, the remaining rack needs to be clipped to the anchors so the new leader can re-rack, or placed on a sling-draw so she can place it around her neck.
|
|
|
|
|
|
|
|
|
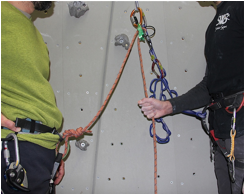
Trading Plates: a really neat way of swapping over. The belayer brings the second up and leaves him hanging from the Reverso. The belayer then grabs the second’s plate and puts him on an indirect belay with it. The second (now the leader) grabs the Reverso he is hanging from and sets off up the next pitch with it. A backup knot is only needed if the belayer is needed to help sort the rack, and can be either side of the second belay plate. |
|
|
Depending on the situation, it can be worth placing the Jesus piece before removing the Reverso. But remember, it is normally good to have the Jesus as high on the belay as possible to reduce the fall factor. |
C. Trading Plates – Combo Style
|
Some climbers have evolved the idea of the leader using a Reverso (in guide mode) and the second using a Grigri. There is a lot of sense in this. The images show one way of swinging leads when doing this which keeps everyone safe all the time. See Chapter 10’s supporting images for comments on abseiling if using a Reverso/Grigri combo. |
|
|
|
|
|
|
|
|
Trading plates when using a Reverso/Grigri combo. |

D. Trad Belay and Leading in Blocks
|
This is a situation where many climbers think the changeover will be slow or will be helped by using a powerpoint. However all that is needed is a few magic carabiners carried by both leader and second. (“Magic carabiners” are two or three spare snap gates used to clip into anchor pieces. Carrying them means draws don’t have to be cannibalised and the changeover is smooth and rapid |
|
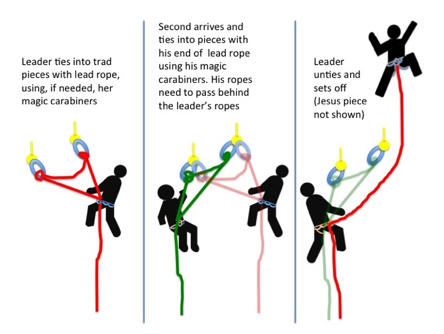
Changeover for a block lead when using an indirect trad belay. Note: there is only one rope in the images, two colours have only been used for clarity. |
E. Block leading on a bolted anchor
|
Clipping the bolts with draws can be useful if the bolts are small or when leading in blocks. |
|
|
|
|
|
|
|
|
Often it is difficult/impossible to get two carabiners through the bolt hangers. By using draws there will be a carbineer for both climbers. Again one of the draws becomes the Jesus piece – to allow this to happen, the rule is, as always, that the climber who is not leading the next pitch ties into the TOP of the draws. When the second arrives he must bring his ropes UNDER the leader’s when he ties in. |

F. Banshee Belay using the Rope and Leading in Blocks
This is about as complex as it gets.

|
Leading in blocks when using a rope-based banshee belay. This is best done with large lockers and once practiced is not as confusing as it looks. Although having 3 lockers in a line might seem heavy and excessive, 2 of them would be in most belays: one for the belayer to tie in with and the other to hang the Reverso from. |
7. Redirect Belay: the Flying Swap
|
|
|
|
Swapping over with a redirect belay: “the flying swap”. A well organised team should be able to achieve this in under two seconds on a bolted route! Whilst bringing up the second, the leader places any remaining clips in bunches within reach of the second as he passes through (here they on the left hand anchor bolt). The second grabs the bunch and climbs through, never stopping! In the left image the second is just reaching the top of the pitch. It can be seen that the leader preclipped the first bolt on the next pitch as the redirect before she lowered back down (if the rock isn’t steep she can normally do this by batmanning down the rope without communicating with the second). It is tempting to think that time has been wasted because of the original leader having to climb up to the bolt and lower back down. However, this is more than made up for by the fact that the new leader passes the belay in climbing-mode and is top roping. This feels more relaxed than, stopping, getting ready to go, stepping off the ledge into leading mode and facing a factor 2 fall until you can clip the first bolt, and relaxed means fast and smooth. |
|
25. Checking the belayer
|
|
|
|
Checking that an assisted belay device has been correctly threaded. It is important you slide your hand along the rope from the leader’s harness, otherwise you might have grabbed the wrong rope and not performed a check at all. Belays and rap stations also need to be checked by eye, when possible by both climbers.
|
|
|
|
|
|
Park with the brake on. Does your second keep the brake off (left) much of the time or on (right). Always have the break on except for the fraction of a second it takes to give slack or take in. |
|
|
The equalette is used by some climbers but has never become popular. This is probably because it doesn’t produce a powerpoint that is as intuitive or strong looking as that produced by simply tying an overhand in the strands of a cordelette anchor. It is likely to appeal to fans of the sliding-X as it often contains one. People sometimes use it when setting top-ropes from two or more bolts as the two strands within the powerpoint naturally suggest the use of two lockers (one on each strand), and two lockers to hold the rope is common practice when top roping. One advantage over a normal cordelette and powerpoint is that the main knots are permanent and hence don’t have to be worked undone at each stance if the anchors are always reasonably similarly spaced: e.g. bolted anchors. There are two standard ways of tying it, one where the main knots are left in place, and the more general case when they aren’t. |
|
|
|
|
|
If the main knots are to be left in place: Form the equalette by tying a pair of overhands about 25cm (10 inches) apart near the middle of a 7mm cordelette or a length of half rope. |
||
|
|
|
|
|
Link the pieces together using clove hitches and figure of eights. Using just clove hitches can make for excessive twists. Although cams have been shown in this image, pre-tying the main knots and leaving them in is only really practical on bolted anchors. |
If clipping just one carabiner into the powerpoint form it into a sliding-X. |
|
|
|
|
|
|
If placing two carabiners either hang the Reverso from the first (large) locker, or you can put both lockers through the sliding-X, although it is unlikely to slide much. |
||
|
|
|
|
|
Or put one locker on each strand. Note a real equalette needs to be made of 7mm cord or stronger (a length or half rope works well). |
When top roping put one locker through each strand. Personally this is the only time I (DC) would use an equalette. |
|
|
|
|
|
|
If all four strands aren’t needed shorten the equalette by clove hitching a double strand (note how the free end has been clipped into the carabiner), or use an overhand. |
||


|
|
|
|
When removing the knots between each belay, i.e. a trad belay. First place all anchor pieces. Clip your 7mm cordelette into the first piece and guesstimate where the sliding-X will be. |
Tie an overhand to one side of the X. |
|
|
|
|
And another overhand on the other side. |
Clip the remaining cordelette to the other pieces using figure of eights or overhands. Don’t expect the main overhands to be easy to untie after a hanging belay. |

27 Belaying a much heavier leader
|
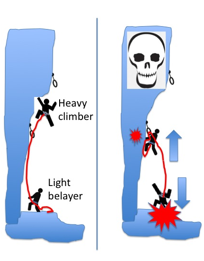
A question that often comes up is how to safely belay a leader who is much heavier than the second. Low on the pitch the fall factor is likely to be higher and therefore the belayer might be propelled up to the first piece and the leader take a ledge or ground fall. The second might also smash into the rock, get hurt and let go of the belay plate.
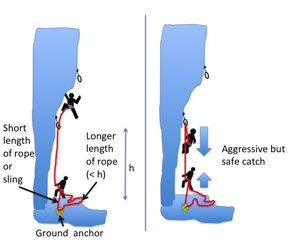
A sensible precaution, unless the belayer is very experienced in holding such falls, i.e. in being propelled, is to use a Grigri. Although this might slightly increase the impact force they will hopefully catch the fall (unless the cam of the Grigri jams in the carabiner of the first piece – an unlikely event). It is also important that the belayer stands under the first piece or they will be dragged along the ground and get hurt. (Standing away from the rock also means that their weight will be less effective in resisting the falling climber, and there will be more rope out – increasing the chances of a ground fall.) Another possibility is to use a ground anchor. In the following pictures the belayer is attached via his belay loop to the ground anchor twice: Once with a short length of rope (or a sling) and secondly with a longer length. The longer length needs to be less than the distance from the ground anchor to the first piece.
With this setup, the short length (or sling) will stop the second smashing into anything or being pulled into the first piece and the leader hitting the ground. Once a ground/ledge fall is not possible, the second unclips the short length from his harness. Now if the leader falls, a dynamic belay is possible, but the length of travel is controlled to keep everyone safe. The belayer needs to be able to unclip the short length easily, therefore clip it with a carabiner. If the leader is climbing above a ledge higher on the pitch, the belayer might have to clip back into the ground anchor, therefore rig it so this is easy to do. On single pitch routes, make sure that the second can disconnect himself from the system so when it comes to lowering the leader off there will be enough rope for her to reach the ground.
For teams experienced in the technique, an alternative to a ground anchor when belaying a heavy leader is to belay directly off the bolts using a Munter and gloves. |
|
|
|
|
|
|
|
As shown above, ground anchoring the second can be useful, but never ground anchor a Grigri when lead or top rope belaying, always clip it to the harness. |
|
|
|
Don’t use a Grigri attached to a ground anchor as it may not lock off.
|
28 Belaying Using a Munter (Italian) Hitch
|
Freedom of the Hills (8th Edition, p165) states that the Munter probably has a higher holding power than any belay plate. This makes sense because as the forces increase the hitch crushes the ropes on top of each other more and more, whereas for a belay plate as the force of the fall increases the ropes become thinner and therefore presumably the effectiveness of the braking reduces. This makes a Munter potentially good for high factor falls (wear belay gloves). However its main use is when you dropped your belay device. |
|
|
|
|
Direct belaying of a second with a Munter; two carabiners and two Munters, one on each rope, are used with double ropes. With two seconds, you would be much better off using a Reverso. (If lowering from a direct belay, use one carabiner and one big fat Munter with double ropes. Always use large locking carabiners, if possible HMS triple action twist-lock style ones – a Munter can undo the gate of a screwgate.
|
|
|
|
|
|
Indirect belaying with a leader with a Munter. The same technique is used to belay a second indirectly. With double ropes this is a right pain and is best only done in an emergency.
|
|

|
|
|
|
|
|
|
Belaying with a Munter is the opposite of using a belay plate (left letting out slack; right locking off). |
|


29 Lowering or Giving Slack with a Reverso in Guide Mode
|
If the second falls off whilst being belayed in guide mode, the device will lock off. If the second subsequently needs to be lowered the device then needs to be rotated to allow the rope to slip. This needs to be done in a controlled manner, or the second will be dropped down the cliff – hence it pays to practice this somewhere safe. A modern Reverso-style device has a small lump with a hole in it. Inserting a carabiner into this forms a lever, allowing the weighted Reverso to be rotated and released. If you have an older device without this feature, then it is probably worth upgrading. |
|
|
|
|
Giving slack with a Reverso when the device has little weight on it: just use your thumb. Note how the brake rope is firmly held.
|
If the second is fully weighting the rope use a carabiner through the tiny hole at the base as a lever, but be careful you lower rather than drop the second. Note again how the brake rope is firmly held. |
|
|
|
|
Until you are well practiced in lowering, consider using a Munter backup on your harness. Always do this if you are using a sling through the hole and a redirect and your body weight to rotate the Reverso.
|
Lowering one of two seconds—note how the rope to the other climber has been tied off. (It has been assumed that the second on the dark rope can keep his weight off the rope—otherwise the backup knot will slide into the Reverso and be very difficult to extract. If he can’t, you will have forget the backup and lower both seconds even if you don’t need to.
|
|
|
|
|
A Reverso without an eye for the nose of a carabiner is released by girth hitching a sling to the keeper loop, running this over a carabiner on the shelf and down to your belay loop. Dropping your weight will release the device. Note the backup Munter on the harness.
|
|
|
|
|
|
On a hanging belay it can be difficult to weight a sling clipped to your waist, or control the release it you do, so try a foot sling instead.
|
When lowering from a Reverso, BD Guide or similar device, never pull on the rope carabiner - this will kill your second as he will plummet the length of the rope. |
30 Keeping your shoes safe at the belay
|
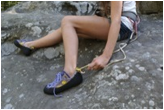
If your shoes are tight, you will need to take them off on the belays. It is a very bad idea to drop them. |
|
|
|
|
|
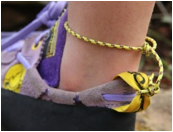
One way of removing your shoes without dropping them: clip a 60cm sling from your gear loop to the back of the shoe before you remove it.
|
And another way: a short length of strong elastic around the ankle.
|
|

|
Although most of the time on long routes carrying any extra gear on your backs makes the most sense, there are times when this becomes difficult. This is most likely either because you plan on taking bivvi gear, or because the route includes some hard climbing. The solution is either for the second to jug up using handled jumars, or for you to haul. Both have advantages and disadvantages. If the second jugs, he won’t get to climb. This might not matter if it is just for a couple of pitches, or if you are swinging leads. For jugging to work, you need to practice it or you will be far too slow. Jugging with a heavy sack on steep ground is a right pain. Hauling means the second gets to climb properly, but for it to work the ground either needs to be steep enough that the sack can’t get stuck or the line of the haul close to the line the second is following so he can unstick it. (One possibility is for the second to link the bag to himself with a length of 5mm cord, or the end of the haul line, so he can yank it from afar if needed and hope the cord doesn’t catch on a flake instead.) The main problem with hauling is the danger of pulling a rock off onto the second or another team. You also need a proper haul sack, as dragging a normal sack up will trash it unless the pitch is overhanging. Luckily there are several small haul bags on the market that are also reasonably ok for carrying the gear to and from a route.
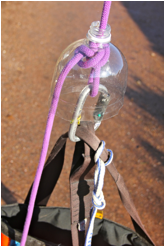
The following images show a couple of simple haul setups for a light bag. To learn how to haul a heavier bag, have a look at a book on big walling. The leader carries the minitraxion attached to the rope on the haul loop on the back of the harness with the cam engaged. When she reaches the stance she clips the minitraxion and the figure of eight on the end of the haul line to the powerpoint, or to a solid high piece. She then pulls any spare rope through the minitraxion and shouts “haul line fixed”. Once all the rope has been pull up and the second is sure the leader is ready he unclips the bag from his anchor and the leader hauls.
The haul bag should be equipped with a tether made from an old cow’s tail to hang it from the anchors and attached to the haul line with an auto-locker and an alpine butterfly protected by the top of a water bottle. Tuck the end of the haul line and the cow’s tail into the top of the bag when hauling. For a light bag, an old half rope makes a good haul line and will also double as the second rope when abseiling. By tying the bag in slightly short, the tail of the haul line can be used to lower the bag out so it doesn’t swing into space on steep pitches. |
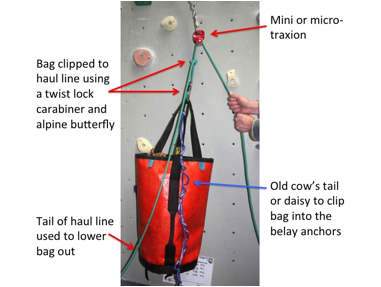
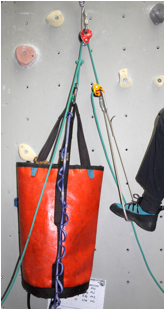
Haul setup for a light bag. The picture shows the bag just having reached the upper belay.
|
|
|
|
|
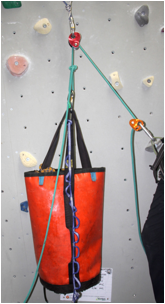
For a slightly heavier bag add another minitraxion or a ropeman on a foot prusik (to create a stirrup hoist), or clip it to your waist. |
Protecting the knot on a haul if the bag will be dragged over several lips. |
|
|
|
|
Lower the haul bag out on the tail of the haul line if the pitch heads to one side. The alpine butterfly can be moved along the line to give to required length of tail. (The lead rope is not shown.) |
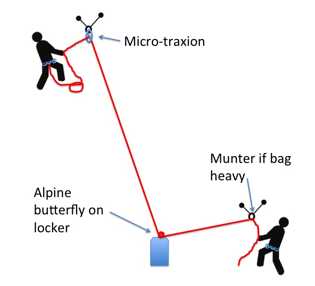
32 Location of the Jesus Piece
|
Where the Jesus piece (JP) is located can be important for the integrity of trad belays, especially with wires (stoppers). If the JP is higher than the anchors then the belayer might be pulled upwards above the anchors and rip them out (Figure A, below). If the JP is one of the anchors (B) this less unlikely, but the fall factor higher. If the JP is below the anchors (e.g. the powerpoint is used, C) it can’t, but the fall factor will be even higher. This suggests than the use of a counter piece attached to the belayer might be useful. As usual, there are no rules and everything is a compromise: the use of a counter piece on the belayer will reduce the dynamic belaying the mass of the belay introduces, making the effective fall factor higher. On the other hand, holding the fall could be made even more difficult if the belayer and belay device is dragged into the JP. |
|
|
|
|
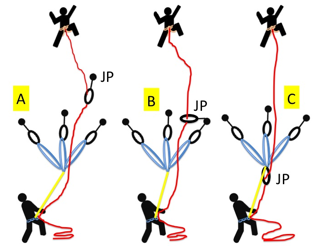
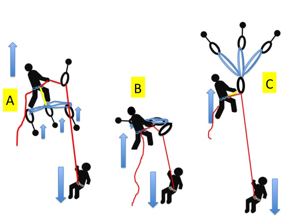
|
|
|
|
|
Some of the issues above can tamed by the use of a counter piece. Left: here the counter piece is clipped to the belayer to stop him being pulled rightwards in the event of the leader falling. Middle: the counter piece is simply a piece in opposition to one of the nuts in the belay and placed to ensure the belay stays put if an upward force is applied. Right counter piece in a cordelette belay. In the middle and right image, the counter piece is to protect the belay, not the belayer, who might still be flung upwards. |
||


|
Rarely discussed in climbing is the difference between the actions of gravity and inertia. If the first piece is directly above the belay and the leader falls the belayer will be pulled upwards, but gravity will be acting on the belayer to limit how fast and far he travels. Hopefully this will result in a soft catch for both belayer and climber. This is a gravity-limited fall.
If however the first piece is off to the side but the climber has gained height after this piece or a subsequent piece, gravity will not slow the second when the leader falls. The result will be a more aggressive catch and the belayer might well be travelling fast when he comes tight on the belay and therefore let go of the rope. This is an inertia-limited fall, and will be at its most serious for the belayer if they are much lighter than the leader. In some drop tests reported by Petzl, they had to stop using a set up where the Jesus piece was off to the side as the belayer was suffering too much. Note: this is only occurs if the leader gains height. On a purely traversing pitch this is not an issue unless the distance between the protection is great. Nor is it likely to be if the leader gained height after a long traverse with many pieces of protection, as the drag of the rope on the rock will limit the force on the belayer. |
|
|
|
A: a gravity-limited fall. B: an inertia-limited fall. Be careful of the latter. |

33 Avoid snap-gate to snap-gate (or locker to snap-gate)
|
|
|
|
|
|
Try not to clip snapgates to one another or to locking carabiners if they are securing anything more important than your lunch—they can twist undone. There was a bit of a fashion for using pairs of carabiners as short draws once upon a time, and most of the time this worked fine, however if either one of the carabiners isn’t free to rotate, or the carabiners can find themselves in strange orientations, one might force the other open in much the same way as back clipping can unclip the rope. On the other hand, if you have run out of slings and draws, using two snapgates on a peg or bolt might be better than using just one, as this might reduce the chances of the carabiner twisting open on the bolt, and will reduce drag. |
|||
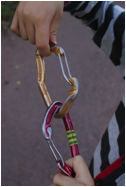
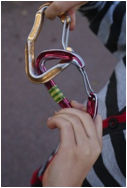
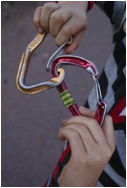
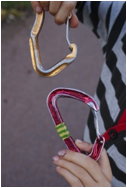
|
Detailed instructions on how to use a Grigri can be found on Petzl’s website and you should read them if you plan on using one, however the following images cover two points where mistakes are common. (Other devices operate in other ways – so always read the instructions, and don’t just do as you see other climbers do.) |
|
|
|
|
|
Most of the time belay just like you would with a belay plate with a hand securely on the brake rope. |
If you need to give slack rapidly and can’t do it as you would with a belay plate or by temporarily moving closer to the wall, “float” the Grigri off the index (fore) finger of the brake hand whilst still keeping the hold of the rope. Place your thumb on the cam and rapidly pull the rope through the device. Remove your thumb immediately and return to the normal belaying position. Whilst your thumb is on the cam the device will not catch a fall. |
|
|
|
|
|
|
Never let go of the brake rope or wrap your fingers around the bottom of the device. Here, the belayer has done both. |
Be careful not to stop the cam activating by taking the force of the fall through your upper hand. Your upper hand needs to either let the rope slide through it without friction, or the hand has to move up with the rope, or it needs to let go. One way of ensuring you don’t grip too hard is to only grip with the ends of your fingers and thumb. Your lower, brake, hand should grip normally and must never let go during the fall (and it shouldn’t let go after either, although you see the latter often at the crag). |
|

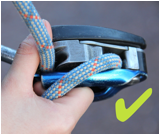

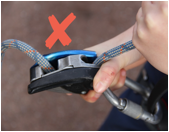
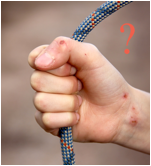

|
Try to avoid clipping more than one “thing” into a carabiner at the belay. This will lead to a twisted mess and make it hard to cleanly unclip one of the “things”. The most common mistake is to clip the rope into the first piece to protect you when building the belay but not to add a second carabiner for the cordelette, or the sling used to take the Reverso. The sling then becomes entangled with the rope making the changeover a mess. |
||
|
|
|
|
|
|
|
|
|
When clipping carabiners to things clip them so they end up gate out and down. This makes it much easy to clip the rope, heavy sack or anything else into the carabiner. Note this doesn’t matter on the top carabiner of a draw or similar, as the rest of the draw is already clipped to the carabiner. |
||
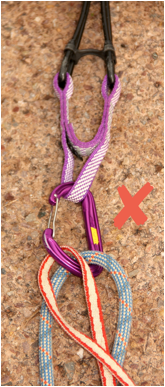
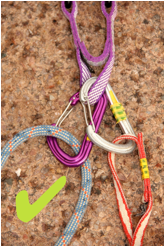
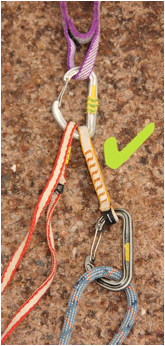
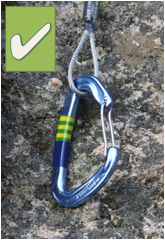
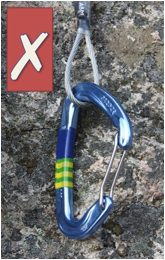
|
Many of the techniques discussed in the book might best be practiced on top rope. Setting up a top rope isn’t exactly hard, and how you do it will depend on the anchors, but just like abseiling, plenty of accidents have occurred. It will only be safe if: the anchors are solid, no one trips over the rope at the top of the crag (don’t place it where hikers might walk), you don’t step off the top by accident whilst rigging it (once you have one anchor in place clip the rope from the anchor to you with a Grigri in case you slip), the top rope can’t pull any blocks off even if one anchor fails (make sure the top is solid). The following images show two ways of setting one up. Other obvious ways would be to use a cordelette extended over the edge with some static line, or rapping down to a bolted anchor. The basic principle is to get the main lockers over the edge of the cliff to reduce friction, reduce wear on the rope and to reduce the chances of the moving rope dislodging anything. Consider padding the edge (you can buy purpose-made rope protectors). As you might be playing on it for a long time the knots can become difficult to undo, so use alpine butterflies. |
|
|
|
|
|
One of many, many, ways to set a top rope. Here a length of static line or climbing rope has been used to place the lockers over the edge. The system is highly redundant: two anchors, two butterflies, two lockers. Using a static rope for the rigging line at the top of the cliff reduces movement and wear.
|
|
|
|
|
|
Close-up of the two butterflies – using two makes it less likely that an edge could fatally cut the rope. |
|
|
|
|
|
The Pex Hill method provides a neat solution to getting the main lockers in just the right position using only a single rope as both the rigging rope and the top rope. The climber is belayed by a 2:1 advantage, making it a useful system if the belayer is much lighter than the climber. It only works if the height of the crag is less than 1/3rd the length of the rope. A clovehitch rather than an alpine butterfly can be better on the tree nearest the edge, as this can make it easier to get the rope between the two trees tight.
|
|
|
|
|
|
Pex Hill method of top roping. The climber’s harness is on the left. The belayer’s top hand is shown on the right. |
|
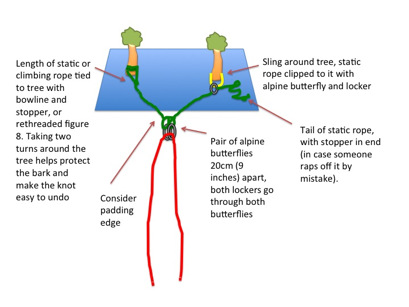
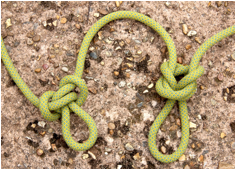
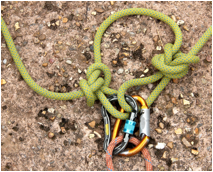
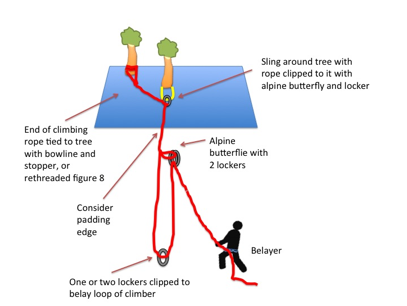
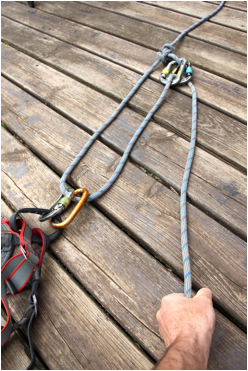
|
Ropes keep getting thinner, and some climbers have started to question whether normal belay plates are capable of providing enough friction on long, high fall factor, falls. Even when the plate says it is capable, most climbers won’t have held such a fall nor understand that if the rope travels through the brake hand they might well get burnt. One possible solution is to use the technique used to add friction to a rap by using two lockers of the same size.
The biggest problem is that the manufacturers have not recommended this technique in their literature and hence we don’t know if there are any unintended consequences. So it is a use-at-your-own-risk approach, so test your device first somewhere safe and with a backup. It is important not the use the approach with any belay device that relies on the locker being forced into a slot or niche – i.e. an assisted device. (For example: the Click-up, Alpine-up, Smart, Jul, etc.)
One situation where it would seem to be very sensible to use the approach would be when, because the other rope was lost or damaged, one had to climb on the single strand of a twin or half rope
|
|
|
|
|
|
Belaying with a single half rope. It is critical that both ropes are clipped to the belay loop (left image), or you will be reducing the friction, not adding to it. The right hand image shows how not to do it. |
|
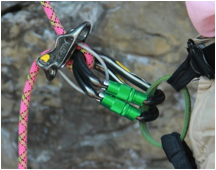
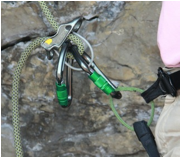
Please use the following links to buy the book: Amazon USA (kindle) / Amazon UK (kindle) / itunes / kobo
v 24 November 2014
--------- multipitchclimbing.com ---------