--------- multipitchclimbing.com ---------
|
This site presents the images from the ebook High: Advanced Multipitch Climbing, by David Coley and Andy Kirkpatrick. In order to keep the cost of the book to a minimum most of these were not included in the book. Although they work best when used in conjunction with the book, most are self-explanatory.
Please use the following links to buy the book: Amazon USA (kindle) / Amazon UK (kindle) / itunes / kobo |
|
At a guess this will be the least read part of the book. Climbers are strange beasts, we know the sport is dangerous, and that the danger is one reason we do it, but we act in a way that says “it won’t happen to me”. This is in direct contradiction with all the cams etc. we carry and plug into cracks on easy routes and then don’t fall off onto. We protect trad climbs most of the time not because we think we will fall, but just in case we do. If you climb long enough in places where you can’t just lower the climber to the ground, your time will come.
Although it is tempting to think that you will be able to come up with a solution if something serious ever happens, this is unlikely to be the fastest approach, nor is it sensible to try and manufacture knowledge under stress, when it is getting dark and the rain has just started. You need a well-stocked toolbox of practised pathways to a solution which you can build off. The first skill will be a working knowledge of first aid. There are plenty of books and general courses on this, as well as outdoor activity focused first aid cources.
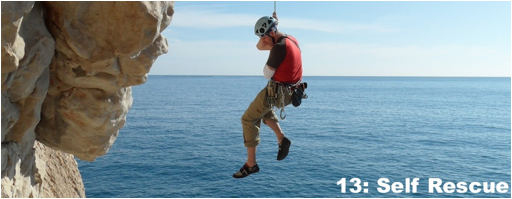
This chapter explores what you can do if something unfortunate happens to you or those around you. It is presented as a series of scenarios, such as an injured leader or an unconscious second and covers both situations where safety is within a rope’s length and when it isn’t. The two key skills you need to learn is how to move the weight of the casualty on and off the anchors, and how to get them up or down the cliff efficiently.
For a more detailed analysis of the topic David Fasulo’s Self Rescue is recommended (get the latest edition).
A self-rescue can often mean pulling a casualty around roughly and dragging them across the rock, so don’t try a self-rescue if you think there might be a spinal injury. |
|
Contents 1 Basics (A. French or Italian? B. The Shelf C. Emergency Power Points ) / 2 Tying Off a Belay Plate or Grigri / 3 Escaping the System (A. From a Direct Belay B. Indirect Belay: Anchors in Reach C. Indirect Belay: Anchors not in reach D. No slings or prusik cords E. Indirect Belay and Redirect F. From a DIL belay)/ 4 Improvised Harnesses (A. Chest Harness B. Waist Harness) / 5 Spiders and Munter tails / 6 Lowering a Climber (A. From a Redirect B. From a Floating Plate C. Lowering a Big Load D. Lowering Past a Knot) / 7 Rescuing the Second (A. The Drive-by Pick Up B. Counterbalanced Lower) / 8 Leader rescue / 9 Traverses etc. / 10 Hauling – the theory / 11 A hauling system that actually works / 12 Other Points (A. Belaying with a Munter B. Dealing with a Damaged Rope C. One or Two Carabiners? D. Calling the Helicopter E. Carrying the Casualty Out) |
|
|
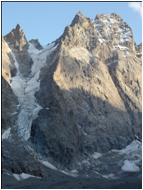
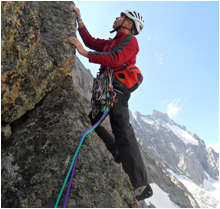
Big Tower is Watching You (the sunlit arête and the face below it), Glacier Noire, Ecrins, French Alps. At 800 m long and in an alpine environment, even on a bolt protected route like this you need to be able to sort yourself out if it all starts to go wrong. |
|
Most of the information on self-rescue has as its focus the training of aspirant guides etc. This means the assumption is often that it is the second that will need rescuing - as the guide will be the leader. For most of us this means it might be incorrectly focused, as, unless you knock some rocks on the second, it is much more likely that it is the leader who will be in trouble after taking a lead fall.
When it comes to non-life threatening situations, getting the leader and second over the crux are key gorilla aid skills (see Chapter 11).
The assumption also seems to be that the second is only hurt whilst seconding the pitch and hence the rescuer is at the belay. This is possible, but as seconding normally takes less time, it is more likely they will be hit whilst the leader is on lead. (Often it is the leader who pulled the rocks/ice off anyhow.)
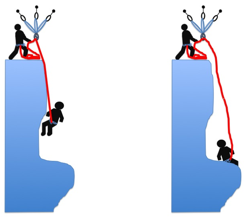
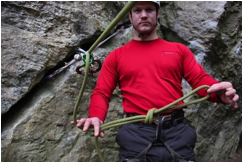
Hence two key scenarios worth thinking about are:
1. Rescuing the leader - this will mean the belay is being pulled upwards, not downwards, and the weight of the belayer is part of reason the belay doesn’t pull from the wall. Hence, you might have to partly rebuild the belay, or keep your weight on the rope at all times - you can use a prusik attached to the leader’s rope and clipped to you whilst you sort something out to achieve this. (This scenario is another reason trad belays are often best if they are built to take an upwards force.)
2. The leader being on lead and needing to rescue the second – who probably can no longer use their belay device to belay the leader, or prusik.
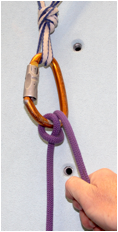
Properly the central technique in self-rescue is the use of a releasable system to hold the weight of a climber. This might be for example when escaping the system or when abseiling past a knot. Two approaches to this have become popular: the simple French prusik and the more complex prusik-Munter-mule-overhand (or PMMO). The book covers both of these approaches. But out there on the cliff you will rarely find either is needed most of the time. To unweight the belay device most of the time all that is needed is to lower the casualty (who might be the leader or second) to a point where they can take their weight off the rope for a few seconds (don’t forget to tie a backup knot first). In Fasulo’s book this point is emphasised repeatedly: don’t get all technical with the knots unless you have to – just use the terrain.
If possible practice most of the skills discussed at your climbing gym (wall) with appropriate backups and near the ground—belay sacks make great “casualties”.
Although holding a climber via a releasable system is a key skill, it often isn’t necessary. Unless the terrain is overhanging it will often be better to park the climber on a ledge, or ask her to take her weight off the rope for a couple of seconds. This will simplify most techniques considerably. When doing this a backup knot of some form will be needed.
The classic escaping-the-belay sequence in most books has the aim of leaving the casualty suspended from a releasable system and the healthy climber with her belay plate so she can abseil if needed. I (DC) have no idea why the books don’t point out that one can always abseil with a Munter hitch (assuming you have a spare locker), so you don’t normally need to retrieve your belay plate. A locked off belay plate in guide mode is also, by definition, a releasable system. So when escaping the system from a direct belay, consider whether it is worth spending the extra time taken to extract the Reverso from the system. In addition, if the casualty is incapable of abseiling unaided, you will only need one Reverso for the rest of the rescue – so use theirs! |
|
|
|
|
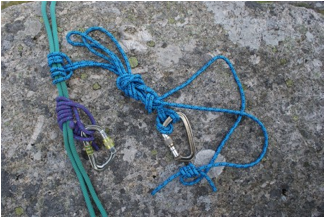
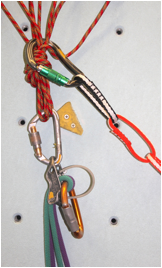
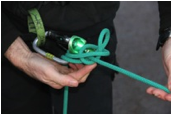
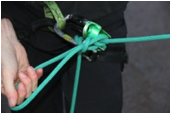
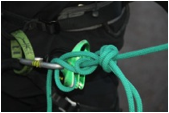
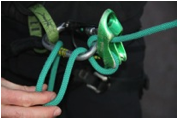
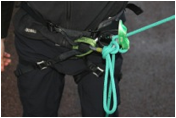
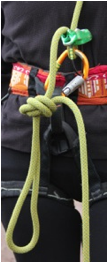
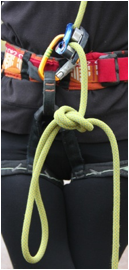
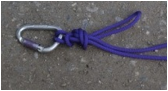
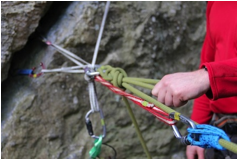
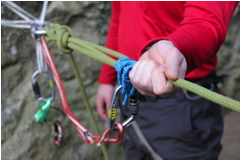
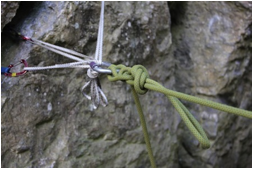
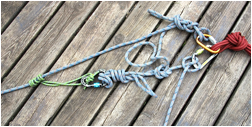
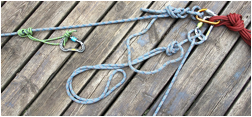
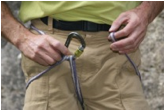
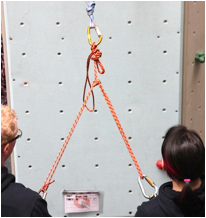
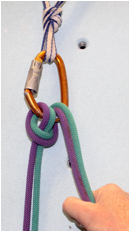
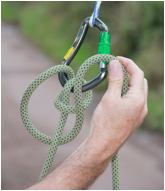
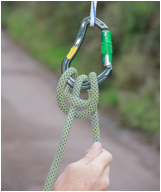
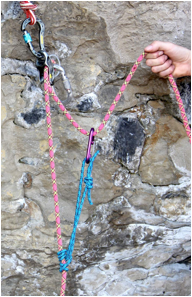
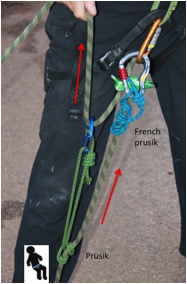
The two standard ways of forming a grab that can be released under load are a French prusik (bottom) and a PMMO (top). |
However, the mariner-overhand can also be useful. Don’t forget the finishing overhand. |

B. The Shelf
|
It is easy to run out of space in the powerpoint during a rescue—consider using the shelf to give yourself more space. Never use the “shelf” above a clovehitch powerpoint: if the main carabiner is removed the shelf might no longer exist – this could have fatal consequences. |
|
|
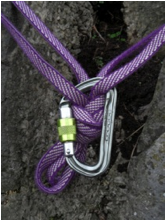
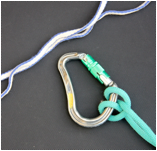
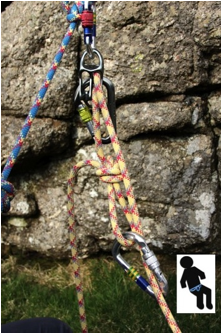
A shelf in use. |
|
|
|
|
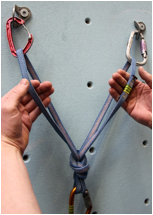
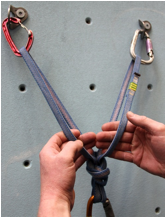
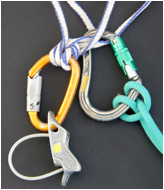
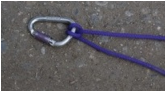
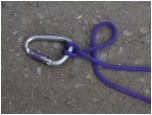
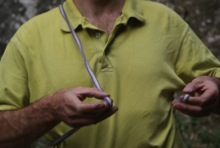
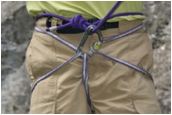
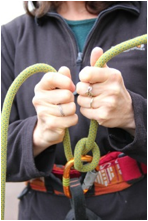
Identifying the shelf—run your fingers down from the anchors to separate the strands. |
|
|
|
|
|
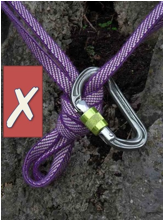
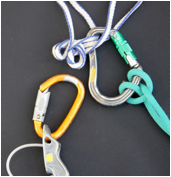
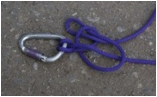
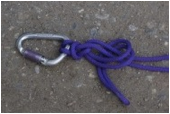
Left a correctly identified shelf. Right a misidentified shelf—if either anchor fails the result is likely to be catastrophic. A carabiner should be left in the powerpoint when the shelf is in use to guard against the possibility of the overhand pulling through. |
|
|
|
|
|
|
Never use the “shelf” above a clovehitch “powerpoint”. Once the main carabiner is removed the shelf might self-destruct. (What happens to the shelf when the clove hitch is removed depends on how the clovehitch was tied: you might be left with a sliding-X, or with the carabiner that was on the shelf attached to nothing—this could be fatal.) |
||
C. Emergency Power Points
|
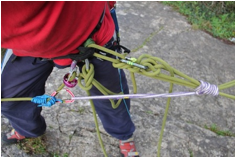
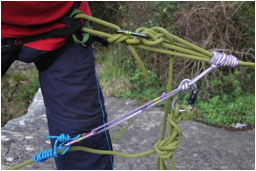
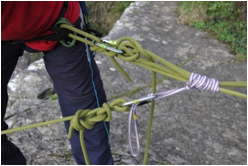
If the belay has not been built using a cordelette (or isolation loop) to form a powerpoint, you might need to create a powerpoint in order to make the rescue easier to mount. If possible do this using slings, if not, use the rope. In general, using slings will be better as you can then fully extract the rope so you can use it to rap to the other climber, or set up a retrievable abseil. However, you might have been left without enough/any slings, or the pieces might be too far away to connect using slings. If you do have a sling (your long second prusik loop might be suitable), then a temporary powerpoint can be built by wrapping the anchor lines with a Klemheist.
Whether you are using slings or the rope, try and place new, separate, carabiners rather than the ones originally used at the anchor pieces. This will make extracting the rope if you need to easier.
The best way to use the rope to form a powerpoint will depend on how many anchor pieces there are. You might end up with a lot of knots at the powerpoint, so it might be better to form the powerpoint on a locker and then use another locker clipped to the first one to hang the Reverso / garda hitch / Munter off. This ensures the knots forming the powerpoint can’t slip out off the main locker, because once formed you won’t need to open it again. An alternative is to use a figure of 8 on a bight an build the powerpoint off this.
Use a of a DIL belay removes the need to build an emergency powerpoint from the ropes, as a DIL includes one.
With a bolted belay formed of a pair of solid bolts, it may prove quicker to simply use one of the bolts as a powerpoint and clip the bolts together with a sling as a backup (i.e. make it Banshee-style). |
|
|
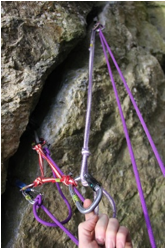
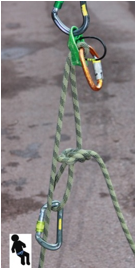
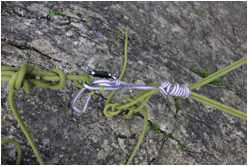
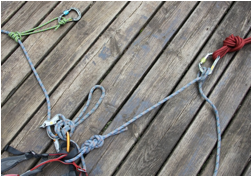
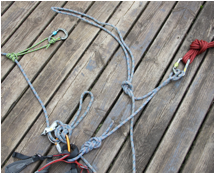
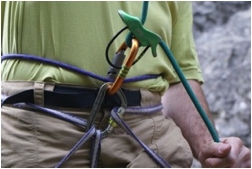
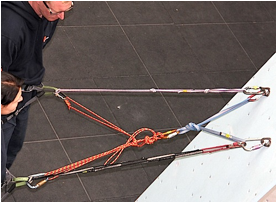
A complex emergency powerpoint built from slings. Note, the climber has clipped the slings to the anchor pieces using new carabiners rather then used the ones the belay was built from. This will make it easier to extract the rope if needed. |
|
* awaiting image |
Emergency powerpoint built from the rope and a figure of 8 on a bight. Note the stopper on the figure of 8, as the figure of 8 might be cross-loaded and potentially pulled apart. |
|
|
|
|
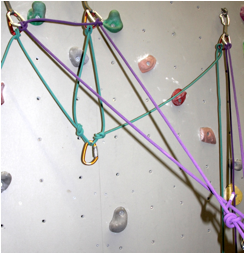
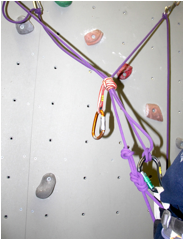
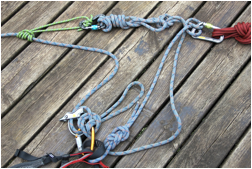
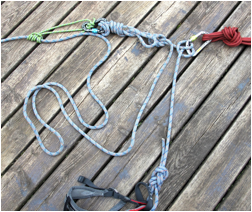
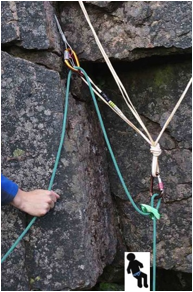
One way of forming an emergency point powerpoint built from the rope when the anchors are within reach. Left: climber tied into the anchors; right powerpoint built. Note, there is only one rope – different colours have been used only for clarity. The climber may have to escape the system first in order to reach the anchors. In this case this would probably be done by forming a temporary powerpoint formed from a sling and Klemheist around the original anchor lines (see images below). Note: use a of a DIL belay removes the need to build an emergency powerpoint from the ropes, as a DIL includes one. |
|

|
|
|
|
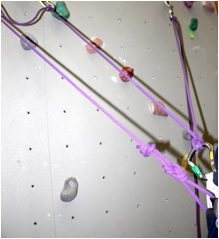
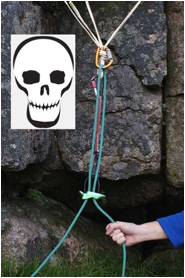
An emergency powerpoint built using a Klemheist around the anchor lines. This has the advantage that it can be achieved without needing to reach the anchors. |
|
2. Tying Off a Belay Plate or Grigri (key skill 1)
|
|
|
|
|
|
|
|
|
|
|
Getting hands free with a belay plate: method 1 |
|
|
|
|
|
|
|
|
|
|
|
Getting hands free with a belay plate: method 2 |

|
|
|
|
|
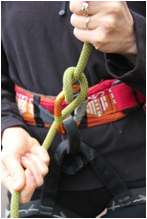
If you know the climber can easily keep her weight off the rope, an overhand on a bight can be used to get hands free temporarily. |
Hands free with an indirect Grigri—just tie an overhand.
|
Hands free with a Reverso in guide mode. |
|
|
|
|
|
|
|
|
|
Getting hands free when belaying with a Munter or when securing the rope in a releasable way to the powerpoint. To tie off a Munter hitch use an MMO. The carabiner might be on the powerpoint, or your belay loop. |
||

3 . Escaping the System
A. From a Direct Belay (key skill 2)
|
|
|
|
Get hands free by tying an overhand in the brake rope.
|
Put a French prusik (or PMMO) on the casualty’s rope and link this back to the shelf or powerpoint.
|
|
|
|
|
Tie a MMO on the rope onto a locking carabiner at the shelf and remove the Reverso.
|
Tighten the MMO to take up the slack that was in the Reverso. |
|
|
|
|
Release the French Prusik (or PMMO). |
Job done. You have your belay plate and the casualty is tied off on a releasable system. However, you could have just tied off the Reverso in step 1 and used a Munter if you need to abseil.
|
B. From an Indirect Belay: Anchors in Reach
|
|
If the anchors are within reach and you don’t have a powerpoint, build one out of slings. Then link the casualty’s rope to it with a sling and French prusik. Then transfer the casualty’s rope to it using an MMO and remove the belay plate using the same approach as for a direct belay. If the powerpoint’s carabiner might suffer a three-way load use one carabiner on each arm of the powerpoint. |

C. From an Indirect Belay: Anchors not in Reach (key skill 3)
|
|
|
|
Anchors too far away to escape easily?
|
Get hands-free.
|
|
|
|
|
Wrap a Klemheist around the anchor ropes and attach this to the casualty’s rope with a French prusik (or PMMO)
|
Attach the rope to the Klemheist using a MMO and remove the belay plate. (Depending on what you formed the Klemheist out of and what you used to connect it to the French prusik, you may have to place an overhand in the sling, as here, to act as a “shelf” for the MMO.)
|
|
|
|
|
Tighten the MMO to remove the slack and remove the French prusik (or PMMO).
|
Untie yourself from the system. The casualty is now hanging from the Klemheist (note the leader’s tying-in knots and locking carabiner have been left in in case the Klemheist slips). You are only halfway there. You now need to build a true powerpoint near the anchors and shift the casualty’s weight onto it. This is done as before: place a French prusik on the rope to the casualty and link it to the new powerpoint. Place an MMO at the new powerpoint. Remove the first MMO and tighten the new one then finally remove the French prusik. (A little time can be saved by not removing the French prusik after you escaped the system.) By now you maybe wishing you had used a DIL belay. |

|
Some good ideas of what to do if you need to prusik up the rope but you don’t have a Reverso or any slings on you, or if you need to escape the system without using a sling or length of cord can be found here: http://www.mountainproject.com/v/prussiking-without-any-slings-or-cords/108353040. These use special prusik knots made from the climbing rope.
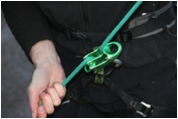
The following images show one approach you can use when you only have your chalk bag cord, and is hence useful for when climbing bolted routes with the minimum of equipment. Here a mariner hitch is used to extend the short holding prusik back the anchors because the belayer didn’t have a long sling to spare. The rest of the escape is as normal.
|
|
|
|
|
|
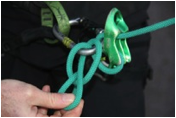
Start by tying of the belay plate as normal and placing a prusik (your chalk bag cord) on the casualty’s rope. |
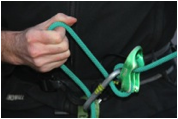
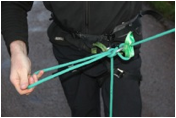
Using the spare rope on the slack side of the anchor, form a large bight of rope with an overhand. |
|
|
|
|
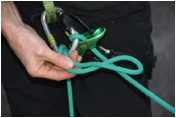
Use the bight to form a mariner or munter- mariner-overhand at the prusik. (As a mariner can slip, a backup knot is recommended.) |
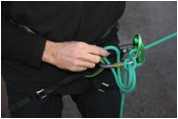
Free the belay plate. |
|
|
|
|
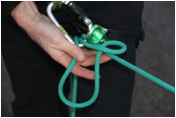
Tie the casualty’s rope off to the anchor with an MMO. |
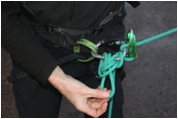
Remove the mariner. |
|
|
Job done. |

E. From an Indirect Belay and Redirect
|
1. Get hands free by tying off the plate. |
|
2. Put a French prusik (PMMO) on the rope to the injured climber below the redirection point and clip it to the redirection point using a sling. |
|
3. Move your body to let the French prusik (PMMO) take the weight of the second. |
|
4. You now need to create enough slack to tie the rope off with a MMO as usual, but ensuring that the French prusik (PMMO) is backed up whilst you do it. So, untie the belay plate lock off, let 2m (6ft) of slack through the plate and lock off the plate once more (an overhand knot in the rope will be fine). Tie a Munter on the redirect’s carabiner and take in any slack to the fallen climber through it |
|
5. Tie the Munter off to form a MMO, remove the rope from your belay plate and release the French prusik (PMMO). |
|
6. Note, if the redirect is the first bolt/piece on the next pitch it is unlikely you can reach it from the stance. In which case you will have to treat as an escape from an indirect belay (above). |
F. When using an isolation loop (i.e. a DIL belay)
This is so simple, it brings into question why the DIL is not more popular when belaying from the rope.
|
|
|
|
1. Tie off the plate with a backup knot. |
2. Undo your tie-in knot (leave the figure eight in place as a stopper knot in case the isolation loops rolls (unlikely). Job done! (Use a Munter if you need to abseil.) |

|
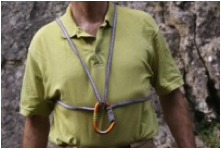
There is always the chance you will forget your harness or drop it. You might also elect to go without one if you only need one for a couple of easy pitches during a day or two of travelling in the hills. Knowing how to make a chest harness is highly useful if you are dealing with a casualty. |
A. Making an Improvised Chest Harness
|
|
|
|
|
|
|
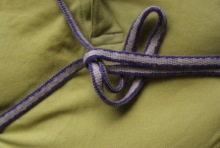
Parisian Baudrier using a 120cm sling.
|
|
|
|
|
|
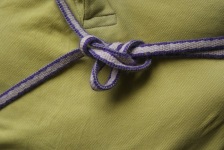
Use a figure of eight chest harness for a larger casualty.
|
|
|
|
|
|
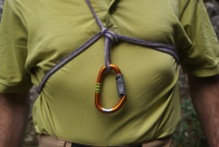
To keep the casualty upright don’t tie him to the rope: use a French or normal prusik, or clip him into the midpoint of his daisy. His weight should still mainly be on the waist harness: the chest harness is just to keep him upright – don’t hang him off it. |
|
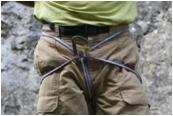
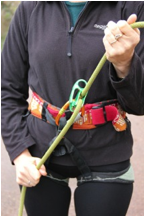
B. Making an Improvised Waist Harness
|
|
|
|
|
An improvised waist harness made from a 120cm sling. The carabiner is clearly crossloaded – this maybe isn’t ideal, but failure of this still leaves the rope tied around the waist. |
||
|
|
In abseil mode. Note a length of cord has been used as a backup because of the possibility of falling out of the harness and because of the three-way load on the lower carabiner. |
|
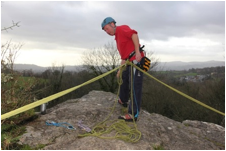
|
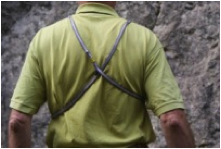
If you look carefully, you can see the climber is wearing an improvised harness. This was on a 20-pitch route with 20 raps, which shows it is possible, even if not sensible. (Ecrin, French Alps.) |
5. Spiders and Munter tails
|
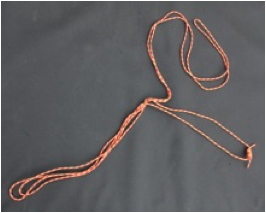
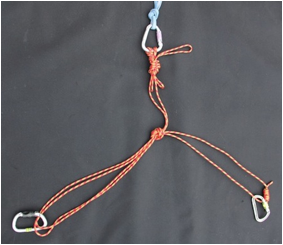
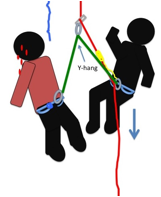
If you need to make a sequence of raps with a casualty one of the difficulties will be getting him off the rap rope and onto the next station and off the station and back onto the rap rope. A person weighs 60kg plus; this makes moving him and not dropping him very difficult if he can’t help himself. If you have rapped with a couple of full haul bags you will understand the problem. You therefore need some form of releasable tail that can be used to tie the both of you into the anchors, yet is releasable under load when you start the next rap. You also need a Y-hang for the rap itself. A single cordelette can be used to perform both these functions in a way that will speed the rescue considerably. You still each need to clip into the anchors at each station with an unweighted second tether (a cow’s tail) in case you mess up. Start by laying out the cordelette as shown in the first image |
|
|
|
|
|
|
|
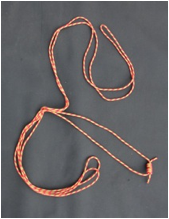
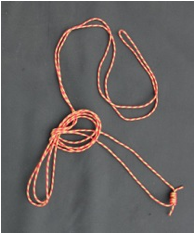
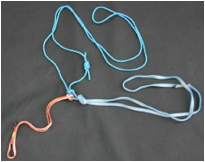
Forming a rescue spider. |
|
|
|
|
|
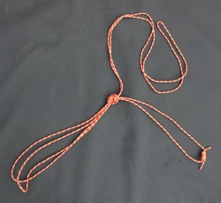
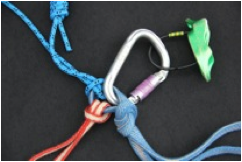
Rescue spider is attached to an anchor with an MMO. The other locking carabiners are clipped to the climbers’ harnesses. |
Attaching the abseil device to the spider—it is clipped through the loops attached to both climbers, i.e. across the overhand. This is the same as for a Y-hang. |
|
|
|
|
If you don’t normally carry a cordelette, you can make a make a rescue spider from two slings and a 3m prusik loop. Or in many other ways. |
Attaching the abseil device |
|
|
|
|
A rescue spider in use. Note the cow’s tails used as a backup in the right-hand image. In order for the system to be releasible, it is important the weight is on the spider, not on the cow’s tails! |
|
|
|
If you don’t fancy using a spider, a long prusik can be used as releasable tail for the casualty here a MMO has been used). Make sure the weight is always on the releasable tail, not the cow’s tail backup! |

6. Lowering a Climber
|
It is normally much better to head down with a casualty than up, so knowing how to lower someone is very useful. It is often useful in normal climbing situations as well, for example when it is extremely windy the first person might be better off lowering than abseiling, unless the rock face is loose.
You can lower straight off a redirect, and this works fine if the person doing the lowering is roughly the same weight or heavier than the person being lowered. A French prusik can be placed below the belay plate as a third hand. If the person is heavier than you lowering via a redirect is difficult and potentially dangerous, as you will be pulled up into the redirect. |
B. From a Floating Plate
|
As just mentioned, if the belayer is much lighter than the person being lowered, the belayer will tend to be pulled into the redirect. An altogether more controlled method that solves this issue is to float the belay plate from the powerpoint. This will only work if the person being lowered can temporarily unweight the rope and be clipped into something whist the belay device is moved is placed as a floating plate. Therefore it is normally only used for lowering from a stance, not if a climber gets in trouble mid-pitch. It is a really neat trick as the belayer does not even feel the weight of the person being lowered. |
|
|
|
|
|
Floating plate lower. This produces a very controlled lower and without the weight of the climber being passed to the belayer. Left, using a lamb’s tail off a powerpoint; middle, off a redirect (the redirect point must not fail). Right: how not to do it. In all cases, use a Munter (or French prusik) on the belayer’s harness if there is any doubt of the strength of the redirect, or your ability to hold the person being lowered. |
||

C. Lowering a big load: Munters and Monster Munters
|
With a really big load you might be better lowering with a Munter, a Monster Munter or a Zuper Munter (see the knot appendix for how to form the latter). |
|
|
|
|
|
Lowering with a Munter with single and double ropes.
|
|
|
|
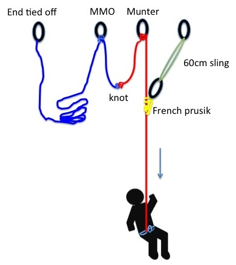
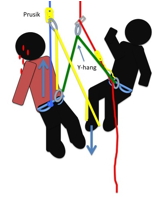
Simultaneously lowering an injured climber and a helper connected by a Y-hang. A monster or zuper Munter makes an ideal lowering knot |
|
|
|
|
|
A monster Munter. This is ideal when lowering a lot of weight and stops the ropes twisting into a right mess. If you are abseiling with a monster Munter, make sure the brake rope exits on the non-gate side of the carabiner |
||
D. Lowering Past a Knot (key skill 4)
|
You can lower past a knot in much the same way as you abseil past a knot. You are most likely to be doing this because one of the ropes has been damaged, or because you needed to join both the ropes together to lower someone to safety. As the knot will have to pass over edges when weighted, but is likely to be exposed to some very rough terrain, it is best to join them with a double (not single) overhand knot with 60cm (2ft) tails. Just like when lowering without passing a knot, you will find it much easier to lower from a direct belay of some sort, than from an indirect. The end of the double length of rope must be tied off to the anchor, or you could lower someone right off the end. |
Using a Munter (Italian) Hitch
|
1. Join the ropes together. Tie the far end to the belay as a backup and the other end to the casualty. |
|
2. Place a Munter on a locking carabiner on the first rope near the person to be lowered and clip it to the powerpoint. |
|
3. Place a French prusik with a lot of turns in front of this Munter and extend it back to the powerpoint with a sling and carabiner. |
|
4. Lower the climber, ensuring the French prusik doesn’t snag, until you only have 30cm (1ft) of rope left before the knot. |
|
5. Slowly creep the rope through the Munter and let the French prusik bite when you have almost no rope left. |
|
6. With the French prusik taking the weight, place a tied off Munter (an MMO) on the other rope just after the knot joining the ropes and clip it to the powerpoint. (Place the MMO as close as possible to the knot joining the ropes.) |
|
7. Remove the first Munter. |
|
8. Slowly Release the French prusik and remove it. |
|
9. Hold the brake rope firmly as you untie the overhand and mule from the second Munter. |
|
10. Continue to lower. |
|
Lowering past a knot. A PMMO will often be better in such a case than a French Prusik. The knot joining the ropes is placed as close to the left hand MMO as possible.
A similar arrangement can be used to lower past a knot with a Reverso in guide mode, just ensure you put a backup knot in the system in case the French prusik slips in the brief moment when you move the Reverso from one side of the knot to the other. |
7. Rescuing the Second
|
If you have enough rope at the belay to reach a safe ledge by abseiling you can opt for a drive-by pick up i.e. you tie the rope off, abseil down to the casualty on the free rope, transfer him onto a Y-hang tandem abseil on your rope and continue down (remember if you are using double ropes, you might be able to free one complete strand—don’t try abseiling with a casualty on one strand of a twin, you won’t have enough friction). If he is hanging in space you won’t be able to untie him from his rope: you will need to either cut his rope or use a stirrup hoist to get his weight off the rope. Once you have reached the next rap point, and secured the casualty, you will have to ascend the rope and set a retrievable abseil. This extra faff means it is normally better to lower the casualty unless he cannot look after himself and make himself secure at the next station. |
Stirrup hoist during a drive-by pickup.
B. Counterbalanced Lower and Abseil
|
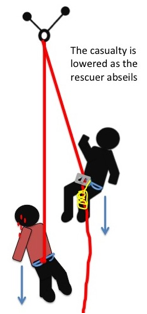
It will often not be sensible to lower an injured climber by himself: the other climber needs to be alongside. A drive-by pick solves this only when you don’t need to pull the ropes down to continue the decent. The alternative is a counterbalanced abseil: In essence you abseil down one rope of a retrievable abseil whilst lowering the casualty on the other rope. The downside is that the ropes are moving and hence there must be no loose rock about. With a single rope the next rap point needs to be within half a rope length of the upper belay. |
|
Counterbalanced lower. A knot in the end of the rope is compulsory. If you have double ropes to hand and need to make a full length rap you will have to descend to the casualty, release one of his ropes, return to the belay, rig the counterbalanced abseil, join the two ropes, rap back to the casualty and descend passing the knot either before or after you pick the casualty up depending on how far up the pitch he was.
Abseiling past the knot in a counter balance abseil with a casualty will not be easy and need practice. So, it might be better to just do a normal single rope counterbalance abseil to get to a point where you can build a new anchor. Then pull your rope down and set a new rap. |
|
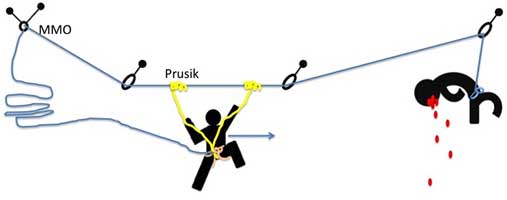
The leader might need rescuing because: she can’t complete the pitch (and can’t use gorilla aid to solve the problem); she has fallen into space; or she is injured.
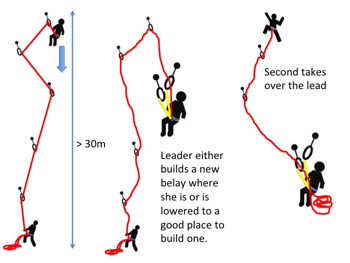
If she has simply fallen into space then she can simply prusik up the rope until she can reach the rock. If she can’t complete the pitch, but the second might be able to lead it, she either needs to lower back down to the stance (possibly by tramlining) or lower down to a good place to build a belay, then bring the second up to the new stance so he can lead through.
A very simple leader rescue: lower to a new anchor and let the second lead through.
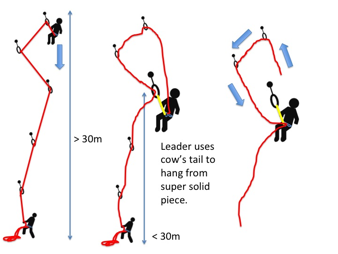
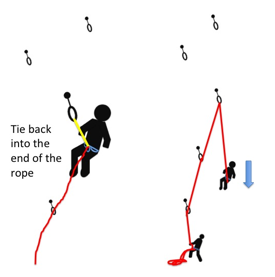
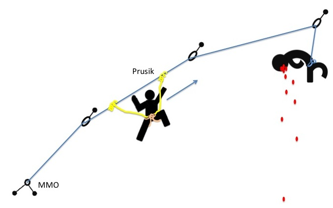
Lowering down to the original belay and escaping from there will be complicated if the leader is more than half a rope length out from the belay. A sensible plan is then to lower down to a solid piece that is less than half a rope length out, clip into it with a cow’s tail and repeatedly bounce up and down on the cow’s tail to ensure the piece is solid (consider adding more pieces). The leader then ties into the rope below her (as a backup), unties her main knot, pulls the rope down, reties into the end of the rope and undoes her backup knot. The belayer then takes in the slack and lowers her down to the stance. This is much the same as lowering off a sports route.
Lowering the leader back to the stance when she is more than half a rope out from the belay (continued below).
Finishing lowering the leader down. The leader clips the piece before she is lowered down.
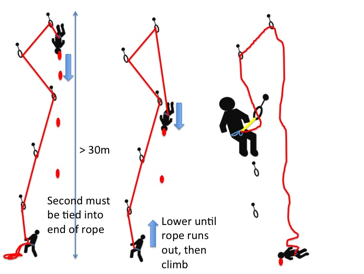
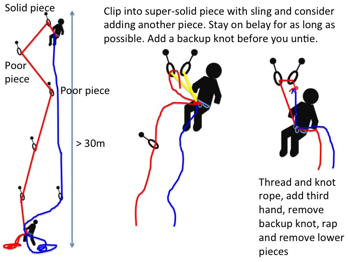
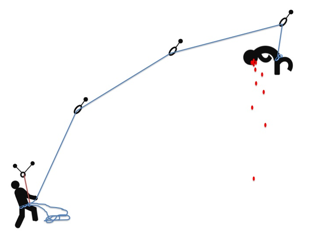
If the leader is injured, the runners very good and she is only a little over 30m up, then it might well make more sense to lower her down as the belayer ascends. This will leave the second now needing to rescue himself – without being able to untie the rope from the leader. So the lead needs to be able to untie her own rope.
A very quick way to get the leader down. The leader needs to be able to clip in at the lower belay, and be thinking clearly enough not to untie until the rescuer has anchored himself to a solid piece! The need for a solid piece for the second to secure himself to and possibly rap from means this approach is normally used on bolted climbs. On single pitch routes, one can imagine various ways the second could tie the rope off and descend even if the casualty could not untie.
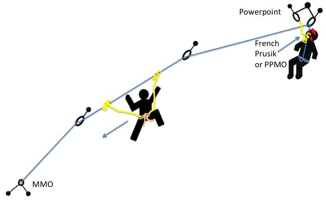
If the top piece (the one the leader failed at) is super-solid and you are using double ropes (twins or halves) and only one of the ropes is involved in the anchors, another option is to clip into that piece (and bounce test it), pull one of the ropes up (probably the one with the fewest/lowest/poorest pieces in), get the belayer to tie the remaining rope off, join the two ropes together and rap (consider adding more friction) off the freed rope back to the stance. Then pull the ropes down. If the top piece is super solid, a normally better and much simpler solution is to thread the ropes through the top piece and rap (if and only if the piece it can’t fail - consider adding another piece). The main reasons to abseil rather than lower are so you can strip more intermediate pieces, or if the most/only solid piece is more and half a rope length from the belay.
Rapping down off a super solid piece.
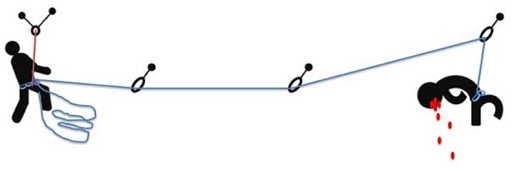
Things start to get much more complex and potentially more dangerous if the leader is injured and can’t get herself back to the belay. This means ascending the rope after removing yourself from the belay. This could leave both second and leader hanging from the leader protection, with the result probably being two dead climbers if it rips. To make thing worse, the second won’t know how good the pro is as he didn’t place it, and hence can’t make an informed decision.
Start by lowering her to the most sensible place. This might be where her weight is off the rope, or where you think you will be able to build an intermediate belay, or to a point where you can reach her quickly.
Unlike when a second is hanging below the belay, the weight of the leader will be passing through a redirect (the top piece), the friction at this point means that unless the leader is considerably heavier than the second, and there is little friction from the rock, escaping the system should be easy. The choice now is simple and stark. Either remove the belay and ascend the rope/rock (possibly as she is lowered), which although very quick, means if the top piece blows there is no belay to form a backup, or try and leave the belay in place as a backup and ascend he rope (possibly after re-jigging the belay so it can take an upward force. What you do will depend on the situation and the urgency.
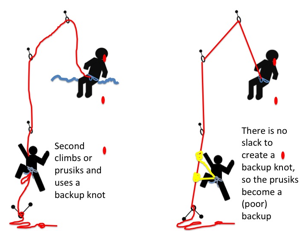
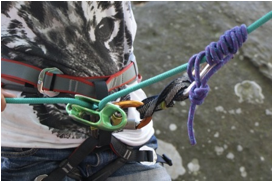
Things will be considerably easier, and potentially safer, if the leader is still capable enough to isolate herself from the system by clipping into a piece and weighting that rather than the rope. This also has the advantage that if the second needs to ascend the rope, and the leader can tie the rope off to a piece, the second will not exacerbate the leader’s injuries by prusiking directly off the leader’s harness and thereby jostling her.
If the belay is to be used as a backup whilst the second ascends, the form of the backup at the rescuer will depend on whether the main rope is under tension from the weight of the casualty or not. If the casualty has managed to unweight the rope, then the rope will be slack and a clovehitch or figure of eight on a bite can be tied and used as a backup knot clipped to the rescuer’s harness. As the rescuer ascends, this knot will need to be repeatedly moved up the rope. (A device such as a Grigri or microtraxion will not be suitable as a backup, as these will only grab in one direction and the second could slide up or down the rope depending on whether they slip or whether a piece blow).
If the casualty cannot unweight the rope, slack cannot be created and no backup knot can be tied. This might be a good argument for not attempting to rescue the leader without outside help. If outside help isn’t a possibility then the rope/rock can be ascended using a pair of prusiks as backup. Again, these must be prusiks not a Grigri or mechanical ascender.
As is often the case, it might well be possible to use a combination of approaches, for example, lowering the leader until the rope runs out, then prusiking up to offer assistance. If nothing else, this will give you less far to prusik.
|
9. Traverses etc.
|
If the casualty is off to one side you may have to drag her over to you, or move the belay over to her. Going for the drag is probably the quickest option in most circumstances, but requires you to have enough rope left at the belay to reach the casualty with your end of the rope. It might not be the best option if dragging her across the cliff would not be sensible (due to injury or loose rock), or if heading up or down would be easier from her location than from the belay. The methods used are key to being able to rescue an injured leader.
With two ropes it might be possible for the leader to pull one rope up and throw it back to the second. Then the leader could be lowered and pulled across to the stance. But this requires the leader to be reasonably uninjured. It might also be possible for the second to give slack in one rope and for the leader to pull herself back possibly with the help of the second. |
|
|
|
If a third hand is needed when taking in rope rather than letting it out the autoblock goes in front not behind the belay plate. This is sometimes called a clutch. (Note the belay plate is on a different carabiner to the lamb’s tail.) Depending on the length of the prusik it is often possible to dispense with the lamb’s tail and simply clip the prusik’s locker to the belay plate’s locker.
Such a clutch is used when pull a rope toward you, i.e. you are taking in, for example when dragging an injured climber toward you. |
A. Going for the Drag

Moving the Belay
10. Hauling – the theory
|
Most climbing manuals have a section on hauling for self-rescue and show a series of standard methods. Having tried many of them out I (DC) have to question if some authors have really used the systems they describe, and if they have, I would question if they have tried them with various combinations of rope, prusik diameter and casualty weight, or from various realistic stance positions. (Some online videos have the person doing the hauling walking 10ft backwards as they haul – in most real situations there won’t be anything like this much space.) I’m not trying to be critical, but I can’t get them to work except in ideal circumstances. Maybe I’m just weak (I weigh 62kg (9½st, 137lbs) so I’m not the heaviest). The assisted hoist (Chapter 11) is unquestionably brilliant. Un-assisted hoists without pulleys etc. are a completely different matter. Hauling someone 3m (10ft) up over a roof will be extremely tough work, hauling someone heavier than you an entire pitch would be a nightmare if you were lucky, and unless you really sort every thing out, impossible. Although many texts stress the difficulty of hauling, there is a difference between suggesting it is will be difficult, and that it simply won’t work as described in the text. This has led to situations where even three people have found it impossible to raise an exhausted climbed and benightment and near death followed.
Although there might be some rare circumstance where there is the need to haul an unconscious partner a whole pitch or more, a much more likely scenario is the need to haul a climber who is hanging in free space, and is too injured to prusik, up to a ledge so they can remove their weight from the harness before they get harness hanging syndrome. Even if you can escape the system and go for help relatively easily, it will be many hours before the helicopter arrives, so the casualty needs to be got to a ledge and parked. For this reason, knowing how to haul is important.
Some truths: · Friction is THE killer, do everything you can to remove any bit of friction, e.g. use the largest diameter carabiners you have, not those 19 gram micros. · Take your clothes off, you are going to be working hard for a long time. · Hauling someone heavier than you is much, much, harder than hauling someone lighter, so don’t bother practicing with someone lighter (add a haul bag full of water bottles if you need some extra weight), and be very careful with your back when practicing. · If the rope runs over the edge of a ledge in front of the stance at anything but a modest angle you will HAVE to move the stance to below the edge, or the friction will be too great. I guess you might in some circumstances be better moving the stance up the wall to improve the angle. (I once tried to haul an injured climber up a sea cliff in Wales using a military vehicle to provide the pull. The rope went through the dirt at the edge of the cliff and formed a right angle. All that happened was the rope got thinner and thinner because of the friction at the edge. Luckily we stopped before the rope snapped). · A Reverso makes a great clutch for small diameter ropes, but adds too much friction with fatter ropes (unless you use the adapted 2:1 wall ratchet described below). · If you get lucky, using a French prusik as a clutch will work, but there is a good chance it won’t bite quickly enough and you will loose much of the height gain on each stroke as it re-sets (and as the gain might be only 3 inches per stroke this is a serious issue). · If the rope passes through runners, then unless they are in a straight line and probably on an overhanging wall, you won’t succeed – remove the runners first. · There are three problems with any system that requires you to grip the rope and pull upwards: you aren’t using your body weight to provide the force; you are relying on small muscles that will tire; you risk damaging your back; you are applying the force through your grip around a 10mm rope. So the question is not just how strong your back is, but how hard you can grip repeatedly for maybe an hour. (This last bit seems to have been forgotten on many texts.) · Adding a microtraxion and a small pulley in a 3 to 1 haul is transformative, so if you are heading to the middle of nowhere consider taking one of each. · If you only have one pulley, place it nearest to the point you pull from not on the suspension point (unless it is a microtraxion or other ratchet, in which case place it as the main suspension point - unless you are using the adapted 2:1 wall ratchet system). · If you are willing to learn how to set up a haul by reading this material or playing around in your garden, go the extra mile and practice it by setting a up a REALISTIC, but safe, scenario (use backups to keep both of you safe). · If you only have time to learn two systems, learn the assisted hoist and the adapted 2:1 wall ratchet. · Unless you practice this stuff, and do it realistically, you might not make the right call in a rescue situation, as you will not understand the limits of what you can do. · The classic 3:1 and similar systems will work if the casualty can help a little by keeping some of their weight on the rope and hence can be useful to help someone over a crux. · The ONLY method I have found to work in a realistic practice scenario with an unconscious casualty is the very last one – the 2:1 big wall ratchet. |
|
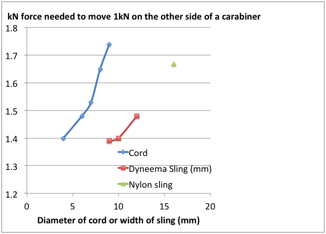
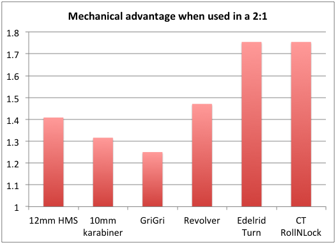
One key question is what is the best diameter of cord or sling to run through the carabiners that are acting as pulleys? Should we use the climbing rope, or should we replace the rope with a thinner cord? The experimental data below is from Jim Titt. It clearly shows that friction at the carabiner is likely to be considerable, and that we should use thin cord or dyneema webbing not the main rope. This clearly shows that by running the main rope over a couple of carabiners most of the mechanical advantage will be lost: so, think thin.
|
|
|
|
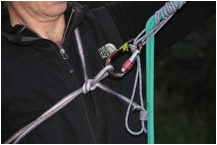
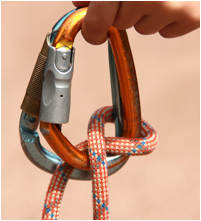
When hauling some way of holding the casualty’s weight whilst you prepare for the next stoke is needed. This requires a clutch (ratchet) to be placed at the top of the system (normally the powerpoint). A microtraxion type device is ideal, but there are several alternatives. Some add more friction than others but tend to lock better with less slip-back as the system settles.
|
|
|
|
|
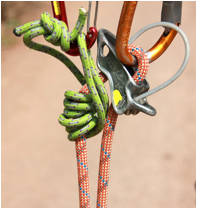
|
French prusik and floating plate. In theory this grips and releases automatically. But this requires the right combination of rope and prusik diameter and roughness of rope and prusik. If allowed to set itself it is likely to let several inches of rope to slide back before it grips. This isn’t too bad when a 3:1 with a long stroke length is being used (for example where you can walk back along a ledge) and the casualty moving a reasonable distance each time, but is an issue if you are only raising them 3 inches with each stroke.
|
|
|
|
|
|
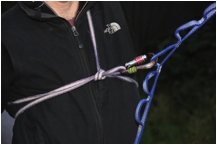
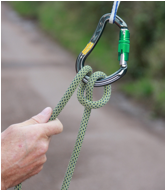
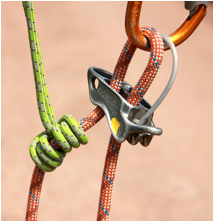
Prusik clutch. This has to be released and reset each time by hand, but will grip better and less rope will slip back compared to a French prusik. The prusik is clipped to the powerpoint or a solid anchor point. |
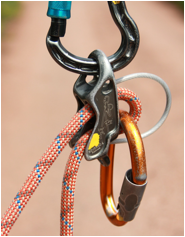
A Garda hitch can be used as a clutch with any diameter rope, but adds friction. |
|
|
|
|
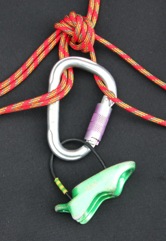
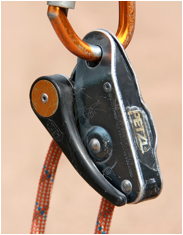
A Grigri makes a very good clutch, but adds a massive amount of friction. |
A Reverso makes a clutch that grips well with little slip back, but adds a lot of friction. With thin ropes and the casualty helping it works well (for example in an assisted hoist). It is also likely to be in place on the rope when the climber gets into trouble. So it is quick to deploy. With fatter ropes the friction is likely to be too much. |
|
|
|
The above data (from Jim Titt) shows the true mechanical advantage of various devices when used as the point the rope turns through within a 2:1. In the test 100kg was being lifted and the device clipped to the weight being lifted (i.e. like a 2:1 assisted hoist, but without any assistance). The Edelrid Turn is a small metal pulley; the RollNLock is a capture/pulley combo much like a microtraxion. From this we see that the greater the carabiner diameter the better; that when used for this application a Revolver (a carabiner with a pulley wheel built in) isn’t much better than an HMS; that a Grigri removes almost all the mechanical advantage. A Reverso or other similar assisted device is likely to add more friction than a Grigri, and hence will remove all mechanical advantage. Hence we can conclude that if we want to preserve the mechanical advantage, we can’t use a Grigri, a Reverso or anything similar as the clutch if it will be loaded during the pull stroke. |
|
|
|
|
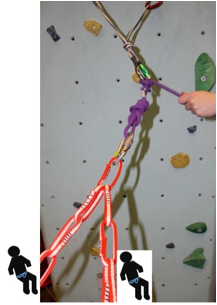
A 3-1 haul off a Reverso in guide mode with a thin rope is super fast to set. If you want to pull down not up, add a redirect to the rope being held in the photo up to one of the anchors and down to a foot loop (using a prusik) to stand in, however this will add a lot of friction. The Reverso can be replaced by a Garda hitch. A 3:1 like this will only be of use when the climber can help at least a little by occasionally taking some of their weight onto the rock, and there is little friction from the edge of the stance. |
3-1 indirect haul. Note the French prusik and belay plate used as a clutch. This will be slow work with each lift only gaining a few inches. The belay needs to be set so the force is being transmitted to the anchors. Again the casualty needs to be able to help a little. This problem with all such systems is that not only are you pulling upwards, and therefore not using your weight, but that you can only apply as much force as your hand can grip repeatedly. |
|
|
|
|
3-1 direct haul using a floating belay plate and clutch. This is an alternative if you don’t have a Reverso and produces less friction. The only purpose of the belay plate is to stop the prusik flipping over the top of the carabiner. Move the lower prusik as far as possible down the rope each time you reset the system. This maximises the stroke length, meaning the losses from slide-back at the French prusik will be less critical. |
The efficiency and easy of use of a 3:1 will be massively improved if a pulley and a microtraxion are used. |
|
|
|
|
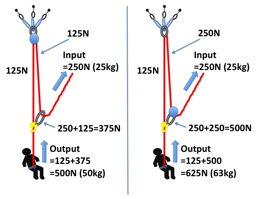
You can get some idea of what you can lift by looking at the forces involved. Left, with pulleys (assumed to be 100% efficient); right, with carabiners (assumed to 50% efficient). The assumption here being that 25kg might be the maximum lift a light climber can apply repeatedly through gripping the rope with one hand. http://user.xmission.com/~tmoyer/testing/Simulation_of_Climbing_and_Rescue_Belays.pdf reports a mean grip strength of 209N, i.e. 21kg, on the brake hand when belaying, so 25kg isn’t an underestimate). The hauler will no doubt use both hands, so we might expect them being able to apply twice the force and raise 88kg (194 lb). So they might just about be able to lift a climber a short distance before exhaustion sets in. The situation will be worse if there is friction over the edge, adding another 50% reduction in efficiency (or more) and indicating it might only be possible to raise 22kg with the 25kg per of lift. I.e. your wonderful 3:1 system isn’t in reality even a 1:1 and the maximum weight of climber that can be raised is 44kg (97 lb). In his book, Fasulo’s recounts the story of a team of four trapped on Bugaboo Spire in Canada. Despite having three people to haul, they failed to raise the fourth member of the team! The most likely reason being friction over the edge in front of the stance. This is not surprising. If the casualty (with clothing, climbing equipment and sack) weighed 100kg then because of edge friction one might need to apply an equivalent of 200kg of lift above the edge, which given the analysis of the 3:1 without pulleys shown above still means over 100kg equivalent on the pull end of the rope. i.e. it would be the same as hauling someone free hanging where there wasn’t an edge straight up the rope.
|
|
|
|
|
|
Where to put the pulley. If you have only one pulley, the above analysis shows that it should be placed nearest to the applied force, not at the suspension point (which seems the most natural place for it). An exception to this rule is if the pulley contains a ratchet (e.g. a microtraxion), because this will grip the rope better and offer less slip-back than a prusik it should be placed on the suspension point.
|
|
|
|
|
|
If you don’t have pulleys, use your fattest carabiners (left), not those ultra-light micros you got for Christmas (right). |
|

|
|
|
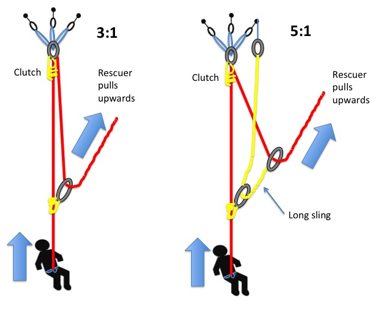
A 3:1 can be converted into a 5:1 by adding a long sling. The problem with all these more complex systems is that the stroke length (the distance your hand travels) will be very small with realistic belays. In a professional rescue from the top of the crag (or a crevasse rescue) the anchors will be placed a long way back from the (padded) edge leaving plenty of space to walk around and to place the prusiks/pulleys a long way from each other. This means the stroke length will be considerable. If you are pulling 3m (9ft) of rope through such a system on each stroke, the casualty will be rising 30cm (1 ft) with each stoke on a 9:1. This will give a reasonable rate of progress. In a realistic rock climbing self-rescue situation you are unlikely to have this space. You will be on a small ledge with the anchors at chest height (and the powerpoint even lower) and your stroke length at maximum power might be 30cm before your hand is too high to pull hard, or the prusiks/pulleys come into contact with one another. A 30cm stoke on a 9:1 means the casualty will be lifted 3cm. But the system might well have 2cm of slip-back, so they will have gained only 1cm. If you can only manage 20cm of stroke, you will get nowhere. |
|
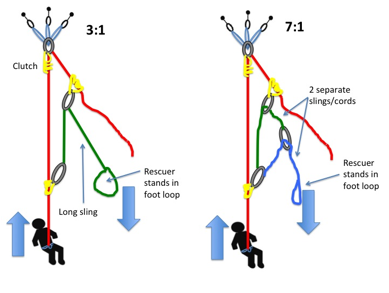
|
|
Left: 3:1 Spanish Burton. This has two great advantages: (i) you pull down, not up, and therefore you can use your body weight, (ii) the force is not being applied via a handgrip. Right: 7:1 Spanish Burton. This looks great in theory, but in a self-rescue situation the carabiners will come into contact with one another after a stroke length of maybe 30cm or less. This will only just have made up for the slip-back from the clutch re-setting. |
11. A hauling system that actually works
|
Having stressed the difficulty of hauling and done some analysis to show where some of the problems lie, what does work with an incapacitated casualty when you don’t have a microtraxion and a pulley? The above methods will work if the casualty can be of some assistance, but not if they really are incapacitated. The hip-hoist (Chapter 11) is one possibility for a short distance, but will only work if you are lucky enough to have a good stance, high anchors and friction from runners. With a hanging belay (and your feet in slings), a long way to haul and a heavy casualty it isn’t going to work unless you have the thighs (and back) of a god. An important thing to remember is that you will be dragging your partner up the rock face and this isn’t going to do them any good. If you have hauled a bag up a big wall you will know that bags get stuck on anything and everything they can. An unconscious climber probably has even more ways to hang up. This means that you will have to regularly descend to the climber to unhook them. This suggests you will be much better off hauling from as near the casualty as possible so you can unhook them by swinging/rolling their rope around, or at least don’t have to travel so far each time. This might well mean the hauling point will have to be moved several times. This in turn means the hauling point might have to be a prusik around the rope the casualty is hanging from. It might also make sense to move the hauling point nearer the casualty as there is a good chance you don’t need to haul them all the way to the original belay, but just to a ledge or new, lower, belay. (One possibility would be to use the far-end system used by big wall soloists.)
To work in practice the system needs to: 1. Use the body weight of the hauler or she will simply run out of strength. This means pulling down, not up. 2. Not use the fingers to drive the system as they are weak, particular so when gripping a rope. This means the attachment point should not be the hands 3. Minimise friction at the carabiners by using a prusik cord or thin dyneema sling rather than the rope to lift the casualty. 4. Use a clutch that works reliably with little back-feed and doesn’t add extra friction. 5. Work effectively once the person hauling has moved the hauling point over the edge to remove the friction generated by the edge of the stance. This means it might have to work from a hanging belay.
An obvious starting point is to ask what those dragging haul bags up big walls use, and see if any of their systems can be adapted to meet the five criteria given above and without the pulleys and rope grabs big wall climbers use. One that does is the 2:1 big wall hauling ratchet.
The key element of this system is that the load does not pass through the clutch during the lifting part of the cycle. This means that one can use just about anything as the clutch even if it would introduce far too much friction to be used within a normal system. This means you can use your Reverso. This means no messing around with French prusiks that don’t grip when you need them too, or that wrap themselves around their carabiner. This means you will have a very reliable and safe clutch. The Reverso might even already be in place on the powerpoint.
Luckily, the 2:1 system also uses a thin pull cord, is designed for pulling downward, the attachment point is not the hands and it works from a hanging stance. So it ticks all five criteria. Bingo. It is also field-tested most days on El Cap.
The system used by big wall climbers makes use of pulleys and a rope grab, so some adaptation is required – see the following photo. I have tested the system and it works well in realistic scenarios. It still takes a long time to raise someone 50m, but it isn’t exhausting and use of the Reverso as the grab makes it feel secure.
The Adapted 2:1 Hauling Ratchet. Note the prusik on the rope should be a French prusik as this will be easier to move. If you don’t have a Reverso to hand, use a Grigri (unfortunately this has a lot of slip-back as it re-orientates) or a Garda hitch (use the occasional backup knot). The pull cord (a long single strand of prusik cord, a length of cordelette, or a thin dyneema sling) has been tied off to the upper carabiner with an alpine butterfly (or possibly even better a bowline and stopper) so the knot can be removed later. The key to making the system efficient is to set the pull cord to just the right length. Hence it is attached to the belay loop of the harness using a clove hitch around two carabiners so you can adjust it even after it has been loaded a few times. To lift the causality simply sit down hard or walk backwards. When the two “pulley” carabiners meet at the end of the pull stroke, pull the rope through the Reverso, then stand back up and slide the French prusik knot back down the rope. If you can’t lift the weight of the casualty, try pulling up on the carabiner clipped to the prusik at the same time as you walk down the cliff. The person hauling needs to be clipped to the anchors via a tether or via the rope in case the pull cord snaps. Using thin 5mm prusik for the cord will give less friction, but it will stretch more unless it is spectra. It will also be difficult to untie the knots after the haul (even if you use alpine butterflies). So, consider using a strand of 7mm cordelette - at least when practicing.
*awaiting image The Adapted 3:1 Hauling Ratchet. The basis of the design comes from an Ontario Rock Climbing Assoc. Safety Manual (1990) and was pointed out to me by “Marty C” on a Mountain Project forum. The clever thing about this is that it adds some mechanical advantage over the 2:1, but without adding in any extra turning points, i.e. the cord still only runs over two carabiners. It has advantages and disadvantages over the 2:1. Advantage: it is is a 3:1 and therefore better if the casualty is heavier than the rescuer, or some edge friction is still present. Disadvantages: the distance you will raise the casualty per stroke is a LOT less than with the 2:1. This is not just because it is a 3:1, but because the travel distance is very small, as the upper carabiner descends to meet the rising prusik, giving a very small raise per stroke. A second issue is that, unlike the 2:1, the prusik does not reach the Reverso, and hence there will be a long length of unweighted rope between the Reverso and the prusik at the end of the stroke. This rope will stretch once it is reloaded. Because of these disadvantages, it probably makes sense to use the 2:1 if you can and only use the 3:1 if you have to, or you have a large ledge and a long cord so you can get a considerable stroke.
The above analysis indicates the following as a potential hauling strategy.
1. Use an assisted hoist if the injured climber can help. 2. If they can’t help and you think it might work, you are strong and they are light, and there are no intervening runners try a hip hoist or a normal 3 to 1 as shown above. 3. Assuming you failed to move them, or because you know from having practiced that it would not have worked, then get ready for a very long process. Consider all other options. 4. Take most of your clothes off. You are about to get very hot. 5. Escape the system. If you plan to abseil or prusik all the way down to the casualty, and they have a Reverso-type device, don’t bother to waste time removing yours from the belay – just tie the Reverso off and rap using a Munter. You can then use their Reverso to create the 2:1 ratchet. If you are using the second method below, it is important you don’t remove the Reverso at this stage even if you plan to use it later. 6. Prusik (or abseil) down to the casualty, removing the runners. Apply first aid and create a chest harness to keep them upright. 7. Prusik back up. 8. Move the attachment point they are hanging from over the edge of the ledge if needed. In doing this you are trying to do two things: create a new powerpoint to mount the rescue from, and create an unweighted loop in the casualty’s rope that can be fed into the Reverso. The details will depend on whether the new powerpoint is just over the edge, much further down the pitch, formed on the rope by using a prusik, or from wires and cams, and a host of other details. If the casualty is weighting the rope the transfer to the new powerpoint will be the difficult bit, and will either be by (i) hoisting them momentarily upwards and onto the powerpoint, or (ii) by dropping them down onto it. We give an example of both, (i) will be the quickest, but might be difficult if the casualty is heavy.
(i). The method is based on the stirrup hoist used above to complete a drive by pickup. In this example it is assumed the aim is a transfer to a powerpoint formed by a prusik on the casualty’s rope, but the idea will work for other powerpoints. Start escaping the system and retrieving your Reverso if you don’t plan on using the casualty’s for the ratchet. Then prusik or abseil down to the location of the new powerpoint. Form the powerpoint using a prusik or Klemheist around the casualty’s rope. It must not slip, so use plenty of turns. Clip yourself into the powerpoint and hang. Build the 2:1 haul ratchet, including installing the Reverso, but rather than clipping your belay loop to the haul cord, form a loop in the cord at waist level. Now stand in the loop to raise them and create a loop in their rope. Feed this loop through your Reverso in guide mode. Lower them onto the Reverso by removing your foot. Clip the haul cord to your belay loop and haul away. When you need to get them off the Reverso and onto a new belay, clip them into the belay with a sling (a releasable tail would be even better), form the foot loop again, stand in it to take the weight off the Reverso, and remove the rope from the Reverso. With this approach it should be possible to haul them up to the haul point, tie them into the rope, remove the haul point and move the haul point further up the rope. This allows you to stay close to the casualty and unhook them from protrusions as and when necessary.
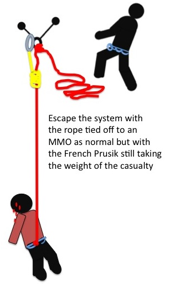
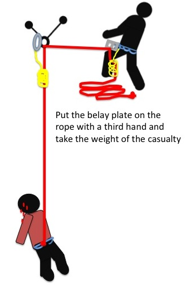
(ii) This approach is based on releasing the Reverso the casualty is hanging by weighting a French prusik or PMMO while a new powerpoint is constructed over the edge and the Reverso is moved to it. Escape the system (but leave the Reverso in place) and run the spare end of the rope down the cliff, with an alpine butterfly or figure of eight on it some way over the edge (this will be the new powerpoint). Tie this rope off to the anchors leaving 1 to 2m of slack between the Reverso and the tie off (to allow the Reverso to be removed and moved). Place a PMMO on the casualty’s rope over the edge and below the new powerpoint and clipped back to the new powerpoint. Release and remove the Reverso from the old powerpoint, lowering the casualty onto the PMMO on the new powerpoint. Climb down over the edge and hang from the new powerpoint on a tether. Now place the Reverso (in guide mode) on the casualty’s rope (triple check you have threaded the rope the right way around) and clip it to the new powerpoint. Release the PMMO so the Reverso takes the casualty’s weight. Construct the 2:1 ratchet and start hauling.
|

|
|
|
|
|
|
|
Belaying with a Munter is the opposite of using a belay plate (left letting out slack; right locking off). |
|
B. Dealing with a Damaged Rope

Isolating the damaged part of a rope using an alpine butterfly. This means the rope will still be strong.
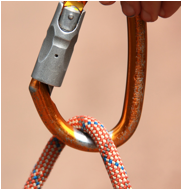
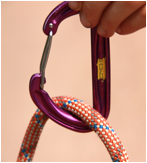
C. One or Two Carabiners?
|
Many books suggest that by using a pair of carabiners wherever there is a large change in angle of the rope in a hauling system losses to friction can be reduced. Tests would appear to suggest this is not true. This is what Jim Titt had to say about this urban myth. “Two krabs reduces friction? Completely wrong. Reputedly the advice to only to use one ring for abseil points to reduce the pull-down resistance was given in a 1906 guide to Saxony and nothing has changed since. No gear manufacture makes an abseil chainset with two rings because they know it increases the friction. The tests are ridiculously easy to do yourself with a luggage scale and a rucksack, or even standing on bathroom scales and pulling on a suspended load, I pull with a powered winch and let the computer do the rest”. This is Jim’s graph for 1,2 and 3 carabiners (this is with a 9mm rope over 12mm karabiners, with a thicker rope the effect is apparently greater):
COPYRIGHTED IMAGE: Jim Titt, with permission. |

|
|
|
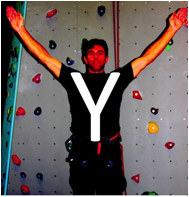
|
Signalling to the helicopter crew: Yes, I need rescuing.
|
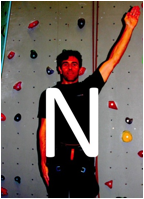
No, I don’t need rescuing. |
|
|
*awaiting image x2 |
|
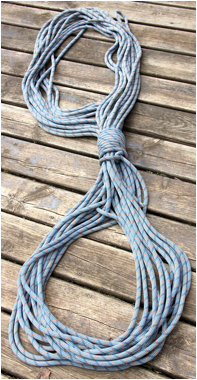
To carry a casualty (who is safe to be moved in this way) make a large butterfly coil – this will be about the same length as the shortest rescuer is tall. |
Place the coil over the rescuers’ shoulders. Or if there is only one rescuer, over the shoulders. |
Please use the following links to buy the book: Amazon USA (kindle) / Amazon UK (kindle) / itunes / kobo
v 24 November 2014
--------- multipitchclimbing.com ---------