--------- multipitchclimbing.com ---------

|
This site presents the images from the ebook High: Advanced Multipitch Climbing, by David Coley and Andy Kirkpatrick. In order to keep the cost of the book to a minimum most of these were not included in the book. Although they work best when used in conjunction with the book, most are self-explanatory.
Please use the following links to buy the book: Amazon USA (kindle) / Amazon UK (kindle) / itunes / kobo |
|
Cheating isn’t often discussed by climbers except when doing someone down. This is probably a mistake. Old photographs often show climbers in the mountains standing on each other’s shoulders or pulling on pegs. Nowadays, unless you set out to go aid climbing, no one wants to pull on the pro, but knowing how to cheat effectively and efficiently can be a real life saver when you get stuck and retreat isn’t a good idea. This might be because the top is one pitch away, whereas the bottom is twenty pitches down and it has just started to rain; or because your partner has had an accident. However, often it is because one of the team isn’t as good as the others and just needs a helping hand to get over a roof. Knowing you can cheat if you really have to will also allow you to tackle those long alpine routes that have one short pitch that is much harder than the rest of the route with confidence. Although some will disagree, many of these routes also make for a better, more balanced, outing when climbed in this way.
There is an art to cheating and it needs to be practiced. Without having cheated a few times climbers under stress seem to forget it is an option, and even it they remember to cheat can’t do it efficiently. Hence twenty minutes later they are still stuck under the crux hanging from the rope getting weaker and weaker trying to free it. Most of the time it is a matter of getting the leader over the crux by simple French freeing (i.e. pulling on gear), but it might be useful to build a couple of aiders out of slings. Next the second needs to get over the crux. The approach used will depend on the situation, but planning will be key. Often throwing a loop of rope down will solve the problem, other times the second might be able to haul himself up one rope while the leader protects him with the other rope. The key point is to avoid prusiking at all costs as it is so slow – but sometimes there is no other way. |

|
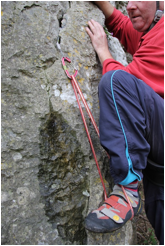
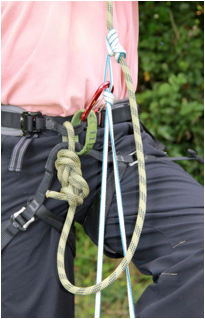
Tete D’Aval, French Alps. By alpine standards, few objective dangers, but at twenty pitches, an easy place to get benighted. This means that the leader or second might elect to cheat on the odd move if they don’t think they will top out before dark. |
1. Getting the Leader Over the Crux: Gorilla Aid
|
|
|
|
Do what you need to get over the crux: left, foot in sling; right, clipping into a piece to rest and place a higher runner to pull on. As the left image shows, simply using 60cm slings as the extenders on pieces can get the leader or second rapidly over the crux without the need for anything complex. |
|
|
|
|
|
On long hard climbs, if you think you will have problems with a short section, consider taking a hook or two. |
Be creative: A large cam makes a foothold.
|


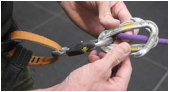
Going Prepared to Go Ape
|
Once you know you are going to have to aid more than a couple of moves, stop and take time to build an aider and a daisy or two.
|
|
|
|
|
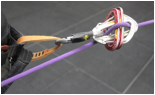
|
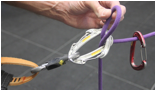
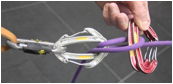
Improvised aider made from a 120cm and a 60cm sling—note how the knots have been tied to form offset loops and the stitching of the red, sling is right at the base of the aider. This will make it easier to get your foot in and out.
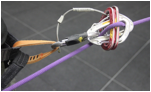
|
Gorilla aid rig (an improvised aider and daisy made from knotted slings) in action.
|
|
|
|
|
Unless you need the extra reach, try not to clip an aid sling directly into a wire or peg. Clip into the top of the piece’s extender. This will make it much easier to unclip your aid carabiner quickly. |
|


2. Getting the Second Up: More Gorilla Aid
|
|
|
|
Sometimes the best way to get over the crux is just to give it some effort. (Top: Chris on the Plum, Tremadog, Wales. Bottom: Tom Bight, Spain.) |
|


|
One of the key tools for getting the second over the crux is the drop loop haul. To be possible at all the second needs to be less than 1/3rd of a rope length of rope and know what to do. It will be far better if a direct belay is used. So, if you think the second might have a problem getting over the crux, tell him the plan and set up a belay just after the crux.
|
|
|
|
|
|
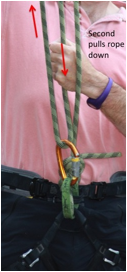
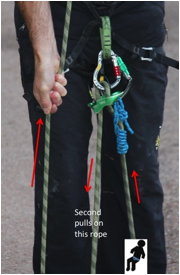
3:1 Drop loop haul off a pre-existing direct belay (there is only one rope – the colours are for clarity). This takes as long to rig as it does to throw the rope down the cliff. It is hard to believe how effective this is until you try it. The second is protected the whole way by the rope self-feeding through the Reverso or Grigri. The second will be hauled directly towards the belay by the red and green ropes and hence it won’t work if the second’s main (blue) rope takes a different path through runners off to the side and the second can’t easily remove them as he ascends. If so, use the 2:1 haul shown below. This is probably THE key technique for getting the second over the crux. All teams should have practiced it so they are as fast and as confident with it as they are with abseiling. It will help if the leader belays soon after the crux, even if this means adding a pitch. |
The second completing a drop loop haul. |
|
|
|
|
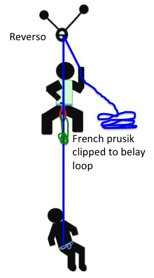
2:1 Drop loop haul off a pre-existing direct belay (there is only one rope – the colours are for clarity). This is used if the direction of haul isn’t the same as that taken by the lead rope, or if the friction from the rope passing through the runner is too high: Tie off the main (blue) rope; throw a loop down; both second and belayer hauls; use a backup in case the belayer drops the red rope. In the drawing a Munter has been placed so the second can be belayed normally once over the crux. An alternative would be to also tie the main rope off at the Reverso once the second’s weight is off the it, remove the blue rope from the Reverso and place the red rope through the Reverso so it forms both backup and belay. Using a 2:1 isn’t as good or as quick to set as the 3:1 above, so if possible belay just above the crux (and vertically above it) so a 3:1 can be used. |
|


|
|
|
|
Drop loop haul off an indirect belay. This one takes longer to rig and is hard work but is still effective. |
The leader during a drop loop haul off an indirect belay. |

|
|
|
If the second doesn’t have the strength to pull down or is injured, he can add a foot prusik to take some of the weight. A small mechanical device as the prusik will speed things up considerably. |

|
|
|
|
Left: Hip hoist off a direct belay - be careful of your back. This will just about work for a very short distance or if the second can help a little by trying to climb the rock. Right: close up of the French prusik during a hip hoist. If the French prusik keeps slipping add more turns. |
|

3. Ascending a Rope
|
|
|
|
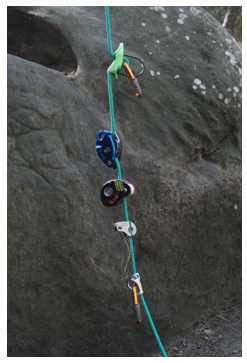
Ascending devices. From the top: Reverso (or equivalent), Grigri (or equivalent), mini-traxion, Ropeman, Tibloc. |
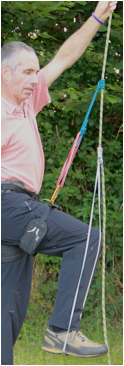
One possible emergency ascension rig in action. (Chalk bag cord; 60cm sling; 120cm sling.) The foot prusik goes below the waist one. A Klemheist knot has been used for the foot sling (a French prusik on a loop of the sling would have been a good alternative). The waist prusik needs to be a Klemheist or ordinary prusik knot for security. Place a backup knot on the rope below you and clip it to your belay loop. Occasionally move the backup knot up.
|
|
|
|
|
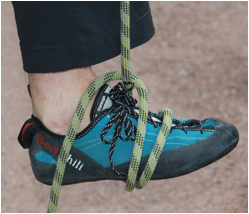
If you don’t have a foot prusik use this hitch (pull on the un-weighted end to move it up the rope – the sticker the rubber the fewer the number of turns), or just use a few turns of the rope around your foot. |
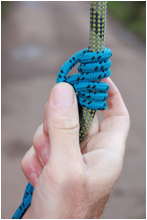
Prusik knots tend to clamp up. Loosen by pushing the loop back with your thumb. |
|
|
|
|
Using a Reverso as the waist prusik. This works best on thin ropes and is almost impossible on a 10.5mm. |
Getting ready to install a Reverso as a waist prusik when starting from a hanging start, for example if you just fell off an overhang. Start by installing the foot prusik: Note the overhand in the foot prusik that creates a temporary isolation loop. Stand in the foot prusik and clip your belay loop into the isolation loop in the sling, then sit back down. This will have created a loop of rope for you to install the Reverso. |

|
|
|
|
A common use of a Reverso prusik is in converting an abseil into an ascent when you miss the next rap station. Simply clip a locker between the Reverso’s hanging hole and your belay loop and sit back down, you are now hands-free. (You might need to take a twist of rope around your foot so you can stand up to get your belay loop close to the Reverso.) Now tie an overhand below the third hand and clip it to you belay loop as a backup. Unclip the original locker from your belay loop without removing the ropes from it. Do this carefully; if you remove the ropes from the locker you will no longer be attached to the ropes. If the ground isn’t too steep and the rap station not too far away, you can just haul/belay yourself up the rope. If it’s steep, just add a foot prusik above the Reverso, and up you go. Don’t forget to place the backup knot before you touch the Reverso’s locker and keep the third hand on at all times. |
|


|
|
|
A Reverso can also be used as a foot prusik. With thin diameter ropes, this will be a lot smoother than a normal prusik knot. |

4. Abseiling and Belaying Without Your Belay Device
|
It is well worth knowing how to still be able to rap and belay when you have dropped your belay device.
|
|
|
|
|
|
Munter rap: make sure the rope exits the carabiner across the back bar not the gate; or the gate could undo. If possible always use a triple action twist lock not a screwgate when using a Munter. |
Bringing up the second, or lowering, off a Munter on a direct belay. (A triple action twist lock would have been better.) |


|
|
|
|
|
|
|
|
|
An alternative to a Munter is to use a carabiner brake to abseil with. The wire in the final image is optional and is only used to stop the two red carabiners being dropped when the rope is removed at the end of each rap. Always use a third hand. |
||

5. Lowering Off a Single Piece

|
Using a prusik as a backup when lowering off a single piece and needing to strip the lower pieces. The prusik might save you if the top piece blows. Only lower off a single piece if you know it is solid. The prusik should use the thickest prusik cord you have and use a prusik knot rather than a French prusik. |

|
A similar approach can be used if the upper piece is questionable and you therefore plan to leave some of the lower pieces in place. In this case, don’t unclip the rope as you pass a piece until you have replaced the draw with another. Double ropes will give you many more ways to keep the distance you could fall to the nearest solid piece at a minimum if the top one blows during a lower. |
Please use the following links to buy the book: Amazon USA (kindle) / Amazon UK (kindle) / itunes / kobo
v 13 September 2014
--------- multipitchclimbing.com ---------