--------- multipitchclimbing.com ---------
|
This site presents the images from the ebook High: Advanced Multipitch Climbing, by David Coley and Andy Kirkpatrick. In order to keep the cost of the book to a minimum most of these were not included in the book. Although they work best when used in conjunction with the book, most are self-explanatory.
Please use the following links to buy the book: Amazon USA (kindle) / Amazon UK (kindle) / itunes / kobo |
|
This, like the Belay chapter is a long one due the many different approaches that can be adopted. Although a series of alternative knots are discussed, the EDK is presented as the normal knot for joining abseil ropes. A surprisingly high number of climbers die abseiling. So keeping it simple makes sense. Don’t try something that might save a few seconds, or looks cool, that gives you more potential to mess up.
Unfortunately, not all abseils will be down simple terrain nor on still days, so you might well need to find an alternative to just throwing the ropes off the edge and this is discussed.
Probably the two most important things to remember are to check the rap anchors are good and to use a French prusik as a backup. At some point the rap rope will get stuck when you pull it, so you need a plan to get it back.
Most of the time the best way to abseil is on a pair of ropes, however if you plan to climb on a single rope, or only take a Grigri with you, you might need to know how to rap with a pull line. There are times when it might be appropriate for both climbers to rap at the same time, and we discuss two ways of doing this – and point out that several deaths have occurred doing so.
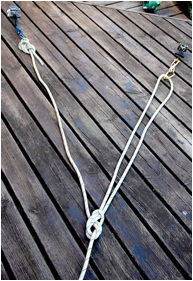
On many cliffs, safety can be reached simply by joining all your climbing gear together in a line and tying the two ropes together. This might get you 150m down the wall, assuming you know how to abseil past a knot. |
|
Contents 1 Types of Anchors and Threading the Rope / 2 Joining the Ropes / 3 Throwing the Rope / 4 The Backup (A. The Third Hand, B. Putting Knots in the End of the Rope) / 5 Attaching the Plate / 6 Descending (A. Using the Third Hand, B. Abseiling with a Bag, C. Adding Friction, D. Dropped the Belay Plate?, E. Creeping the Knot, F. Making Sure You Don’t Let Go of the Rope G. Descending into the Unknown) / 7 Stuck Ropes / 8 Abseiling with a Single Rope, a Pull Line or a Gri-Gri (A. Single Rope, B. Pull Lines, C. Combo Rap)/ 9 Building your own Stations / 10 Making the Rope a Little Longer / 11 Simultaneous Abseiling / 12 Abseiling past a Knot / 13 Fixed Lines (A. What is a Static Rope)/ 14 Retrievable Abseil Slings / 15 The American Death Triangle |
|
|
|
|
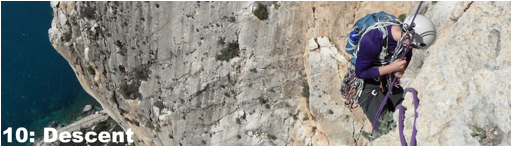
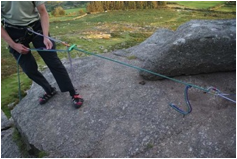
Getting to the top is only half the battle. (Rapping down Big Tower is Watching You, Ecrins, France.) |
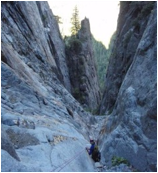
Rap routes will often take you down chutes with exposure to stone fall, particularly if there is a party above. (Yosemite, USA.). Wear a helmet, be careful where you throw the ropes, and watch out for stones when you pull the ropes. |
1. Types of Anchor and Threading the Rope
One key to staying alive is to not rap off poor anchors.
|
|
|
|
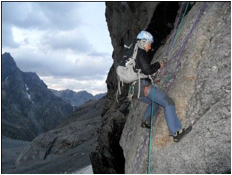
Not all in-situ rap anchors look as good as you might like. Spend some time improving them. (Carry a knife and some cord.) |
|
|
|
|
|
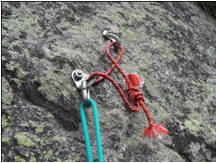
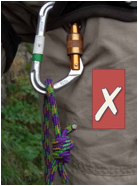
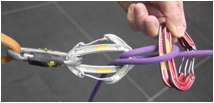
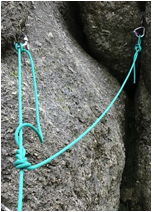
Thread the rope the correct way (left) so the down rope doesn’t trap the up rope and make it difficult to pull (i.e. not the way shown on the right).
|
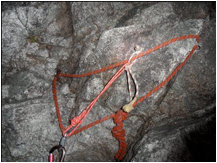
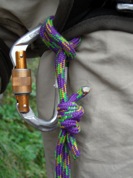
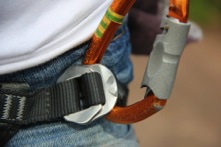
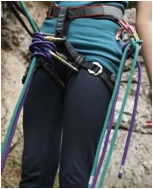
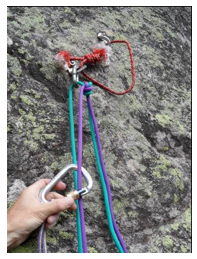
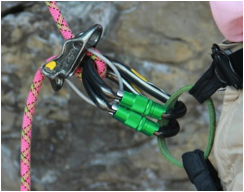
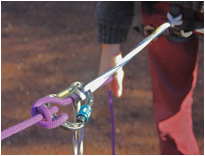
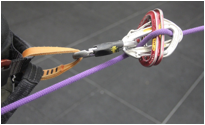
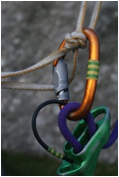
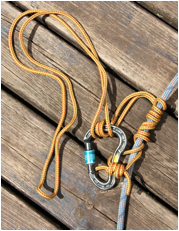
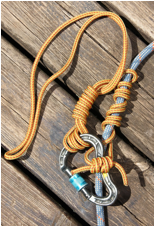
A temporary anchor link made from a short extender. Without this, if the left hand bolt fails the climber could fall off the cliff. The extender will be removed by the last person down. (The Prow, Yosemite, USA.) |
|
|
|
|
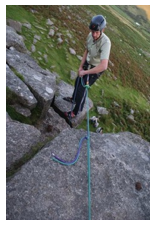
It is common for the first rap to directly from the top belay and it seems natural to thread the second’s end through the chains when he gets to the top, as his ends will be on top of the pile when he unties. However, this will mean the ropes will be up the wrong way to throw off the cliff. It is therefore better to thread the leader’s ends through the chains, even though her ends will be on the bottom of the pile, and then throw the second’s ends down the cliff. Often it can be quicker not to let the second untie but to lower him down the cliff on the first rap as soon as he arrives (if the rock is solid). This might require bringing him up the last pitch using a redirect rather than using the belay plate in guide mode. |
|

2. Joining the Ropes
|
A lot of forum space is taking up with a discussion of which rap knot to use. I (DC) almost always use an overhand. |
|
|
|
|
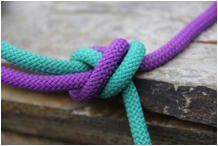
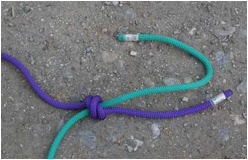
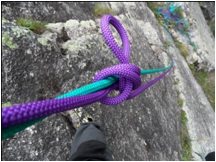
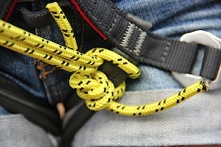
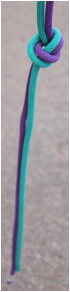
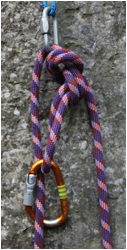
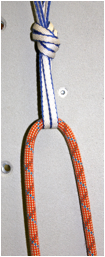
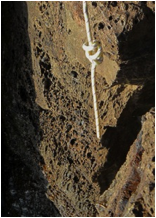
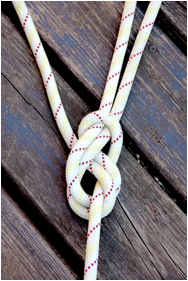
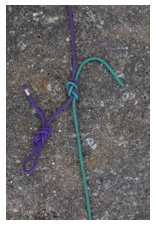
The standard way to join ropes: an overhand with 40cm tails. |
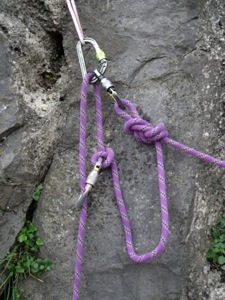
Some feel safer with a pair of overhands. |
|
|
|
|
A flat knot such as an overhand used to join two ropes passes easily over an edge.
|
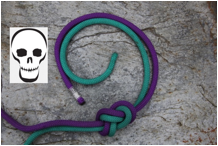
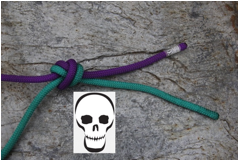
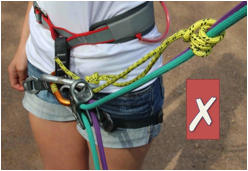
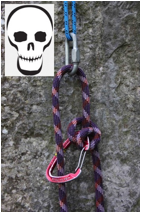
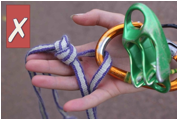
Never use a flat figure of eight to join ropes—this has proved fatal. |
|
|
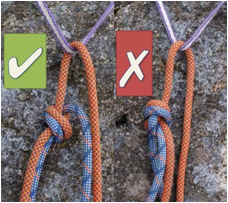
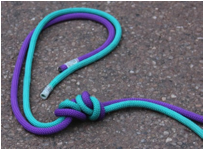
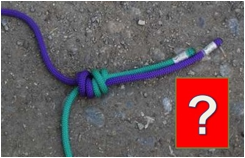
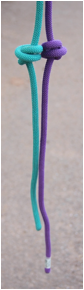
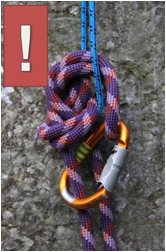
Don’t be tempted to use short tails with an overhand knot. If the knot rolls, it could roll off the end. |
|
|
|
|
Tying a big flat fish – start with half a double fisherman’s. Although this is plenty strong enough for abseiling and lowering, it has a possibly dangerous failure mode: see the knots appendix, and I (DC) would just use the normal EDK. |
|
3. Throwing the Rope
|
|
|
|
|
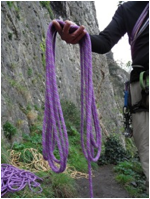
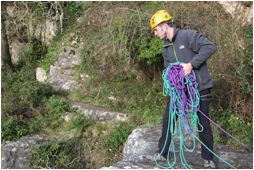
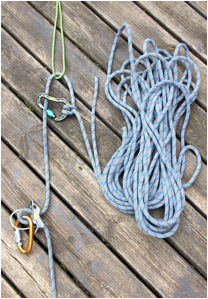
When preparing ropes for throwing, flake them into butterfly coils rather than using round coils. |
However carefully thrown, mystery knots in the rap rope are always possible. The thinner the rope the more this will happen. |
|
|
|
|
|
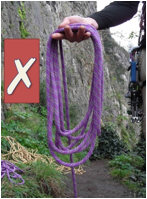
Don’t just toss the lot down the cliff.
|
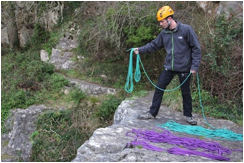
Throw one at a time unless the ends have been tied together. If the ends are tied together, you can still throw them carefully after butterfly coiling them.
|
|
|
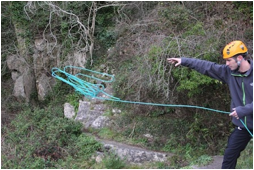
Try and aim the ropes, and account for any wind. |
|
|
|
|
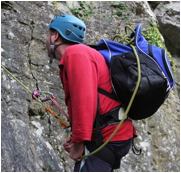
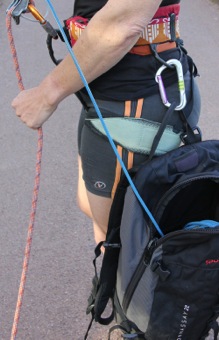
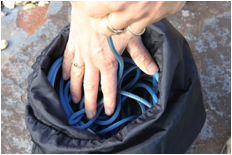
If it is windy keep the rope flaked out in a sack. If the rap is over steep ground, clip the sack to a gear loop (if the gear loop is a strong one) or to a sling around your shoulders. The sack needs to hang below your third hand so the rope can feed automatically out of the bag and into the abseil device. A sack also works well with short carabiner-block abseils for holding the pull side of the rope, or the pull-line. Although coiling the rope around your shoulders will work, you need to make sure you let out slack well in advance, or it will all end in a mess. |
|
|
|
|
|
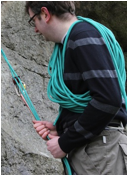
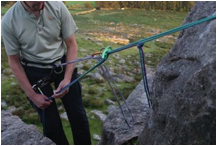
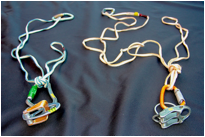
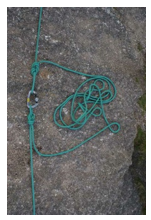
The holster method makes an alternative to wrapping the rope around your shoulders when it is windy. One rope is attached on either side of the body using a girth hitched 60cm sling. If you are lucky the ropes will pull out of the holsters by themselves as you descend. I’m never this lucky (DC). |
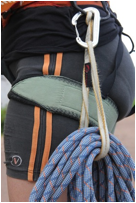
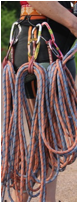
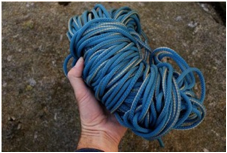
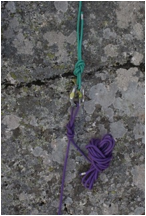
An alternative to the holster method is the stacked butterfly. Simply jettison each bunch in turn when needed as you descend. (Note: the ropes are not separated.) |
4. The Backup
|
The other key to staying alive when abseiling is the backup: normally a third hand and a knot in the end of the rope.
|
|
The third hand is normally formed from a French prusik placed below the belay device. Many people think a third hand is guaranteed to save them, it isn’t. Don’t be casual about how you tie it. Its success depends critically on the number of turns used, the length of cord, its diameter, the diameter of the rope and how slippery either is. If in doubt add more turns – and if using a new combination of rope and cord, test it before you leave the stance. See here * for an example of one failing to grab.
One reason to extend the rap device away from you by using a tether is to stop the third hand being able to touch the rap device. If this happens the third hand is likely to release – sending you plummeting. One situation where this is most likely is when cleaning on abseil, or installing bolts, as you will be thinking about other things, and might well lift you thigh up when slinging around to get to the placement, or trying to free the piece.
|
|
|
|
|
|
Always use a third hand when abseiling. So you don’t have to stand on your rope and try to fiddle the rope into the rap device without dropping it, place the third hand on the ropes before the belay plate, then pull a loop of slack up. Then put the plate on the rope.
|
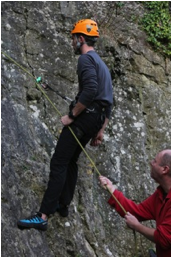
If you can’t use a third hand for some reason use a Fireman’s belay (the person on the ground is in essence playing the role of an autoblock.) |
|
|
|
|
|
Left and middle, two good ways to attach a third hand to the leg loop so you can’t drop the prusik. |
||
|
|
|
|
Left, it is just about possible for the buckle of an adjustable leg loop to slide if the third hand’s carabiner loads it in just the right way. Right, a simple solution: use another structural part of the harness |
|
|
|
|
|
Some people prefer to put the third hand on the belay loop; others find this more awkward. If your harness has a plastic clip buckle on the leg loop, this approach might be a better method in case the leg buckle blows. When doing this, it is essential to extend the plate away from the harness by using a lamb’s or cow’s tail, or a daisy. |
Don’t be tempted to place the prusik above the plate. You will not be able to release it easily if it sticks.
|
B. Putting Knots in the End of the Rope
|
A third hand won’t stop you abseiling off the end of the rope, so always tie a knot.
|
||
|
|
|
|
|
The best way to stop you abseiling off the ends is probably to tie them together. Leave 1m tails. As this story shows, it is easy to rap off the end of the ropes because there is a good chance you are thinking about something else: http://publications.americanalpineclub.org/articles/13199903700/print
|
An alternative is two separate knots. (Overhands, fisherman’s, barrel knots, fig 8s can all be used.) |
Don’t like using knots? Try using floating rap hitches to reduce the chance of rapping off the ends of the ropes. Tie a clovehitch 60cm (2ft) from the end of each rope around a carabiner and clip it to a gear loop. Tie these before you throw the rope down the cliff, and jettison them only if you need to because the ropes start to twist near the end of the rap. Once jettisoned be very careful not to rap off the ends as there will then be no knot to catch you. The good thing about floating hitches is that you can’t forget to remove them before you pull the ropes. |
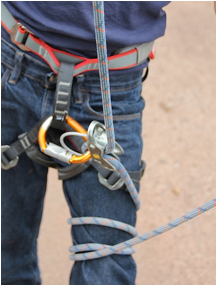
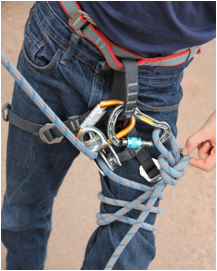
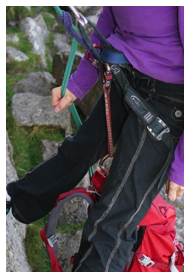
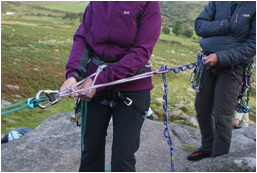
5. Attaching the Plate
|
If you are making a series of raps it is probably best to extend the plate away from the harness with a cow’s tail or daisy. This will give you a tether to clip into belays using the locking carabiner (the anchor carabiner) at the far end. It also allows you to perform stacked abseils. Remember, feed the ropes through the belay plate without taking the plate off its locker – this way you won’t drop it. One reason to extend the device away from the harness is so that you are much more likely to place both hands on the brake rope, rather than one on the brake rope and one above the device. If one hand is above the device and something happens it is very tempting to grab the rope hard with the hand above the device, rather than the one below. Which is the opposite of what you need to do, and unless you have a third hand in place could kill you. Unless you are performing a stacked abseil, on the ropes before you place the rap device. This allows you to pull a loop of slack up through the third hand that won’t fall back down once you let go of it. This means it will be a lot easier to get the plate on the rope.
With a Grigri I (DC) tend to clip it to the belay loop. This might not be best practice as it makes it a bit difficult to add a third hand. As this story shows, a third hand on a Grigri-like device can be a good idea unless you know you will let go of the handle if something happens: http://www.mountainproject.com/v/why-we-back-up-a-rappel/108910267 |
Don’t extend the abseil device too far away from you. You need to be able to reach the rope above the device to install a prusik if get stuck.
|
Four ways of extending the plate away from the harness: |
|
|
|
|
|
Daisy |
Cow’s. The locker on the end of the tail is used to anchor the climber to the rap station. |
|
|
|
|
Lamb’s |
Purcell (the rap device is attached via a clovehitch) |
|
|
As you leave the stance clip the anchor carabiner on the daisy or cow’s to the rope as a reminder of which strand you need to pull. |
|
|
|
Stacked Abseils
|
|
One of the key speed-up techniques is the stacked abseil. This can halve the time a team of three takes – see the book to find out why it says so much time.
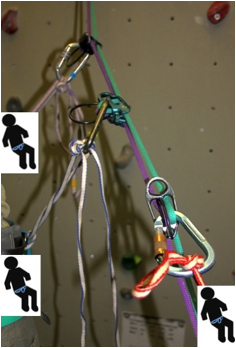
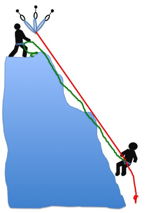
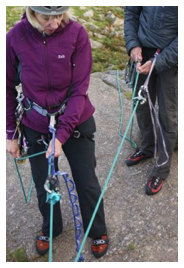
Performing a stacked abseil. The first person to rap first places her third hand on the ropes then draws in enough slack for the whole team to put their belay plates on the ropes at the same time. Note each person has extended their plate with a cow’s tail or daisy so they aren’t pulled on top of each other at the stance. While the first person descends, the second person puts her third hand one, then ditto for the next person. |
6. Descending
|
Always check everyhing before you unclip from the anchors. Make sure both ropes are attached to the rap device and that the third hand is around both ropes. After doing this, take the ropes in tight to the anchor so you are now hanging off the rap device and ropes not your teather. Only then unclip from the station. This is an example of using a second, non-visual, check of a system.
|
|
|
|
|
|
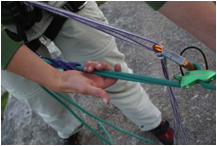
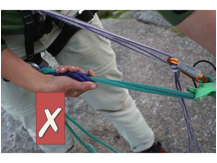
When pushing the third hand down the rope, try to keep your hand above the knot and push it down (left); not grab it and pull down as this can stop it from doing its job, and means you will have to let go of the rope to make it bite: this will be un-nerving and a poor idea if it doesn’t bite! |
|
|
|
|
|
If you need to stop for a while you can engage the third hand and just hang. However, no third-hand is fail safe, so if you need to let go of the rope you must back the third hand by wrapping the rope around your thigh. (Third hand not shown in image.) |
If you still don’t feel safe, or need to hang for a long time, clip a bight of rope to your belay loop using an overhand. |
|
|
|
|
|
|
|
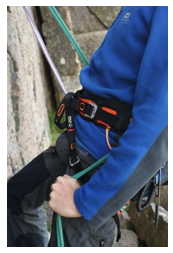
Rapping with a sack on steep ground: clip it to your belay loop or hang it from the other side of a Y-hang. (The belay plate is out of sight on the cow’s tail.) |
Or if the bag is heavy, treat it as a casualty and rap using a Y-hang. |
|
|
|
|
|
|
|
Adding friction when abseiling. It is important that the two carabiners are the same size.
|
Reducing friction when abseiling. |
|
|
|
|
Other ways of adding more friction: Pass the rope around your back. (The belay plate is out of sight on the cow’s tail.) Or add a Munter.
|
|
|
|
|
|
Or take the brake rope down to a locker on your belay loop, then up to a second locker clipped to the plate’s locker. When adding friction in this way, make sure the moving rope isn’t rubbing against the cow’s tail in a way that could abrade or even cut the through the cow’s tail. |
Or use a monster Munter (note the rope exits on the non-gate side). Again, be careful not to allow the rope to abrade the sling. (One solution if you are worried about this might be to clip the Munter’s locker to another locker and clip this second locker to the sling. Just make sure both lockers are locked.) |

|
If you drop your belay plate, use a Munter or a carabiner brake. |
|
|
|
|
|
|
|
|
|
|
|
The above images show how to build a carabiner brake. The wire in the final image is optional and is only used to stop the two outer carabiners being dropped when the rope is removed at the end of each rap. Always use a third hand. |
|
E. Creeping the Knot
|
The last person to rap has the responsibility for spotting any potential retrieval problems. The most likely problem is the knot getting stuck in a crack or on the edge in front of the rap station. If the latter could be a problem either slowly creep the knot over the edge as you rap over the edge, or if there is a reasonably sized ledge just over the edge, rap to the ledge and pull the knot down over the lip. (You will need a third hand to do this safely.) |
|
|
|
|
|
Creeping the rope over an edge to stop the knot catching. |
|
|
|
If you are not sure you will be able to find the next rap station consider rapping on one rope and being belayed on the other. If you fail to find the next station, you can then simply top rope back up. This works well even if the terrain is too hard to climb in parts as you can prusik these sections on the rap rope, but switch to top roping on bits you can climb, then possibly to an assisted hoist: Prusiking the whole length of the rope will take a considerable time, and is usually unnecessary. |
7. Stuck Ropes
|
When considering whether to use a single, doubles or twins, one thing that often gets forgotten is that the heavier the rope, the more likely it is that is will fall down the cliff smoothly, rather than being blown all over the place and thereby get caught. This suggests singles can have an advantage in locations where hook ups are common. Of course if the rope does snag, and you can’t retrieve it easily, having another half rope could save your bacon. One possible solution is a combination of fat single plus a light half rope, always rigging the raps so the thin rope is pulled drown first. This requires the bottom ends of the ropes to be knotted together in case the thin ropes feeds through the rap plate more quickly.
The book discusses in detail what to do if the rope gets stuck. The solution will depend on the situation, and will range from simply pulling harder by attaching a prusik to the rope and jumping up and down on it, to having to ascend the rope. The key is how to keep yourself whilst doing this and the book presents various possibilities. |
Use a foot prusik to free a stuck rap rope.
*awaiting image: magic overhand tied at top of rap
8. Abseiling with a Single Rope, a Pull Line or a Gri-Gri
A. Single Rope
|
If you have a single rope and a normal belay plate you can rap as normal, i.e. on both stands. However if you are using a Grigri this won’t work. An easy solution is to take a belay plate just for the abseils; an alternative is to use a carabiner block. This is also a nice trick if you have a series of very short raps, maybe a series of 5m rock steps. At such times it is a pain to have to have to repeatedly uncoil a 60m rope, throw it all down and watch it get tangled on the bushes below, then have to coil it back up. Better to use a carabiner block and keep most of the rope stacked in your backpack. |
|
|
|
|
|
Rapping on a single rope with a Grigri? Use a carabiner block. The approach on the left is possibly better as the knot is less likely to get pulled over the rap sling, locking carabiner, rap link or maillon. However unless you are very experienced, I (DC) would recommend you simply bring a belay plate to rap with and abseil as usual on both strands. The approach is very useful if part of the rope is damaged. |
Don’t use a snap gate as a carabiner block—always use a locking one.
|
|
|
|
|
|
Left: If the rap ring is very large, or there isn’t one, the knot can invert, stopping the rope from being pulled down. (This is more likely to happen with a figure of eight than a clove hitch.) Right: Placing a maillon will stop this from happening.
|
|
|
One issue with the carabiner block used on a single rope is that both strands look the same. Even more so in the dark. Hence you might rap on the wrong strand. In which case you will probably die. Here are two ways to help stop this. Combining the two methods (i.e. tie the rope off AND leave one side piled on the ledge) gives you more chance of survival and of not having to prusik back up when you forget to throw the second half of the rope down (as you be more engaged with the system). It is critical that the inexperienced (by which we mean those that have not regularly used the system before, even if they lead 5.12 and have climbed for twenty years) are not left on the upper stance by themself in case they rap on the wrong strand.
|
|
|
|
|
|
Keep a team safe on a single rope rap: the pull side is clipped to the anchor for everyone but the last person. If anyone but the last person raps on the wrong rope, they will be ok. Both ropes are thrown down the cliff and you need a knot in the end of the rope. This is still safe if you tie the figure of eight on the wrong strand. |
Another way to try and stop people abseiling on the wrong end and to their deaths is to leave the pull end coiled on the ledge until the last person raps. This means the last person needs to remember to throw it down. Note this only gives a visual indication of which rope to rap on and no backup. If they try and rap on the wrong rope they will still die. They will also die if they coil the left hand rope onto the ledge, then throw and rap on the right hand rope. Hence as far as backups goes, this is a very poor one. |
B. Pull Lines
|
A natural extension of the carabiner block concept is the pull line. Here the rap rope is linked to a thin cord, 5-6mm being the norm. This allows you to climb on a single rope but complete full length raps with just the added weight of the cord. As it is so thin, it is unlikely you will rap the pull line by mistaking it for the rap rope, which is one safety feature. Some have rigged a pull line rap without the blocking carabiner, and hoped to rely on a maillon or rap ring from stopping the knot joining the two ropes from pulling through. Some of these people are now dead. Always place the carabiner block. (Here’s a link to a test showing knots being pulled through rap rings: *)
Personally I (DC) don’t get along with pull lines: the pulling is much harder than when using a normal diameter rope, in high winds they are a nightmare and they get tangled all over the place even when there is no wind. However for one long rap off the back of the hill they can be very useful. |
|
|
|
|
|
|
|
A 50m 5.5 mm pull line takes up very little space and weighs little.
|
Pull line rap setup. Rap on the lead rope never the pull line! |
|
|
|
|
|
|
To keep a thin pull line under control, flake it into a backpack, large fanny pack (bum bag), or a sleeping bag stuff sack clipped to a gear loop for the decent. Once you are at the next station, as one person pulls it down, the other re-stuffs it for the next rap. |
||
|
If a pair of climbers have elected to use a Reverso/Grigri combo (i.e. the leader is belaying with a Reverso and the second with a Grigri) and don’t bring a second belay plate for abseiling with they can either rap using a carabiner block (as above), which often seems to make pulling the rope harder, or use the method shown in the images below. A word of warning: If the team gets confused, which is more than possible, one of them might rap on one strand without the clovehitch in place (for example the one with the Grigri goes last without thinking through the implications of this). This would be fatal, and suggests most teams would be better off bringing a second belay plate and abseiling on both strands as normal. Light might be right, but there are times where the most practiced technique is the one to use. After all, a second Reverso only adds * grams. |
|
|
|
|
|
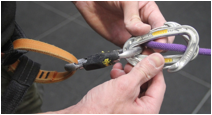
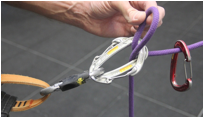
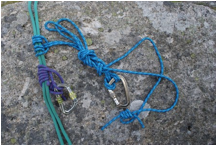
Thread the rope as usual. |
Add a clovehitch on a locker. (Note, unlike a carabiner break, abseiling on the wrong strand is unlikely to be fatal, especially if you have a placed a knot in both ends.) The first person raps with the Grigri. |
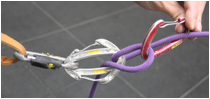
The last person removes the clovehitch and locker, and raps on the Reverso ON BOTH STRANDS. If they forget to remove the clovehitch they will still be safe, although they will have to prusik up to free the rope. However if they remove it then rap on a single strand by mistake they will die. |
9. Building Your Own Stations
|
Either because you are climbing somewhere wild or being forced to retreat, you might have to build your own rap stations. This can be a highly traumatic experience. Mainly because you don’t know if you will find somewhere to build the next one, but also because you ideally want to rap off several solid pieces, but know that you have to conserve enough gear to be able to keep building rap stations all the way down the cliff. Conserving gear for this reason is potentially sensible and a classic climbing compromise of one element of safety over another. What is not sensible is not backing up rap stations because you don’t want to go to the the expense of buying more gear. That’s just stupid.
It can often make sense when building your own stations to take what you can get when you can get it, rather than always trying to rap a full rope length. This might even save some gear if you can find some solid trees to rap off.
|
||
|
|
|
|
|
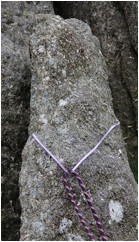
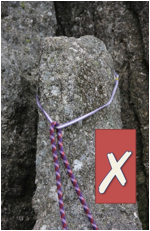
Use a long sling when rapping off spikes (left), not something that might flip off the top (right) – a short sling can also increase leverage.
|
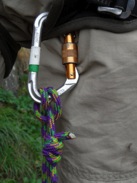
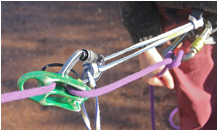
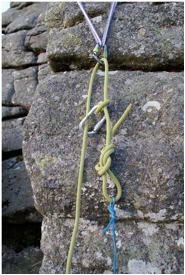
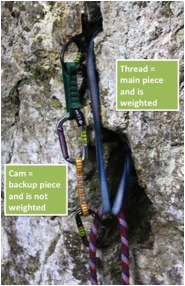
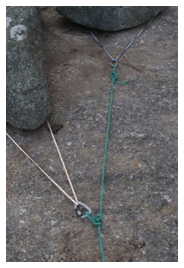
A thread being used as a rap point. A cam has been placed as a backup and will be removed by the last person to rap. Note how the cam has been extended to ensure the weight of the other climbers will test the thread, but if the thread fails the destabilisation will be as small as possible before the cam takes the strain because the carabiner is right next to the thread. If in doubt, never rap off a single piece and that includes fixed gear. |
|
10. Making the Rope a Little Longer
|
If you get lost you might need to make the longest rap possible to reach safety if you can’t find another place to build a rap station (or if didn’t bring a trad rack). |
|
|
|
|
|
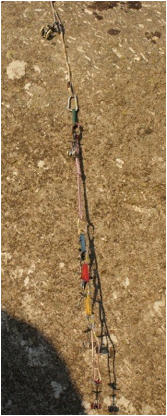
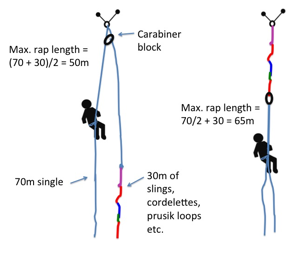
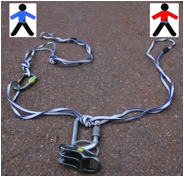
If you run out of rope, use everything you have to make the rope longer. Ten 60cm sling draws, two 120cm slings, two 7m snake-loop style cordelettes and four prusik loops might allow nearly 30m of extension without having to even use cams and carabiners. |
You can either use slings etc. to extend the rap point down the cliff, climb down the extension and rap, or rig a carabiner block abseil and use the slings to extend the pull side of this. The latter means you will get your slings etc. back, but you will not be able to rap so far. Note: there is a good chance that the mess of slings will catch on something when you pull it down unless you pull carefully. |
|
|
|
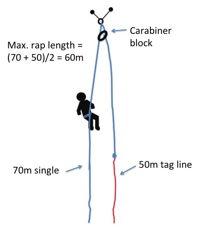
Using a carabiner block with a 70m lead rope and a 50m tag line will allow you to complete 60m retrievable raps. To find the place on the main rope to tie the carabiner block, tie the two ropes together, then, starting from the other ends, flake the ropes back until you find the midpoint of the pair. A 60m single and a 40m tag line will allow 50m raps. The tagline can be further extended by slings and other gear to allow an even greater distance to be descended in an emergency. |
|
|
|
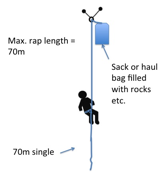
An emergency/total madness approach is a sack-block. The rope is passed through the rap point and tied to a sack or haul bag. The attachment point on the bag must be able to take the weight of the climber without question, so make sure you include the shoulder straps – you might end up prusiking back up so consider wrapping the bag with a sling and sending a prayer to your favourite god. The bag must not be able to pass through, or get hooked up on, the rap point, so leave a locker or maillon. Additional weight in the form of rocks might need to be added to the bag as it needs to be heavy enough to automatically pull the rope down once the climber reaches the bottom of the rap and removes her weight from the rope. The sack will then fall the height of the rap, possibly ripping open and scattering its contents (i.e. rocks) on the way down or top of you, or exploding on the ground. Unless the landing zone is massive the bag is likely to continue down the wall—leaving you without the rope. It is important that the knot attaching the rope to the sack can’t get stuck in the rap point: this might require a carabiner block—which will make it less likely the bag will pull itself down. (Unless the rap is at least vertical, it is unlikely the bag will pull the rope down, but will get stuck on a ledge at some point during its descent.) I (DC) only know of one person who has done this, and this was in a situation where not getting the rope back would not have been fatal. In theory, by tying two 60m ropes together you would have a 120m retrievable rap, or die trying. |
11. Simultaneous Abseils
|
A key skill for getting a casualty or nervous second down the cliff is the tandem rap, where the climbers are both attached to the same rap device. A true simuli-rap, where each climber uses their own rap device and only one strand of the rope, is rarely justified and has been the cause of several deaths. |
|
|
|
|
|
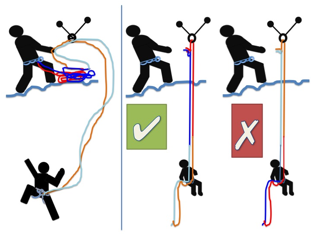
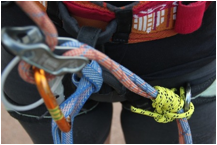
Standard Y-hang made from two 120cm slings. The climber in red will control the rap device as the other won’t be able to reach it. |
A correctly (left) and incorrectly (right) clipped cow’s tail for a Y-hang for a tandem rap. Clipping across the knot stops the plate sliding down to the harness when under the weight of the second person |
|
|
|
|
A single 120cm sling can be used for a Y-hang if the climbers are happy to be close to one another. Use a 240cm sling if you want the casualty below you. With a long sling a normal overhand can be used to form the suspension point. |
|
|
|
|
With a simul-rap each climber is on a different strand, each with their own plate. If one climber removes her weight/plate from the rope, the other may fall to his death. |
Tandem-rap with a climber with a minor arm injury: both climbers are on a single plate controlled by one of the climbers. The climbers are connected to the plate using a Y-hang – here a 120cm sling and a cow’s tail have been used. |
12. Abseiling Past a Knot
|
The normal advice for passing a knot is to use a PMMO or French prusik and to hang off this whilst the abseil device is swapped to below the knot. However, most of the time this is over complicating the situation and unless you are hanging in space, just use the terrain (e.g. a small ledge) to keep your balance while you move the belay device from the upper to the lower rope. Don’t forget to use a backup knot! With a bit of forethought, it is often easy to place the knot joining the two ropes so it is next to a suitable ledge. |
|
A French prusik (bottom) and a PMMO (top). The PMMO needs a considerably longer prusik (>3.2m), but is possibly easier to control and doesn’t need another sling to reach the belay loop. A mariner hitch (see below) combined with a French prusik also makes a good way of passing a knot. |
|
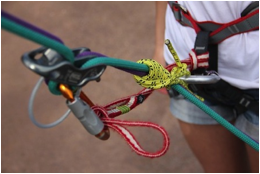
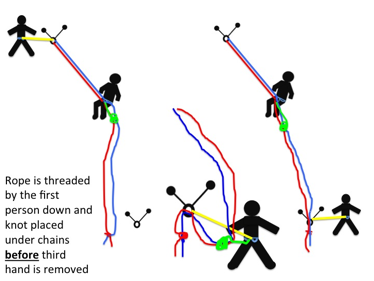
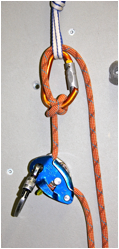
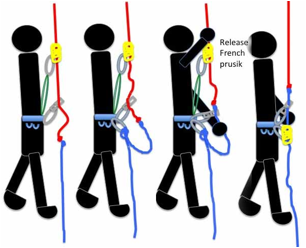
Above: Abseiling past a knot. The French prusik is shown in yellow. This needs practice to get the right distance between the French prusik and the knot. Having an extra prusik loop so you can place a third hand below the plate before you slide to release the upper prusik will help to make it smoother and give you both hands to release the upper French prusik. The upper French prusik can be replaced by a PMMO, but this needs to be as short as possible or you wont be able to reach up to retrieve it from the rope after you have passed the knot. For this reason I (DC) don’t think this is a great place to use a PMMO.
|
|
|
|
|
|
|
|
An alternative to using a French prusik or a PMMO to pass a knot, is a French Mariner, i.e. a French prusik on the rope followed by a mariner hitch on the carabiner. This potentially gives the best of both worlds: a French prusik which, if it won’t slide, is releasable via the mariner. The great thing is that, unlike a PMMO, because the carabiner is clipped through the prusik loop, not around it, the prusik loop will stay with you, not move out of reach. Start by wrapping the prusik cord around the rope(s) to form a French prusik. |
Loop the cord around the carabiner twice and form the mariner. If you are nervous about this holding, replace the mariner with a Munter-Mariner-Overhand. You will need a short sling from the locker to the belay loop. When you have moved the belay device to the other side of the knot and need to release the French mariner, start by trying to slide the French prusik down to release it. However, if this doesn’t work, slowly undo the wraps of the mariner. |
13. Fixed Lines
|
Many climbers use old climbing ropes for fixed lines and most of the time this is an adequate solution, however is isn’t the best solution. Dynamic climbing ropes are not very abrasion resistant, most are only 60m long and they stretch under bodyweight. This stretch means that if the line is prusiked or jugged it will rub up and down on any sharp edge, and this combined with the lack of abrasion resistance can lead to a damaged rope or worse. Although stretch can be an issue when abseiling, the real issue is when jugging as this creates more up and down motion.
In aid climbing it is normal to jug the climbing rope. However, it is normally only jugged by one or two people before it is moved, therefore it is unlikely to rub on the next pitch in exactly the same place. The leader will also be very aware of any sharp edges etc. as she will have led over them, whereas when you throw a fixed line down a cliff, you might not know about the sharp-edged roof 10m below. Hence if you plan on jugging a line several times, the rock might be sharp, or think that others will be rapping the line all day long, use a static and protect the rope using gaffa tape on sharp edges or a rope protector.
For fixed lines climbers use ropes that conform to EN 1891. Such ropes might best be termed semi-static as you will still feel some bounce. This makes them safer in any situation where they might be dynamically loaded. For example, you drop a haul bag attached to one, or part of the rap anchor fails. (More truly static ropes are apparently used by the military for abseiling out of helicopters etc.) There are two forms of EN 1891: A and B. Type B ropes have reduced slippage of the sheath therefore in theory less bunching of the sheath when abseiling. The minimum static strength of type A ropes is however higher (12kN for Type B, with termination, versus 15kN for Type A). EN1891 contains a dynamic test on a 2m length of line with figure eight knots at each end. A drop of 0.60m is completed five times. The rope must produce an impact force of <6kN in all five falls when the test mass is 80kg for Type B and 100kg for Type A. For both A and B, static extension should be not more than 5% with a 150kg mass.
In practice type B ropes are lighter, and in climbing it does normally matter which is used for fixed lines.
If when you buy it, the sheath of your static line doesn’t seem to be well bonded to the core, and the rope feels about as supple as a normal climbing rope, throw it in a bath or bucket of cold water for an hour, weighting it to keep it submerged, and then dry it somewhere warm but in the shade. This will shrink the sheath down onto the core and make it harder wearing. |
|
|
|
|
|
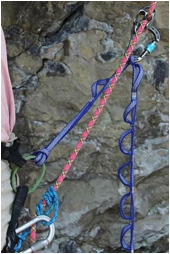
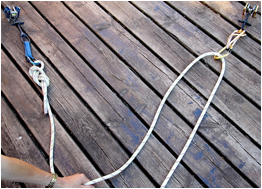
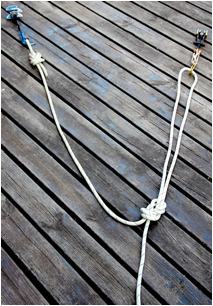
One way of rigging a fixed line from two anchor points using a sling. (An alpine butterfly has been used for the lower attachment point, but a figure of eight or overhand could have been used.)
|
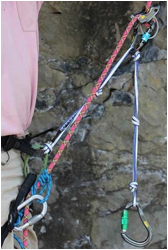
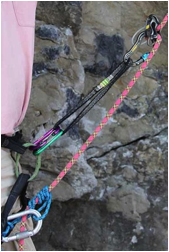
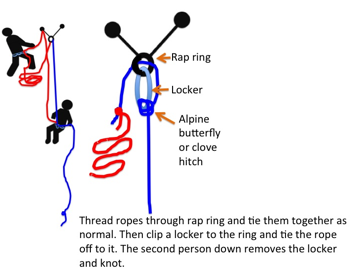
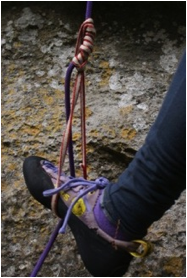
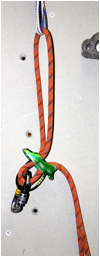
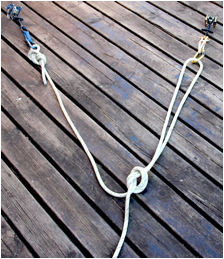
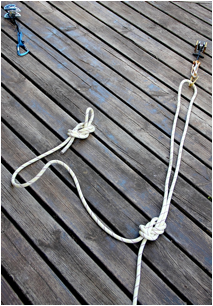
An alternative to using a long sling to reach the second piece: form the rope into a long loop with a figure of eight on a bight or an alpine butterfly. You can then spend time adjusting the knots to ensure each arm is the correct length, or as has been done here, add a clove hitch on the carabiner to allow for easy adjustment. |
Always place a stopper knot at the end of a fixed line: The ground (or sea) might be further away than you thought.
|
*awaiting image
A Bunny Ears knot is ideal for attaching a fixed line to two anchor points that are close to one another.
|
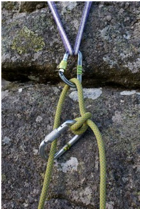
If the two anchor points are a long way from each other (for example stakes at the top of sea cliffs or trees back from the edge), there is a need to measure the length of the arms in some way before tying the knot, and you will be dealing with a lot of rope in each arm. This suggests something simple might be best. An overhand is just this. Note how the rope is clipped to both anchors at the start and pulled down to the place where you want the knot to be in an action reminiscent of that used when setting the arms in a cordelette belay. As some rope will be lost to the knot, allow for this by measuring out a little more rope. |
|
|
|
|
|
|
|


|
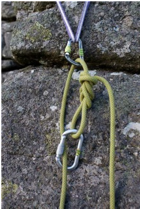
Some people prefer to use an inline figure of eight rather than an overhand. This is particular easy to adjust, and to untie at the end of the day. It is important than the angle between the arms is not too large (<90 degrees) as the knot will fail if it inverts, this would then be serious if one of the anchors were to fail. |
|
|
|
|
|
|
|
|
|
|
|
|
|
|
|
|

|
There is often the need to join fixed lines for very long raps. This is best done by creating a changeover station at a point where the abseil device can be removed easily and placed on the lower rope – i.e. not mid overhang. A common example is when one rope runs down a gentle slope from trees or boulders a long way from the cliff edge, then the second rope is placed down the cliff itself. Sometimes there is also the need to shorten fixed ropes, for example to stop them ending up in the sea, and this might need to be done at the edge, not at the anchors to allow you to see what length is needed. |
|
|
|
|
|||
|
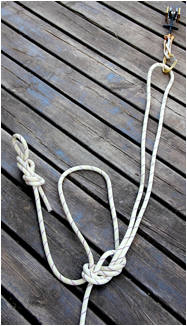
One way of shortening a fixed line mid rope—clove hitches or alpine butterflies could also have been used.
|
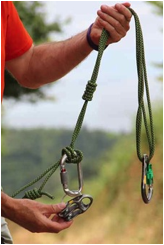
Here two ropes have been joined with a pair of locking carabiners. Note how the spare rope has been firmly coiled—this is important to stop someone using the wrong rope and rapping off the end. |
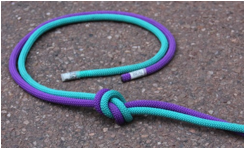
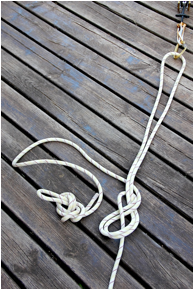
A neat way of joining two fixed lines and creating a changeover station using a Flemish bend with a figure of eight tail. (Use a cow’s tail to clip into the figure of 8 as you move the rap device from one rope to the other.)
|
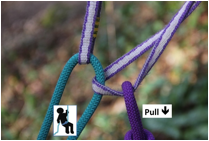
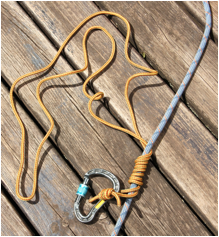
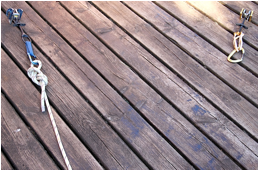
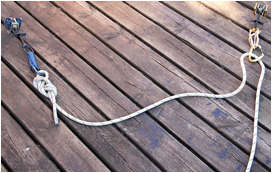
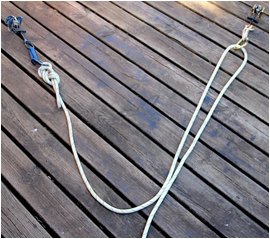
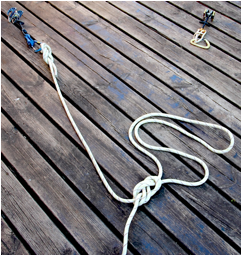
|
A retrievable rap sling. Once down, pull the blue rope down and then the purple one. Here the purple rope has been tied to the sling, which is fine if the sling is around something smooth (like a tree branch). If you only thread the pull line through the sling rather than tie it to the sling, you might get the rope back even if the sling catches as you pull it down. But you stand much more chance of rapping on the wrong strand as they will look almost the same.) This also works with a single rope as long as you are less than a third of the way up a route. |
|
*awaiting image |
|
A retrievable rap sling used as a way of retreating from a bolted route. On square-edged bolts pulling the rope through the bolt will damage it so a sling or piece of rap tat is needed. On smooth staples this is unnecessary. Only rap off a single bolt if the bolt cannot fail. |
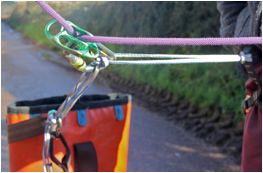
15. The American Death Triangle (geek warning)
|
Belay bolts can be in any arrangement, but a side-by-side arrangement of two bolts is common in some parts of the world. On rap stations, it is not uncommon to find these connected by a sling (or piece of cord) tied to form a simple triangle, rather than brought together to a powerpoint. The rap ring is then free to slide at the base of the triangle. |
*awaiting image
Photo of an ADT
|
Because the ring slides, the system provides reasonable equalisation. However, because of the top horizontal link, the direction of pull on each bolt is different than with a powerpoint (as indicated by the blue arrows in the schematic) and produces a greater angle than if the bolts had been linked to form a powerpoint, and hence the force on each bolt is greater. In addition, if one bolt fails extension will occur and the climber dropped a short way. If she wasn’t using a third hand she might well lose control. This has led to such an arrangement being called the American Death Triangle or ADT. |
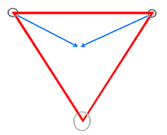
Schematic of forces within an ADT.
Image from http://en.wikipedia.org/wiki/File:AmericanDeathTriangle.png.
|
We can analyse the situation as follows.
For a powerpoint arrangement the force on each bolt will be (if the powerpoint perfectly shares the load):
Fbolt = 9.81 x weight of climber / (2 cos (0.5 x theta))
where theta is the angle at the rap ring.
And if the powerpoint fails to share, then at most, Fbolt = 9.81 x weight of climber on one of the bolts.
For the ADT:
Fbolt = 9.81 x weight of climber / (2 cos (45 + 0.25 x theta)).
If the climber weighs 80kg (i.e. provides 785N) and manages to abseil without bouncing, then if the angle at the ring is 60 degrees:
Fbolt = 453N for the powerpoint and 785N for the ADT.
This suggests several things: (i) At 60 degrees or less, the force on either bolt with the ADT is no more than if the climber had rapped off a single bolt. (ii) A powerpoint possibly places less force on either bolt than an ADT, but the ADT only multiplies the force by a maximum of 1.7 (at 60 degrees), not by 100s of times (it is unlikely that the angle at the base of the triangle would be greater than 60 degrees, and with smaller angles the multiplication is less). (iii) In either case the force is modest and even with bouncing would only be an issue if one of the bolts was inherently unsafe.
A bit of thinking shows that a powerpoint does offer advantages, force-wise, over an ADT but only in a narrow range. To make the powerpoint worthwhile, rather than just picking one of the bolts to rap off at random, one of the bolts must be weak enough not to be able to take the whole force of the climber (784N). If it cannot take more than 453N it will blow and you will die if the other bolt cannot take 784N. With an ADT the first bolt will blow if it cannot take 784N. So in this case (60 degrees) the powerpoint offers an advantage only when the weakest bolt has a strength of less than 784N but more than 453N. This is a narrow range of possibilities. (At smaller angles the window is even smaller; with heavier climbers or bouncing the whole thing just scales.)
This doesn’t mean climbers should rig rap stations with ADTs, as a powerpoint (or two equal length slings) with a rap ring are better solutions. It just shows that an ADT is, like a powerpoint, as safe as the bolts it is made from. An ADT with an angle much greater than 60degrees, is a poor idea. At 120degrees (about the maximum I (DC) can imagine finding, Fbolt = 1.5kN for an 80kg climber rapping smoothly, or maybe 3kN if not so smoothly.
The main issue with the ADT is that is unstable under partial failure, i.e. if one bolt blows you will drop not swing onto the other, which if you are near the anchor could generate a reasonable force (and be a bit of a frightener at any point of the rap, and possibly fatal if you are not using a 3rd hand). This could be a major issue if the other bolt is also weak, or the tat connecting them poor, or you are clipped to the rap ring with a daisy (which will offer no elasticity). It also doesn’t offer any redundancy if one of the arms of the sling is damaged or the knot incorrectly tied. Hence assuming you have enough rap tat you should build something better than an ADT.
This last point is the final complicating factor. Assuming you are not rigging a permanent rap station for others, but simply joining two belay bolts together because you a escaping down a route, you might be limited in the amount of rap tat you have. If you only have, say, 1.2m of cord for each station then the angle at the base of the triangle will be smaller with an ADT than with a powerpoint or if you cut the tat into two 0.6m lengths to form a sling on each bolt. The result will be that the multiplier provided by the ADT is reduced. (An alternative would be a sliding-X, however, given a fixed length of tat, this will still produce a larger angle than an ADT.)
From the above equations we see the powerpoint and ADT will give rise to the same Fbolt when
theta(PP) = 90 + 0.5theta(ADT).
So the if the ADT is causing an angle of 60degrees, the powerpoint would need to use enough cord to create an angle of 120 degrees for it to generate the same force as an ADT, and unless the angle with the powerpoint is greater than 90 degrees, it will always generate less force than an ADT.
Another common ADT-like situation is when a lower-off consists of two bolts with a couple of chain links on each bolt. Threading the rope through the links on both bolts forms an ADT like triangle. The above analysis still holds, and it is far better to thread both bolts than just one. In addition, in this case the angle between the ropes is likely to be very small. Even at the start of the rap the angle is likely to be less than 10 degrees, so the multiplication factor between the ADT and a powerpoint will be less than 1.5. Interestingly, the above equations converge to a ratio of about 1.4, so even at the bottom end of the rap there is a multiplication factor. It is however worth remembering that once you have descended to the point that the angle between the ropes is less than 60 degrees (which is probably before you even leave the station) the force on either bolt will be less than if you were on a single bolt.
So although the ADT is not a great idea, it is fictitious to see it as something that will multiple the force on the bolts in an unlimited manner, and is much better than rapping on a single bolt. |
|
|
|
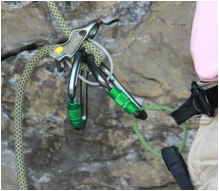
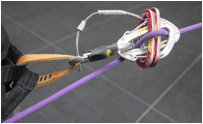
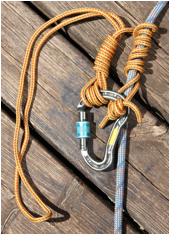
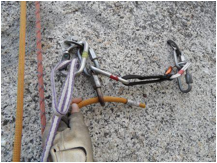
Threading the rap rope to form an ADT-like triangle. (The Prow, Yosemite, USA). A temporary anchor link made from a short extender has been placed. Without this, if the left hand bolt fails whilst the rap was being rigged the climber could fall off the cliff. The extender will be removed by the last person down. (The Prow, Yosemite, USA.) |
Please use the following links to buy the book: Amazon USA (kindle) / Amazon UK (kindle) / itunes / kobo
v 24 November 2014
--------- multipitchclimbing.com ---------