--------- multipitchclimbing.com ---------
|
This site presents the images from the ebook High: Advanced Multipitch Climbing, by David Coley and Andy Kirkpatrick. In order to keep the cost of the book to a minimum most of these were not included in the book. Although they work best when used in conjunction with the book, most are self-explanatory.
Please use the following links to buy the book: Amazon USA (kindle) / Amazon UK (kindle) / itunes / kobo |
|
|
Climbing is dangerous. Soloing, even with a rope, is even more dangerous. Only consider it if you know you have the experience and are happy with the potential consequence: death.
|

|
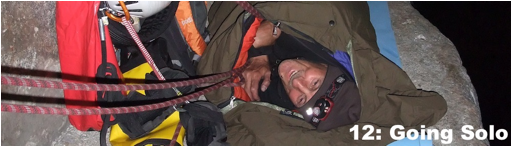
This chapter is not about climbing without a rope. It is about climbing without a partner. This might be because your partner is injured or because you have decided to climb without one. Solo climbing is more dangerous because you don’t have anyone to buddy check you, the systems are more complex, the belay less reliable and if you get hurt you are on your own. In the book we consider a variety of approaches that can be used for roped solo leading either by choice or in an emergency. We also look at solo top roping. Andy has a book on solo aid/big wall climbing. |
|
Contents 1 Basic Approach / 2 Types of Device / 3 Some other Points / 4 Top Rope Soloing |
|
|
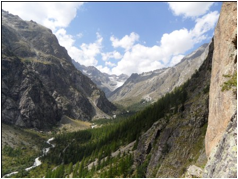
Ailefroide, France. Lots of long bolted routes and a good place to learn to rope solo.
|
|
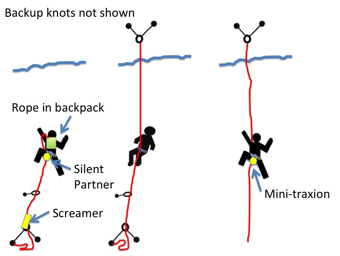
The basic approach is to: tie your rope to a multidirectional anchor that cannot fail, climb as normal placing gear but using a special belay device clipped to your harness, on reaching the next stance rap back down to remove your gear and dismantle the lower belay, climb back up using your chosen solo top-roping approach; then repeat, repeat, repeat. The rope can be carried on your back, left on the lower belay in a rope sack, or carried in a large number of backup knots on the harness. |
|
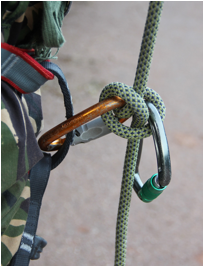
As you don’t have partner, you need something to catch you if you fall. A clove hitch on a locker will work in an emergency – consider placing a second clove hitch on another locker as a backup. |
|
|
|
|
|
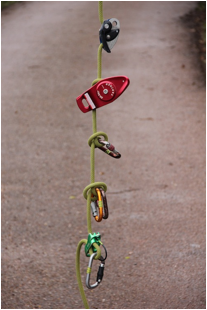
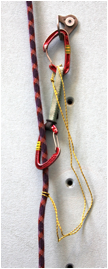
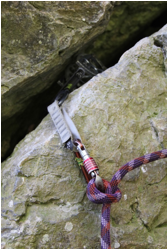
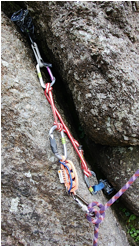
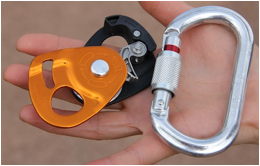
From top: Grigri (or Eddy), Silent Partner, clove hitch (or figure of eight), running clove hitch, Reverso—all can be used for solo leading if you have to, but only one is designed for the job. |
Close up of a running clove hitch.
|
|
|
|
|
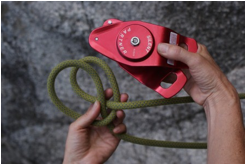
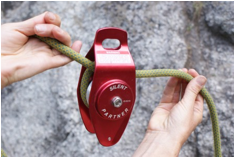
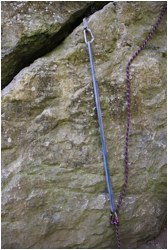
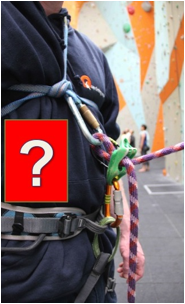
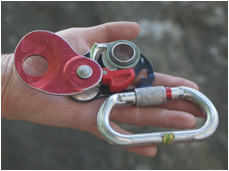
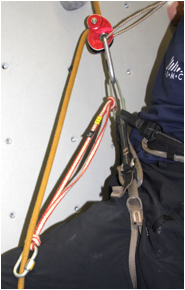
Silent Partner showing how the rope is attached using a clove hitch.
|
The rope needs to exit from the top not bottom of the Silent Partner.
|
|
|
|
|
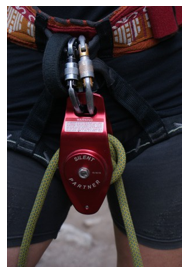
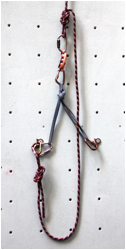
Attaching the Silent Partner to the harness. One or two maillons would be even better. The right-hand image shows the Silent Partner clipped to the tie-in points. This is the method shown in the manufacture’s instructions (and reduces the chances of it hitting you in the teeth when you fall), but some climbers attach it to the belay loop. |
|

|
|
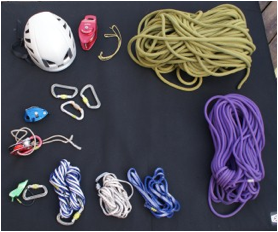
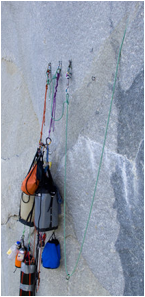
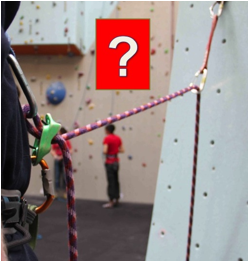
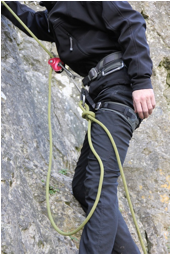
Standard soloing kit, including a spare rope to allow you to escape more easily, a Grigri to make stripping the pitch quicker, a mini-traxion to top rope solo back up again, some spare locking carabiners, a daisy (because you won’t always be tied into the rope), 1mm prusik loops to stop reverse feed (see below), a Reverso in case you have to escape the route and cordelettes to build equalised belays . You also need to add in a rope bag and possibly one or more screamers. Note the mandatory helmet. |
3. Some Other Points
|
The instructions with the Silent Partner suggest you carry the rope in a series of backup knots attached to lockers clipped to a structural part of the harness (e.g. a belay loops). Some find this gets in the way of their feet and hence carry the rope in a backpack. An alternative is to use the approach used in aid climbing: flake the rope into a rope bag at the lower belay. |
|
Rope soloing with the rope in a sack, note the carabiner on the shoulder strap (backup knot not shown – it would be on the rope between the Silent Partner and the backpack). |
|
Once the weight of rope between the anchor and the belay device is great enough, rope can automatically reverse feed through the device. This means a lot of slack will pile up and a fall will be much, much longer. The solution is to occasionally place something on the rope to remove this weight, this is termed a re-belay. |
|
|
|
|
|
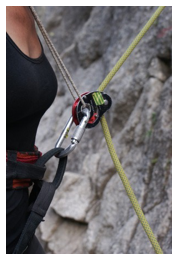
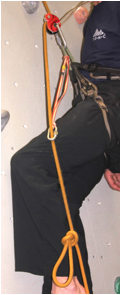
1 mm prusik being used to stop the rope feeding backwards through a Silent Partner. As an alternative to 1 mm prusik cord, consider using large clothes pegs, prusiks made of wool, or rubber bands. |
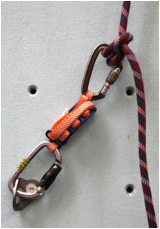
Another way to stop reverse feed: Double-clipping a runner. Even through a screw gate has been used to stop the rope from unclipping itself, an extender has been used as a backup in case the screwgate is cross-loaded. This will increase the effective fall factor, but is quick to do.
|
|
|
|
|
Left: fixing the rope to a mid-pitch piece (either as a backup in case the belay fails, or to stop the rope reverse feeding). The danger with this is you can take a factor 2 fall. Right: adding a long sling to access some of the shock-absorbing potential of the lower part of the rope when fixing the rope to a mid-pitch piece (there is a clove hitch on the lower carabiner). This will avoid a factor 2 if you fall higher up the pitch after you have placed other runners, but not if you fall off just after placing it.
|
|
|
Others have tried making the prusiks to stop reverse feed out of wool rather than 1mm cord, or using rubber bands. A French prusik or Klemheist (on 5mm cord) works well. (With a Klemheist place it so it slides in the correct direction (i.e. upside down) - see image below.) Another possibility is to use your micro traxion rather than a prusik loop. You simply collect it on the way down for use on the way back up. (This assumes you are rapping the lead rope not a haul line.) However a micro traxion (or a Petzl Tibloc) has very nasty teeth and if you placed it the wrong way around, or something strange happened, it could destroy the rope.
It is important to understand the difference between rope solo free climbing and solo aid with respect to re-belays. When aid climbing, you rap your haul line and jumar back up the lead rope – with the protection and re-belays in place. This means you will weight the re-belays as you ascend. If you used 1mm prusiks etc. these might snap – which could leave you with a dangerous fall onto the teeth of your jumars. So you either need to use something you can simply snap by pulling the rope hard before you ascend (e.g. rubber bands), or something that will not snap even with you jumaring on it (e.g. an upside down Klemheist tied in 5 or 6mm cord). With solo free climbing this problem doesn’t occur because you rap the lead rope removing the re-belays on the way down.
It is worth noting that solo aid climbers also place re-belays before points where the rope passes over a sharp edge. This is so the rope is not abraded by the edge as the climber jumars back up: because the rope touching the edge is not weighted as the re-belay takes the force. |
|
*awaiting image Klemheist stopping reverse feed
The advantage of a Klemheist is that it holds the rope well, but if you fall it will hit the carabiners it is attached to, release and let the rope slide, thereby accessing the full length of the rope. However this action cannot be guaranteed, so put the Klemheist on a long sling to allow the rope to stretch.
|
|
In the event of a fall the only dynamic element will be the rope as there will be no belayer to be lifted up off the stance, or any slip through the belay device. This means falls might be more aggressive with a higher effective fall factor. Hence it is common to include some form of screamer into the anchor system.
|
||
|
|
|
|
|
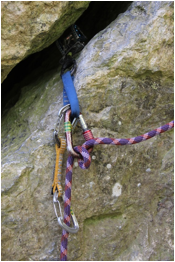
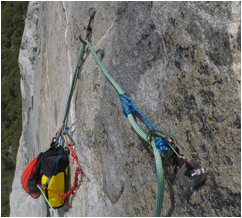
A “screamer” anchor. A large loop is left in the rope to allow the “screamer” to deploy.
|
Using a screamer as a mid-pitch backup in case the belay fails. Trad placements will need to be multi-directional (right). |
|
|
Another reason to re-belay is so all the slack is taken out of the belay. In the above left image the screamer is magically pointing upwards. This is because the climber led up a few metres then placed a re-belay and pulled the lead rope up through it to take the slack out of the system. This reduces the length of the fall by a minimum of approximately twice the length of the powerpoint’s shortest arm. However, as the image below left shows additional slack can build up. |
||
|
|
|
|
|
Solo anchor with a lot of slack in the lead rope [COPYRIGHTED IMAGE by Mark Hudon (Elcappanos.com)] |
The solution: A re-belay. [COPYRIGHTED IMAGE by Mark Hudon (Elcappanos.com)]. This is an aid climbing image. For free climbing the Klemheist would be on a long sling. |
|
|
In an emergency you won’t have a Silent Partner to hand. This means you will most probably be using a clove hitch to self belay. Others have played around with using a Reverso. One advantage of using a Reverso it that it can be used on double ropes (it will be smoothest with thin twins and would be very difficult to feed with a fat single).
|
|
|
|
|
|
Attaching a Reverso for roped soloing. The device is not designed for such use, so the technique should only be considered an emergency approach, and even then, no one really knows what will happen if you fall, the device or rope might well fail! (If the rope fails, you will probably die.) Its main advantage is that unlike other approaches it works with twin/double ropes. Just as when trying to use a Reverso as a prusik: the thinner the rope, the easier it is to make it work.
Unfortunately, it would seem that the thinner the rope the more likely failure is. Jim Titt has reported some pull test results (http://www.mountainproject.com/v/atc-guide/106838345__1) and they don’t look encouraging.
He describes two failure modes. “First fail mode: The trapped rope escapes sideways from under the tensioned rope and gets trapped between the tensioned rope and the side of the slot. This is very difficult to free and you have to dismantle everything and twist the locking krab brutally to release the rope. Take your Prusiks. Second fail mode: Apply yet more load and the trapped rope where it crosses the tensioned rope goes down through the slot with a bang. At this point the holding power drops off considerably but not catastrophically, though pretty near!”
· “ATC Guide. 10.2 Mammut, used, non-treated. First fail mode 4.8kN. No second fail mode, rope sheath cut at ca 9kN. · ATC Guide. 9mm Edelrid, used, non treated. First fail mode 2.96kN. Max fail load 5.58kN. Residual load 1.6kN · ATC Guide. 8.2mm Edelrid, new, treated. First fail mode 2.05kN. Max fail load 4.06kN. Residual load 1.2kN · Reverso³. 10.2 Mammut, used, non treated. First fail mode 3.68kN. No second fail mode. Rope sheath cut ca 9kN · Reverso³. 9mm Edelrid, used, non treated. First fail mode 2.25kN. Max fail load 3.60kN. Residual load 0.9kN · Reverso³. 8.2mm Edelrid, new, treated. First fail mode 1.6kN. Max fail load 2.38kN. Residual load 0.7kN
All with Petzl Attache 12mm round profile carabiner.”
|
|
4. Top Rope Soloing
|
Read this document in full before considering top rope soloing:
http://www.petzl.com/en/outdoor/product-experience/self-belay-solo-climbing/introduction
|
|
Top rope soloing is frequently practiced in its own right as a way of staying fit if you don’t have a partner for the day. With respect to this book, it is included because you need to top rope solo back up after stripping the lower belay when lead rope soloing. As the link above shows, Petzl recommend two devices are used and that these are of different type (see notes below).
|
|
|
|
|
|
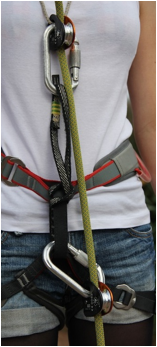
Mini-traxion (left) and micro-traxion (right) with oval locking carabiner—don’t be tempted to use a standard D-shaped carabiner. Hence, always carry your mini or micro traxion on an oval carabiner.
|
|
|
|
|
|
Mini-traxion with elastic neck loop. |
Top rope soloing—note the backup knot. Petzl recommend use two devices of different form when top rope soloing as it is possible to depress the release switch on a mini or micro-traxion, or make various other mistakes. |
|
|
|
|
Another way of backing up a mini-traxion by using a maillon (which needs to be very small, yet strong) on a lanyard and blocking overhands. This is might be ok, but nothing is as good as a real backup knot. |
|
|
This is what Petzl say about top rope soloing with a minitraxion (we can assume the same holds true for a microtraxion):
“Petzl has studied the current usage of the MINI TRAXION as a self-belay device on a fixed rope. Serious accidents and many handling errors have been reported. The risk of using the device with the cam held open is significant, as well as the possibility of accidental opening of the cam when climbing. Consequently, the MINI TRAXION must be paired with a different ascender: ASCENSION, BASIC, MICROCENDER... Petzl does not recommend using a system consisting of only two MINI TRAXION for self-belayed solo climbing with a fixed rope.”
http://www.petzl.com/en/outdoor/product-experience/self-belay-solo-climbing/introduction
|
|
|
|
|
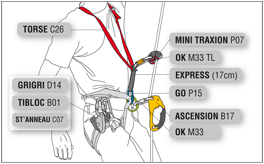
Top rope soloing using a pair of mini-traxion. This is common approach which adds some safety (but see the note above from Petzl). Top: the upper micro-traxion is attached via an elastic cord threaded though the eye of the micro-traxion and an open sling girth-hitched to the belay loop. |
Petzl recommend the lower device is a different device, presumably so you can’t make the same mistake with both devices. COPYRIGHTED IMAGE |
Please use the following links to buy the book: Amazon USA (kindle) / Amazon UK (kindle) / itunes / kobo
v 24 November 2014
--------- multipitchclimbing.com ---------